The Content Area
You can think of the parts of TheBrain’s content area as personal assistants who are ready to help when asked. You can give any of them the day, week, or year off if you choose not to use their services, but they’re all standing by, ready to assist you—-at the click of your mouse.
The content area keeps all of your thought-specific notes and attachments. Attachments can be files, web pages, pictures, and more.
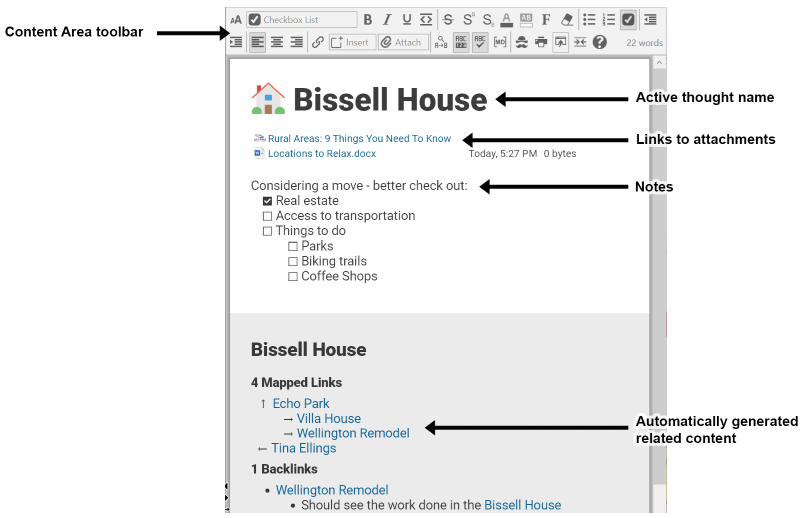
Figure 192. TheBrain’s Content Area
Content Area Overview
Here are some handy things to know about the content area:
- By default, the content area shows content attached to the active thought. If the active thought has no content, the content area shows only the thought’s name and related content (or placeholders for related content to come).
However, if you want to see the content for thoughts you point at with the
mouse, select the “Update displayed content on hover” option in the Behavior tab of the Preferences window. (Please see the Behavior Preferences section on page 64 for more information about setting global user interface preferences.)
- A red border highlights the content area when the content belongs to a moused-over thought.
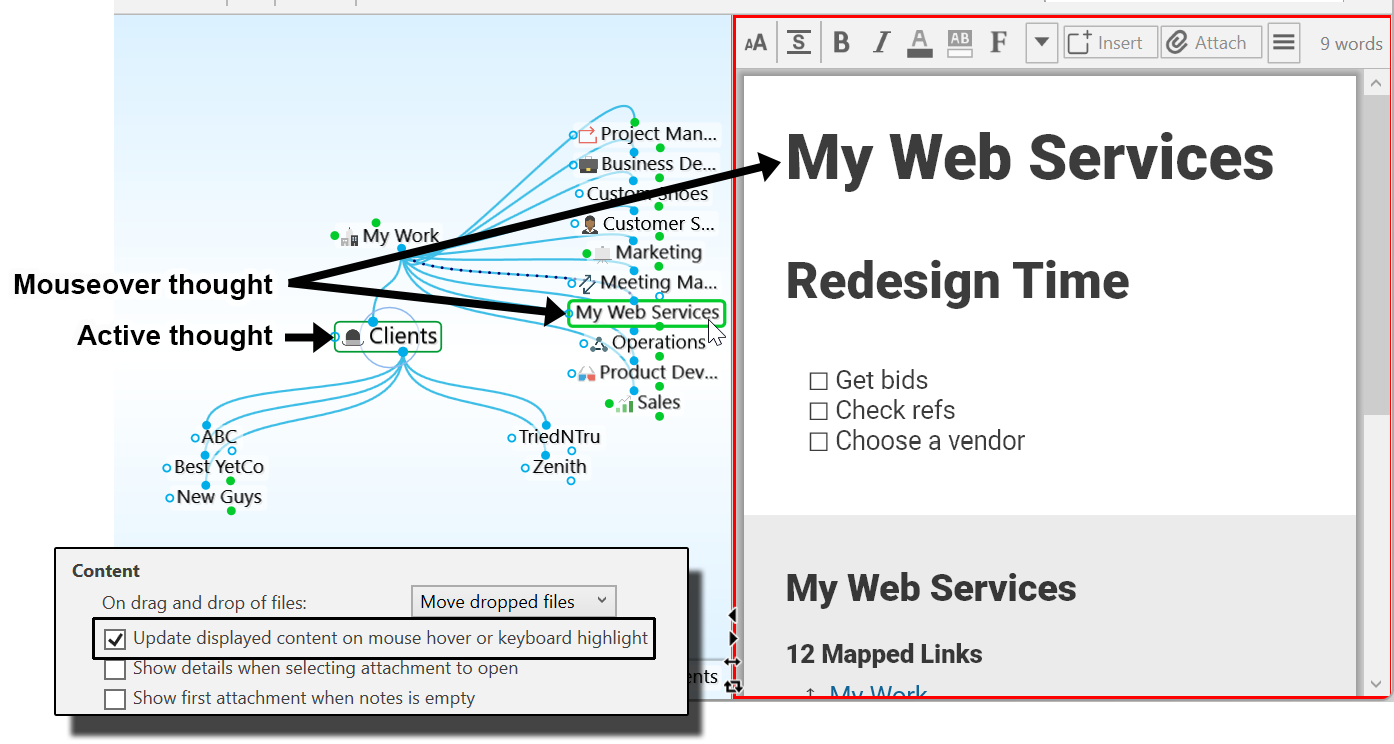
Figure 193. Content of an Inactive Thought after Behavior Preference is Changed
Preferences are global; whatever options are selected when one brain is active

will also be selected in your other brains. Of course, you can change your
preferences at any time.
- With one click, you can move the content area to any side of the plex—
above, below, left, or right. See the Using Smart-Splitter to Arrange TheBrain
Window section on page 38 for details. While you’re working on content you
might find it convenient to maximize the content area.
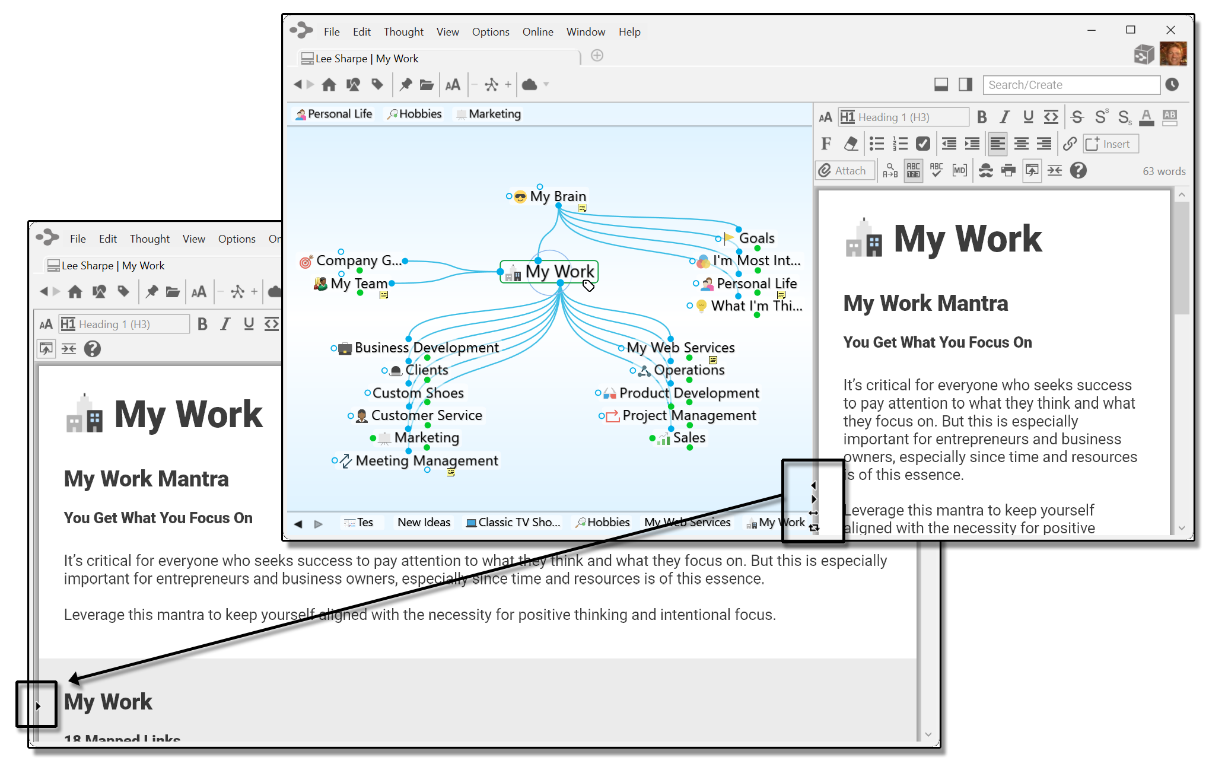
Figure 194. Maximizing the Content Area
- The size of the content area depends on the size of TheBrain window, but when the plex and the content area are side-by-side, you’re in control of how much of the available space each area occupies. Just point the mouse at the line between the two areas and when the double-headed arrow appears, drag left or right to change the proportions.
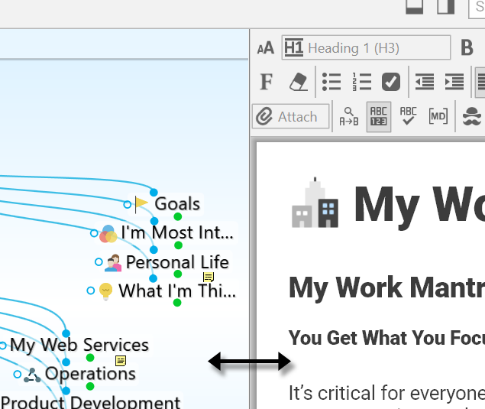
Figure 195. Making the Content Area More Wide or Narrow

Tip:
To work with the content area in a separate window, click the
New Window
command on the
File
menu. Then, maximize the plex in one window and the content area in the other. Changes you make in one window will be reflected in the other because you’re working with the same brain, however, the windows won’t be in synch. In other words, making a thought active in one window won’t make it active in the other.
Note Viewing Options
TheBrain formats its notes using markdown. Users have the option of either viewing the markdown syntaxes (formatting tags) while editing, or staying in a WYSIWYG editor and using the buttons in the content area toolbar for all formatting. The option to toggle on/off this setting can be found in Preferences under the Notes Editor tab. Look for the Show Markdown checkbox.
Additionally, you can switch this setting with a button in the content area toolbar with the Show Markdown button.
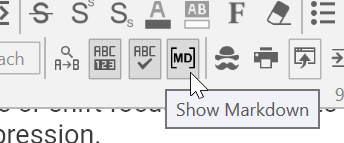
Figure 196. The Show Markdown Button
Even when Markdown is hidden, some keyboard shortcuts will still be operational such as shortcuts for bulleted lists, ordered lists, checklists, titles, subtitles, headings and block quotes.
Creating and Formatting Notes
Take a note, capture your ideas, or create your next literary masterpiece!
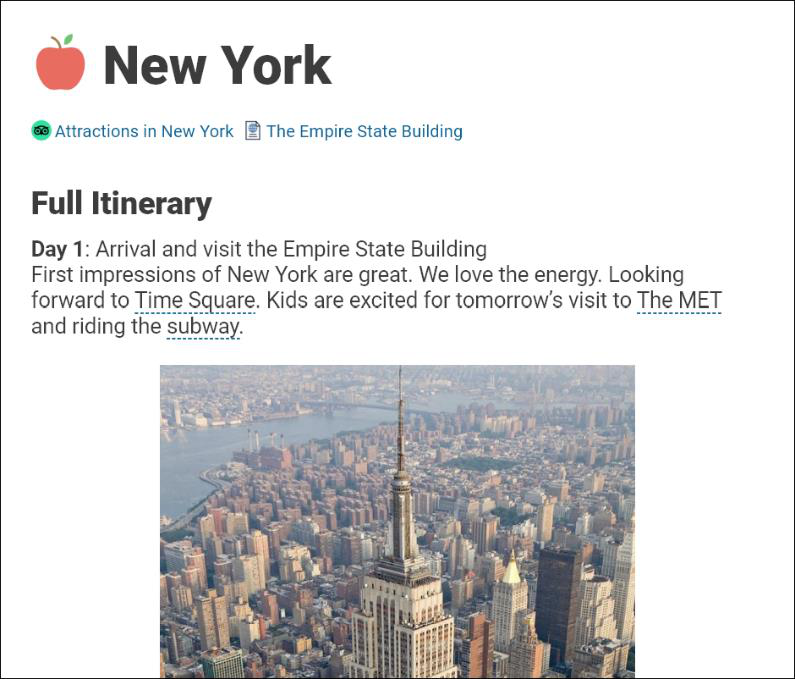
Figure 197. A Note-Worthy Note
The Content Area Toolbar
The content area toolbar is quite robust—don’t feel like you have to use every feature for every note. You’ll see many of the tools you’re familiar with from word
processing and email applications. And when you want your note to look “just so”
you’ll have an excellent array of options at your fingertips.
Depending on how wide you’ve made your content area, you may see the fully expanded toolbar or the compact version. Either way, you’ll have access to all tools via buttons providing access to the additional commands. By default, unless the content area is stretched wide, the compact version of the toolbar will be displayed.
Tip:
To show the expanded toolbar even if the content area isn’t very wide, deselect the “Use compact toolbars for Notes” check box in the
Notes Editor
tab of the
Preferences
window. (Please see the
Behavior Preferences
section on page 64 for more information about setting global user interface preferences.)
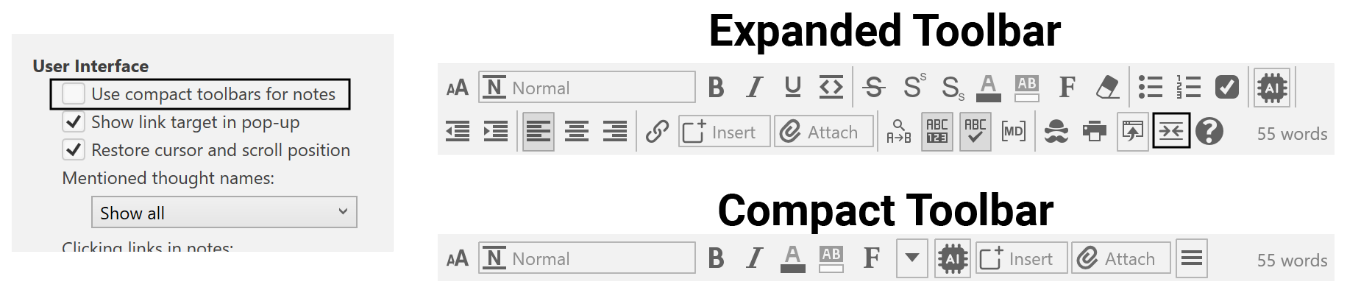
Figure 198. Compact and Expanded Versions of the Content Area Toolbar
Unlike earlier versions of TheBrain software, the content area toolbar is always on display when the content area is open, but does not have your cursor focus.
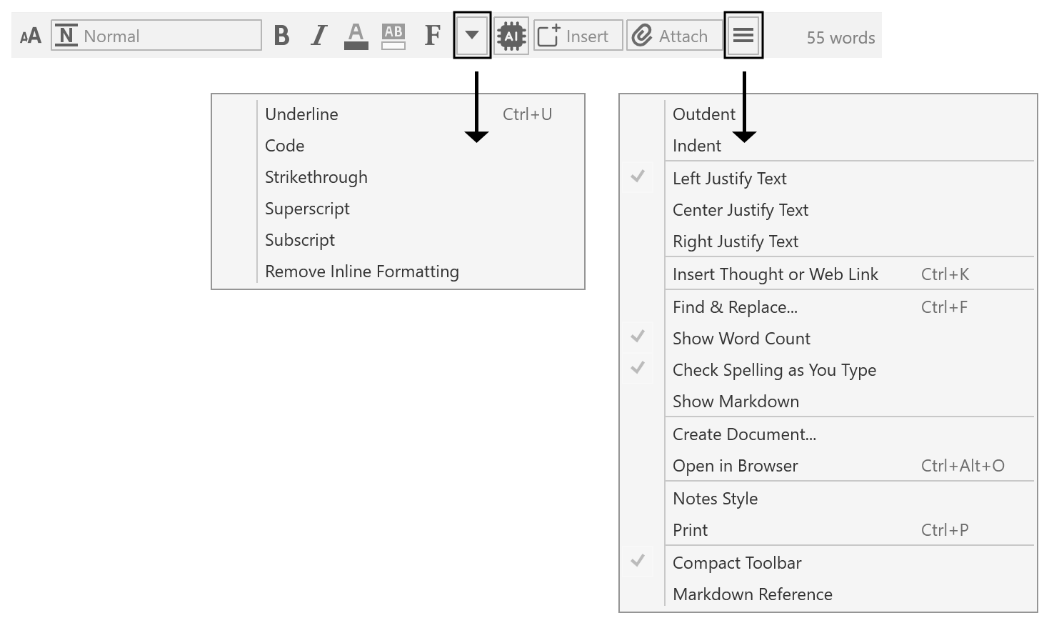
Figure 199. The Compact Content Area toolbar
Here are the buttons that show when the expanded content area toolbar is displayed. The annotations point out special buttons you may not see in other text editors.

Figure 200. Buttons on the Expanded Content Area toolbar
All Notes features are always available no matter which content area toolbar—compact or expanded—is displayed.
Toolbar Buttons
Content Area toolbar buttons (in order of appearance):
Text Size – Use the text size slider to resize the notes
Paragraph Style —choose from:
o Normal
o Title (H1)
o Subtitle (H2)
o Heading 1 (H3)
o Heading 2 (H4)
o Heading 3 (H5)
o Heading 4 (H6)
o Code
o Unordered List
o Ordered List
o Checkbox List
Bold, Italic, Underline and Code
Strikethrough, Superscript, Subscript, Foreground Color, Background Color, Font and Remove Formatting
Unordered, Ordered and Checkbox Lists
AI Writing Assistance – This button will always be visible, even when the Compact Toolbar is enabled.
Outdent and Indent
Left, Center and Right Justify Text
Link
Insert: Date/Time, Table, Special Character, Capture and Insert Image, Mathematical Expression, Horizontal Rule, Page Break and Table of Contents
Attach: Link to File/Folder/URL, Add Markdown File, Paste, Add from Brainbox, Add File from Template, Create Event, Open Thought Folder, Capture Image to Attachment, Copy Path to Thought’s Folder, Template Help
Find and Replace, Show Word Count, Spellcheck as You Type and Show/Hide Markdown
Note Style, Print, and Export
Compact Toolbar and Markdown Reference
Markdown Editor
Notes in TheBrain are created using a next-generation markdown editor. This improved version of markdown enables more capabilities than standard editors for a superior editing experience. As mentioned, the visibility of markdown tags can be turned on/off with the Show Markdown button in the content area toolbar.
Unlike other markdown editors, TheBrain enables direct rendering of formatting, images, and more without requiring a "preview" window.
With the Show Markdown setting turned on, you’ll have text-based, inline code formatting: Ability to type text that converts into formatting, such as:
o “[ ] “ (or “- “) to create a checkbox – “+ “ for a pre-checked checkbox
o ** for bold
o “* “ at the start of a line to create a bullet list
o Block quotes using “>“
Spaces are now ignored while typing between two markdown tags. For example, typing a full sentence in between “” and “” will keep the text bold. Earlier versions of the markdown editor would remove formatting each time a space was added.
Toolbar-based formatting: Not familiar with markdown? A toolbar that works just like you're used to that will also help you learn the text equivalents.
Use the question mark icon link in the content area toolbar to TheBrain
Markdown Reference Guide for more clarity on how you can utilize markdown by typing directly into the notes.
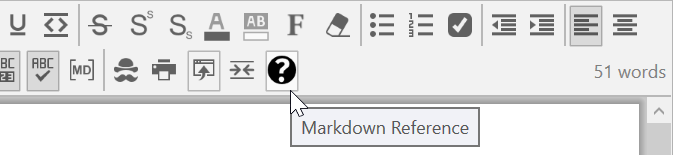
Figure 201. Link to TheBrain’s Markdown Reference Guide
Markdown Variations
TheBrain has updated the markdown tags for designating underlined text to be more in line with traditional markdown specifications. This new setting in Preferences on the Notes Editor tab defaults to off (unchecked). Existing note content from earlier versions of TheBrain will remain in the same formatting. For example, the following markdown tags will designate underlined text:
This word is still underlined.
Checking the option for Render underscore tags as italics will change the word to be italicized.
This word is now italicized.
The markdown formatting commands for underscoring now utilizes an underscore and bracket:
This word is {underlined} in TheBrain 13.
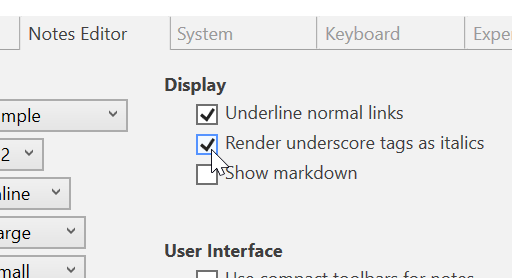
Figure 202. Render Underscore Tags as Italics
Viewing Multi-Column Notes
By default, your notes will display as a single page. Long notes will utilize a scroll bar to navigate in a linear direction. This is called the Simple View. If desired, multi-column notes can be displayed. In Preferences, under the Notes Editor tab, the Layout setting can be toggled between Simple and Multi-column.
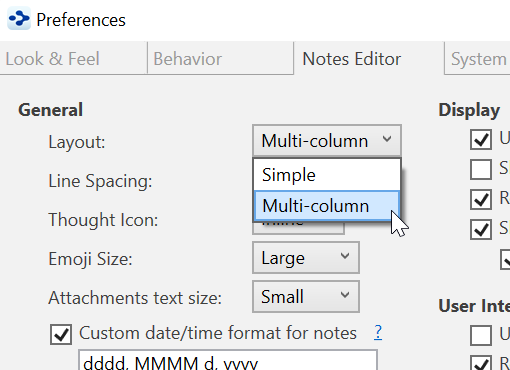
Figure 203. Switching to Multi-Column Layout
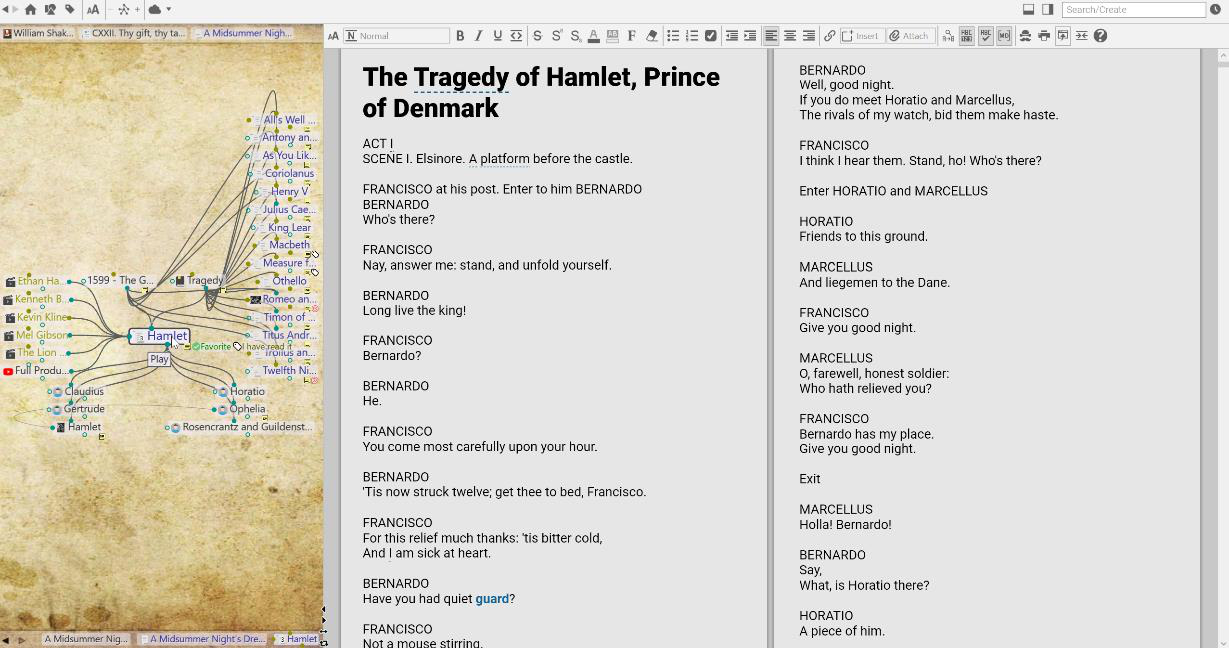
Figure 204. A Multi-Column Note
If you are still seeing just a single column in Multi-column Layout, try giving the
content area more screen real estate. Use the smart splitter to make the plex smaller. Multi-column notes are best suited for high resolution monitors.
Entering Notes
To enter a note, activate the thought to which the note pertains, then click in the open area of the content area and begin typing. The content area toolbar will remain displayed whenever the content area is visible.
Notes are saved automatically when another thought is activated and will be saved when closing a brain and prior to an unlikely crash in the application.
You can use all of the standard techniques you use in other text editors when you type, revise, and format TheBrain notes:
Automatic word wrap controls line endings. Press the Enter key to begin a new paragraph.
Either apply formatting as you go or select existing text before you apply formatting such as bold, italics, underlining, and color.
Standard text selection techniques:
o Drag the mouse through text to select it, or
o Click at the beginning of the text, then hold down the Shift key as you click at the end of the text to select all text in between, or
o Double-click to select an entire word, triple-click to select an entire line
To apply formatting to an entire paragraph, such as lists—bulleted, numbered, or check marked—just click anyplace within the paragraph. There’s no need to first select the entire paragraph.
Standard keyboard shortcuts—such as Ctrl-C for Copy, Ctrl-V for Paste, and Ctrl-A for Select All—work as you would expect in notes. (On macOS, the standard Command key shortcuts also work.) You can copy and paste within notes and between TheBrain and other applications.
To toggle a check box on or off, follow a link, or open an attachment in the content area, press the Ctrl+L keyboard shortcut.

Double space to create a period in notes on macOS.
One special feature for TheBrain notes is that if no text is selected and you
select a formatting command such as bold, highlighting, or change in typeface or font size, the formatting will apply to the entire word in which the cursor is currently blinking.
Tip:
You can press
Ctrl
- Z (or click the
Edit
menu, then click the
Undo
command) to immediately undo your most recent action in notes.
Artificial Intelligence Writing Assistance
Notes can be automatically generated for any thought in your brain with the help of AI. This can be done from scratch or in addition to an existing note.
Additionally, AI can be used to improve, modify, edit and summarize an existing note in a variety of different ways.
Generating New Notes with AI
To create a new note from scratch, navigate to your desired thought and click on the AI button in the content area toolbar. Select Generate Note.
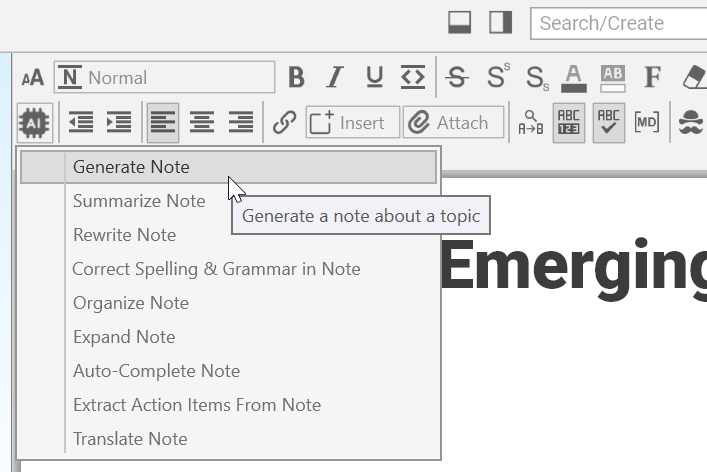
Figure 205. Generate a Note with AI
The active thought name will be automatically selected as the Topic Name, but this field can be modified for clarification if needed. You will also have the option to modify the following settings:
- Set Context Thought – Select a parent thought above the active thought to be referenced as context for your new content. This is helpful for
general thought names. For example, a thought named “Directors” can be given greater context by selecting a parent thought named “Silent Film”
- Use Children for Context – If the thought already has some children, check this box to give AI an indication of the type of content you are hoping to see.
- Creativity – Select from 0% - 100% creative. Not seeing the results
you’re looking for? Try bumping up the creativity level and let AI start thinking “outside the box.”
- Word Count – Specify between 50 – 1000 words for your new note with the Word Count Slider.
Tip:
Although the maximum word count is 1000, you can always add more text manually later, or use AI to expand on existing content.
- Language – Regardless of your default language settings, your AI query results can be generated in one of 78 different languages.
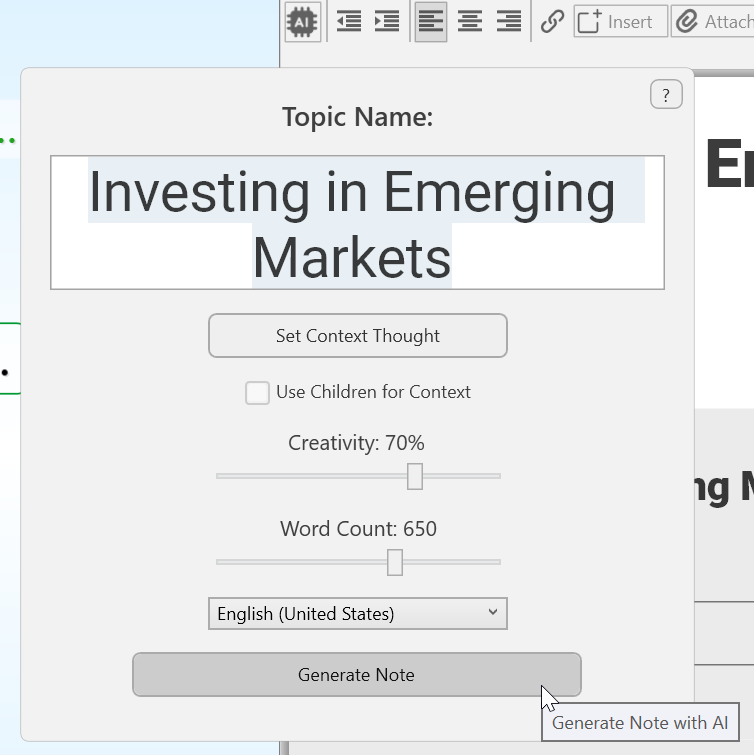
Figure 206. Modifying the AI options
Your new note will be populated word by word. Output will match the language of the input text. While the note is generating, it is not possible to navigate to another thought or brain tab.
Once completed you can scroll through the new note to review what AI has generated. When your review is complete, select one of three options in the banner above the note to either Accept changes, Redo (opens the AI pop up window with the most recent settings) or Discard.
Modifying Existing Notes with AI
There are many ways that existing notes can be modified and/or improved with the help of AI. After each modification, you can review the edit prior to clicking on Accept, Redo or Discard. Additionally, you’ll see a drop-down menu that will allow you to view the original note, new note, or merged note to help you decide if you would like to keep the changes. Merged notes will display new text in green highlights and removed text in red highlights with strikethrough.
TheBrain allows you to transform your entire existing note or a selection within a note with the following options:
Summarize Note
Regardless of the note length, a summery of its content will be added to the bottom of the note. Longer notes may have longer summeries.
Rewrite Note
Rewrite any note in a unique style or format. There’s no limit to the parameters you can provide to TheBrain AI. Try one of the following styles to see the different types of results:
Poetry •
• Patent Application
• Motivational
• Formal or Casual
Modern Slang •
• Legal
• News-Report Style
• William Shakespeare
Correct Spelling & Grammar in Note
Corrects all spelling and grammar mistakes and/or suggests new options.
Tip:
After a Correct Spelling & Grammer in Note modification, it may be a good time to review changes in the merged view before accepting AI’s alterations.
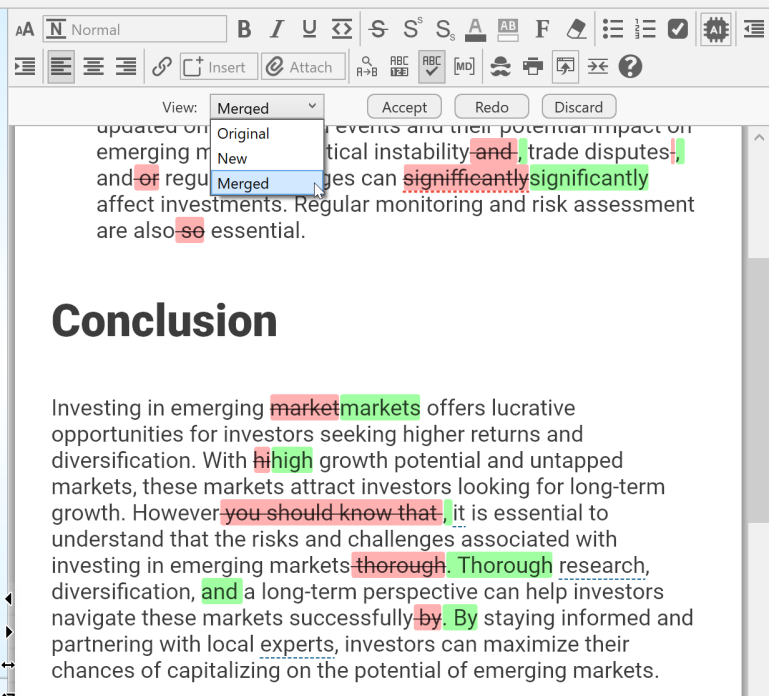
Figure 207. Viewing Merged Changes
Organize Note
AI will review the content of your note and restructure it accordingly. Typically, this will result in a shorter and more concise note.
Expand Note
Taking quick notes, or just jotting down a bulleted list or outline? Let AI turn this fractional data into a complete and well structured note.
Auto-Complete Note
Writer’s block?... AI will pick up where you left off and complete your existing note for you. This feature will even finish your content and line of thinking if you stopped mid-sentence.
Extract Action Items From Note
AI will review the contentment of the note and generate a checklist at the bottom of the note for action items that were referenced and need to be completed.
Translate Note
Convert an entire note, or just the selected text to any one of 78 different languages.
Using Drag and Drop within Notes
You can move images, links, and text in a note via drag and drop. You can also drag note content to external applications.
- To move text, first select the text, then drag the selection
- To move an image or link, start dragging it, then drop it when the cursor is where you want the image or link to be
Press the Escape key to stop dragging.
Tab Key Functionality in the Notes Editor
When you’re typing in the Notes editor, the Tab key performs different functions based on:
Where the cursor is
Whether text is selected
Tab
key reverses the direction of the action. For example, wherever pressing
Tab
shifts text to the right, pressing
Shift
Tab
shifts text to the left.
As in most text processing software, holding the Shift key while pressing the
If no text is selected and the cursor is within or at the start of a paragraph:
- The first line of the paragraph (whether it is one line or many) is indented approximately five spaces each time the Tab key is pressed.
When the cursor is in a list item (bullets/check boxes/numbered lines):
- The entire list entry is indented approximately five spaces each time the Tab key is pressed.
When the cursor is in a title, subtitle, heading, or subheading:
- The level of the heading is decreased each time the Tab key is pressed. The heading level is increased each time Shift+Tab is pressed. For example, to change a Heading 4 to a Heading 3, you would click in the text and press Shift+Tab. (Heading 3 is a “higher level” than Heading 4.)
When the cursor is in a table:
- Pressing the Tab key moves the cursor to the next cell.
Tab characters can’t be inserted into the middle of a line of text. If you want to align text into columns, it’s most efficient to format using a table.
Collapsing and Expanding Notes Sections
You can collapse sections of your notes based on headings, tables, and list items. This helps you navigate through large documents more easily. Collapsing lets you focus on a particular area while writing or reviewing content. When you’re ready, you can expand any or all sections.
Two ways to expand or collapse Notes sections:
- Hover over the area to the left of the notes, then click the down-arrow to the left of the section to collapse the entire list. This symbol will become a right- arrow which you can click to expand the section.
Or
- Right-click in the area where there are notes, then click an option of your choice. Optionally, before you right-click, click in a specific section if you want to collapse or expand just that section.
Choices on the context menu include: Collapse All Except Here, Expand All, Collapse All, Expand Here, and Collapse Here.
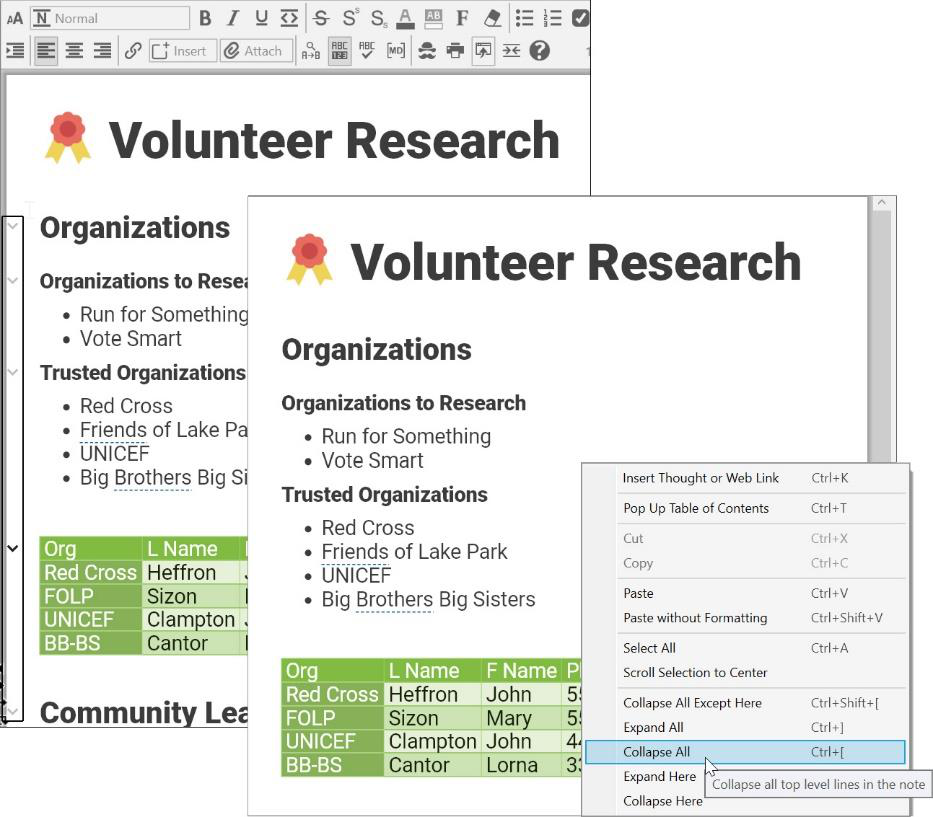
Figure 208. Options for Expanding or Collapsing Note Sections
Choosing a Notes Style
You can choose the style of the notes in the brain that’s open by clicking the Notes Style button in the content area toolbar. The style you choose applies globally to all notes in a single brain, so you can choose a style that matches the
look of each of your brains. You can use a different style for each different brain in TheBrain window.
Notes style and formatting will be preserved if you copy and paste a note’s content from one thought into another. To easily copy an entire note, right click
anywhere inside the note to use the
Select All
option.
From the note’s context menu, you can also select Copy as Text or Copy as
HTML for pasting into other applications.
- To select a style, click in the Notes tab, click the More button, then click the Notes Style command (or just click the Notes style button if the toolbar is expanded), then click a style of your choice from the Edit Notes Style box.

Figure 209. Setting the Notes Style
Note Styles also follow a “responsive web design guidelines” approach which is a fancy way of saying that any note you create will look great whether it is viewed on a 30” monitor or a 4” mobile device.
You can also apply a Notes Style to a Theme, so that it will be in place when

you use that theme with another brain. The techniques for fine-tuning the various Style attributes are the same, whether you start in the content area or the
Brain Theme
dialog box. For details about viewing and changing the appearance of notes in the content area, please see Changing the Content Area’s Default Attributes beginning on page 49.
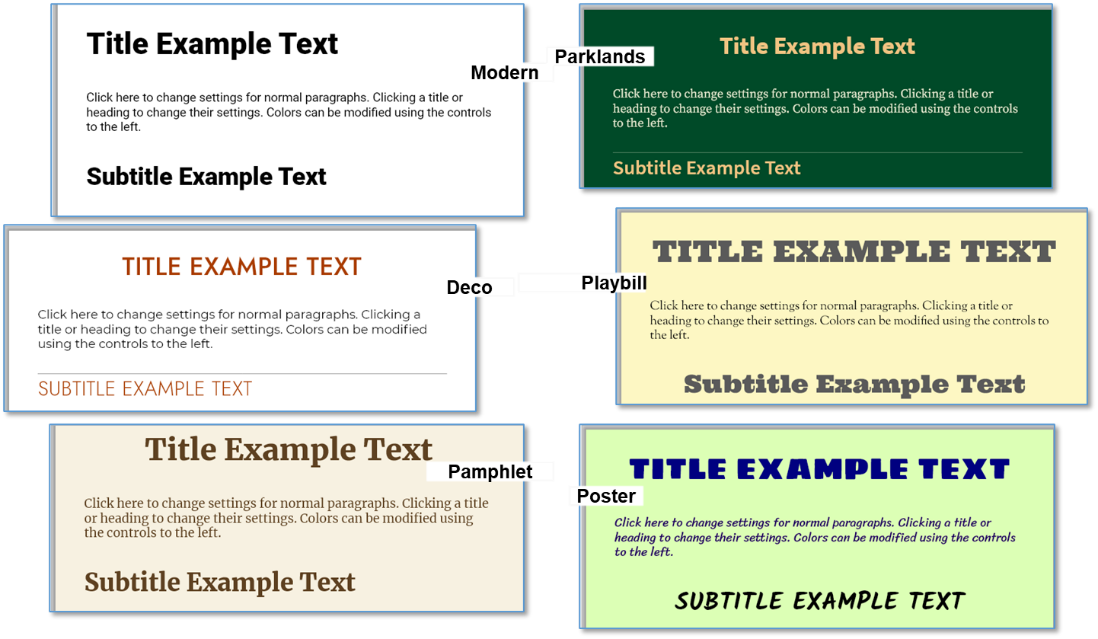
Figure 210. Appearance of Some Notes Styles
Each Note Style has a set of paragraph styles that help you format your notes
consistently. If you don’t choose a paragraph style, the text is automatically attached to a paragraph style named “Normal.”
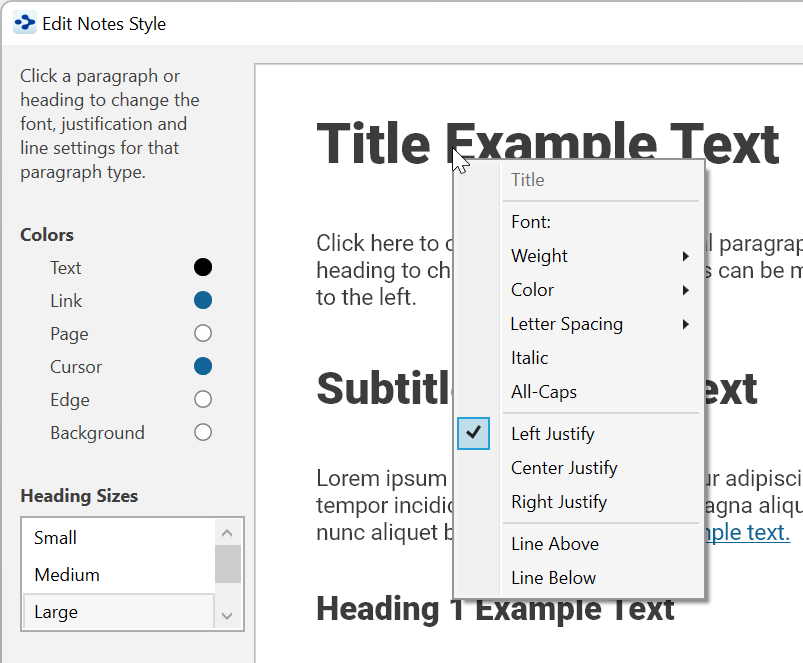
Figure 211. Paragraph Styles
Paragraph styles apply to entire paragraphs. To select one, just click anyplace
with the paragraph, then click the paragraph style of your choice. If you change to a different Notes Style, the text will change accordingly, based on the paragraph styles you’ve selected.
Changing Text Size in Notes
In addition to changing the size of text by choosing different notes and paragraph styles, you can quickly adjust text to a size that is most comfortable for you. It’s as easy as clicking the AAText Size button, then dragging the slider up or down!
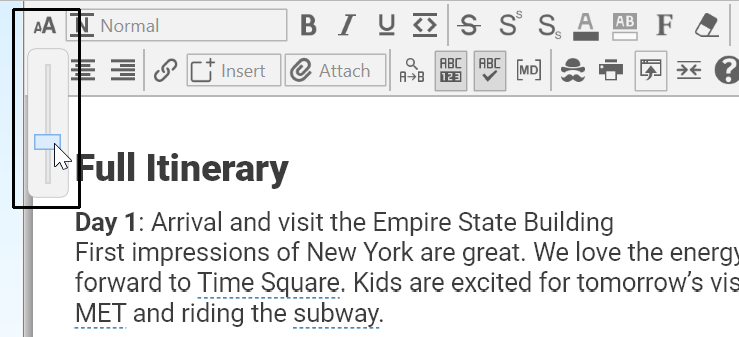
Figure 212. Slider for Making Note Text Larger or Smaller
Paragraph Alignment
Quickly adjust paragraph alignment to left, center or right. Place your cursor anywhere in a paragraph and click on the desired justification.
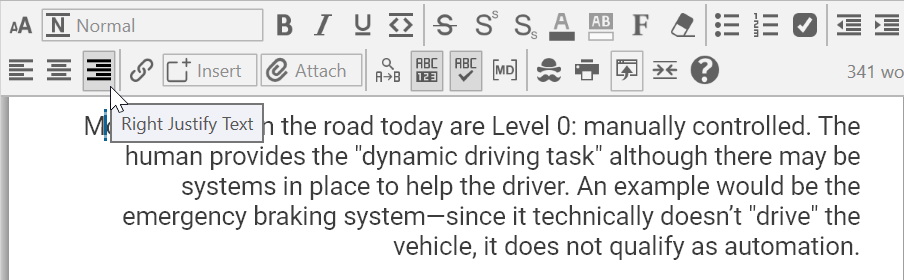
Figure 213. Paragraph Alignment
Custom Font Family for Selected Text
Place your cursor anywhere in a paragraph, then click the Font button to select from of over 900 font families. Fonts are consistent across platforms, so your notes will look the same on Windows, macOS and mobile devices.
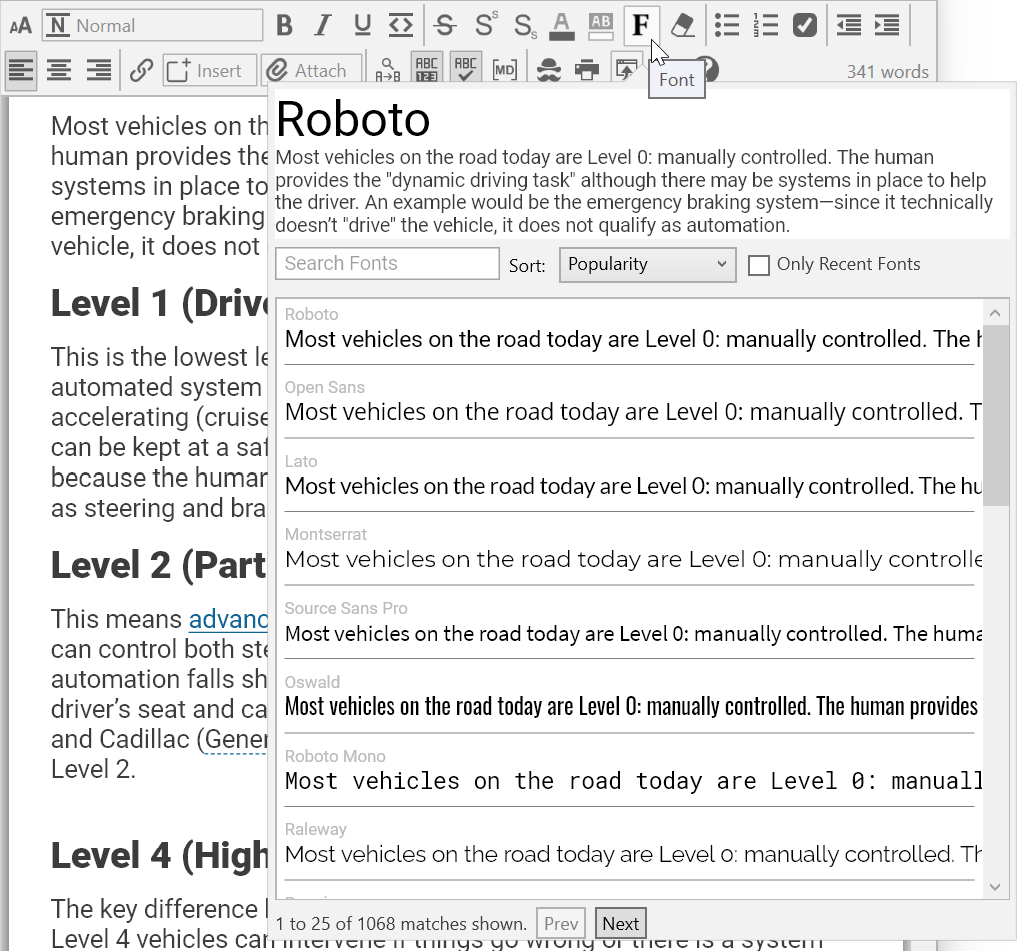
Figure 214. Fonts
Move through large sections of the font list using the Next and Previous buttons.
Adding Tables
Create tables inside of the content area by clicking on Insert and selecting Insert Table. Tables can also be created by copying and pasting from Excel, Word or tables in other notes. When Show Markdown is active, to start a new table, type a word or sentence surrounded by pipe symbols, such as: “|this is a new table|.” Tables can include formatting and images, and cells can be right, center or left justified, using the content area toolbar buttons or with markdown formatting.
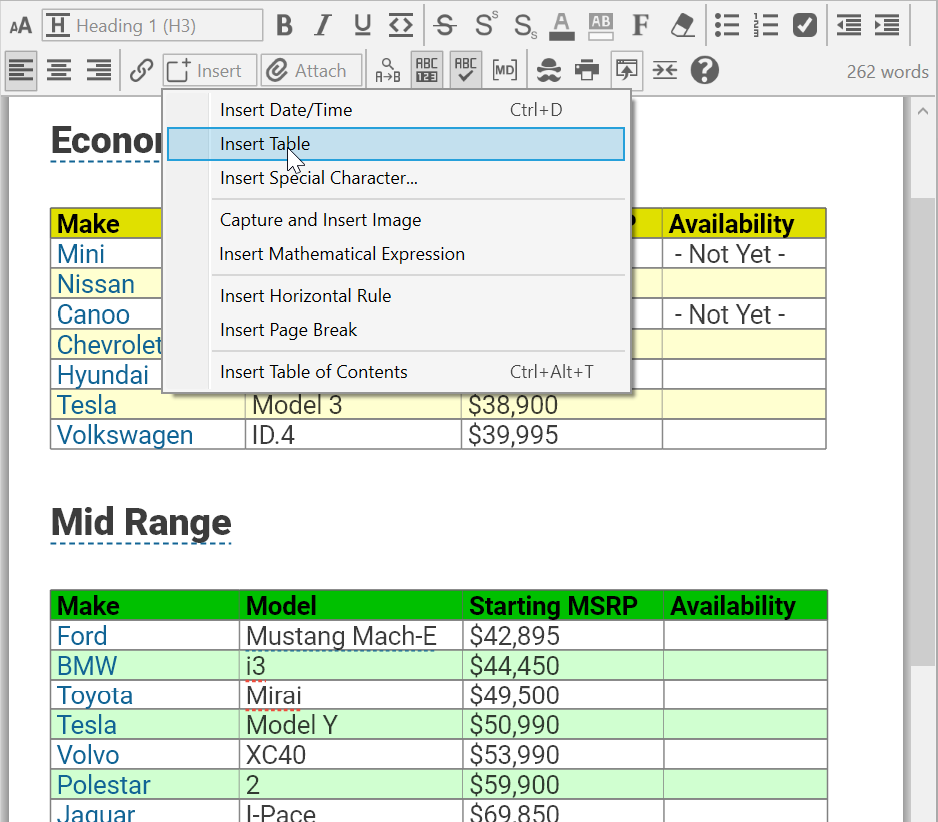
Figure 215. A Table Inserted in the Content Area
When adding a table, you may select the number of columns and rows. More
can be added at a later date if necessary.
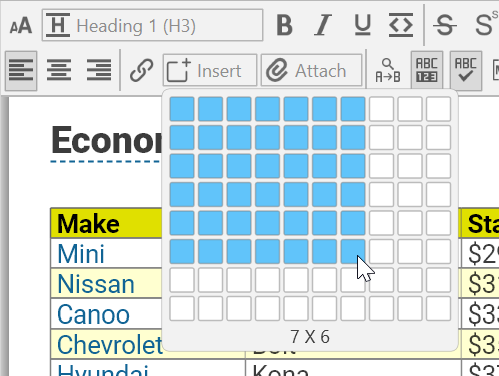
Figure 216. Inserting a New 7x6 Table
pipe characters and optional justification tags). The header will not be visible
when editing and will completely disappear when printed or in view mode. To make a table with no header, leave the cells in the header row empty (only
Multiple cells can be selected at once for group formatting by clicking and
dragging, or use the arrows above or next to a column or row. Right click on an
arrow to select from the following options:
- Justify Left
- Justify Center
- Justify Right
- Duplicate
- Delete
- Move Up/Left
- Move Down/Right
When multiple cells are selected:
- Press the delete key to clear the cells. If an entire row or column is
selected, it will be removed.
- Cut, copy and paste can be used to move cells within a table or from one
table to another.
- You can even select a group of cells, copy it, then paste elsewhere in the
document to create a new table.
- If normal content (not made of multiple cells) is copied and then multiple
cells are selected prior to pasting, the content will be duplicated into every
selected cell.
Table Controls
Edit any cell by clicking inside that cell and using the available buttons in the
content area toolbar. Only formatting options that are available will be accessible,
others will be greyed out.
Click and drag on any bar in your table to adjust the column width. Select arrows
on the left for rows and on the top for columns to then drag and drop to move its
location in the table.
Click anywhere in an existing table and then click on the table icon on the upper left-hand corner of the table to activate a Table Controls Bar below the content area toolbar.
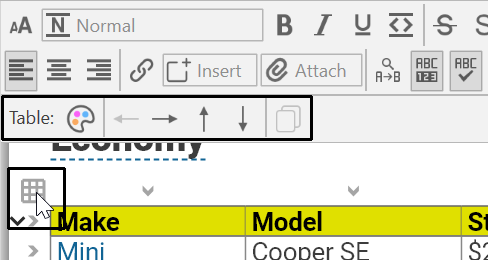
Figure 217. Table Control Bar
From here, you can move selected rows and columns left, right, up, down or duplicate the selected cells. Buttons will only appear for options that are possible depending on which cells are selected. From the Table Controls Bar, the Table Theme Editor can also be opened.
Additional commands are available by right clicking in a table, such as Move, Justify, Select All in Table, Split Table and Toggle Table Toolbar.
Table Theme Editor
Selecting Table Theme Editor from the Table Controls bar will open a pop-up window that allows you to further customize the color settings of the entire table and/or the first row. New cells and content added to the existing table will then follow the same color settings. A sample table will display the colors that are being selected. The following options are customizable:
- Text
- Background
- Alternate Row Background (every other row, starting with row 1)
- Table Lines
- First Row Text, Background and Lines
- First Column Text, Background and Lines
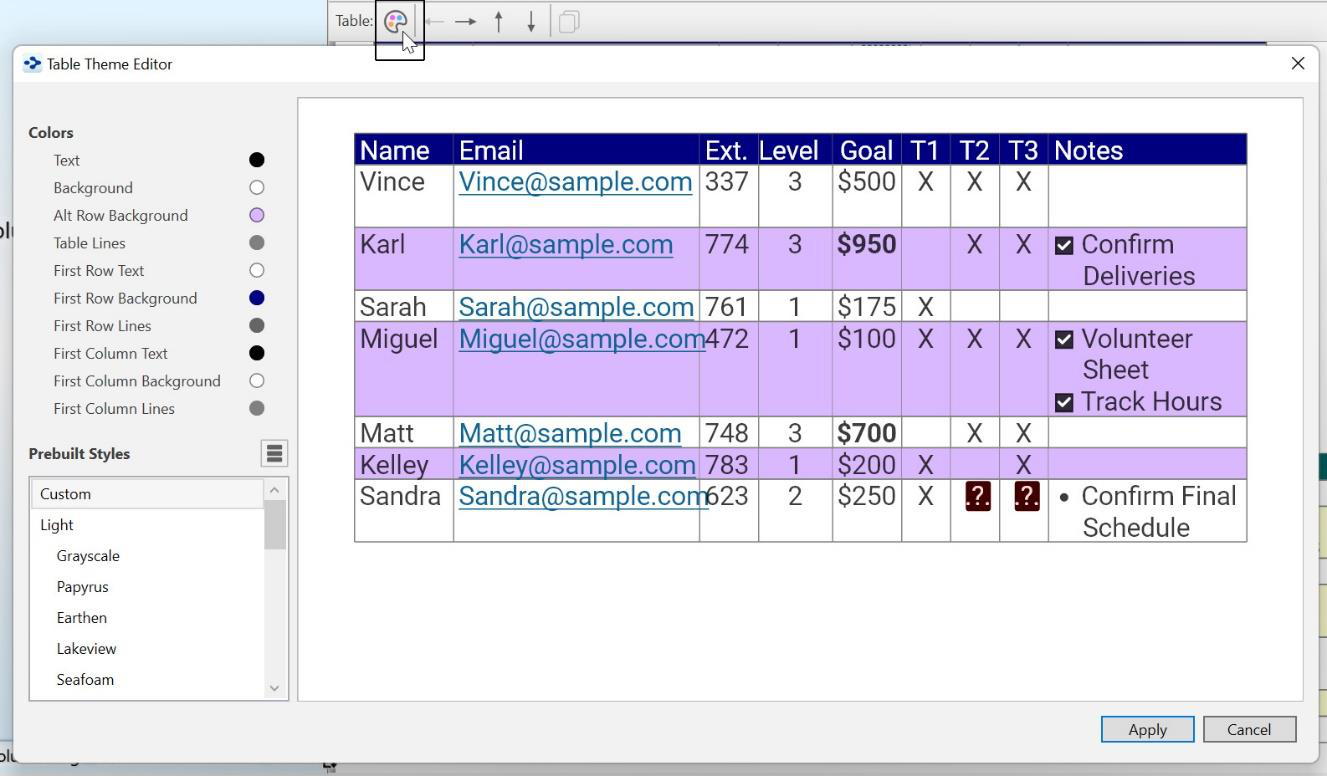
Figure 218. Table Theme Window
Over 20 different Prebuilt Styles are also available from the Table Theme Editor.
Inserting a Table of Contents
You can easily add a Table of Contents into any existing note. The Table of Contents will provide quick links to all Titles, Subtitles, Headings, and Subheadings. You can also see a quick pop-up Table of Contents.
To insert a Table of Contents:
- Click in the note where you want the Table of Contents to begin, then click the Insert button and select InsertTable of Contents option in the content area toolbar. When Show Markdown is activated, type [/toc/].
The Table of Contents that is created will only include the content that appears below it.
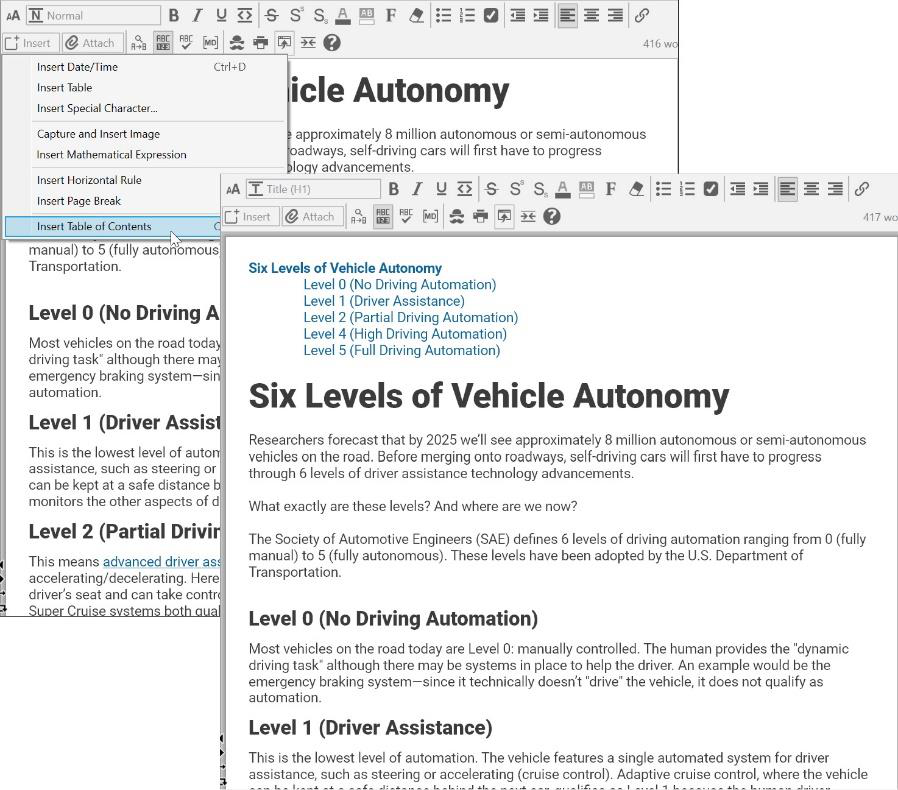
Figure 219. Table of Contents
To delete a Table of Contents:
- Click just above the Table of Contents, then press the Delete key, or click just after the Table of Contents, then press the Backspace key.
To view a pop-up Table of Contents:
- For a quick pop-up window that contains the note’s Table of Contents, right- click in the note or press Ctrl+T.
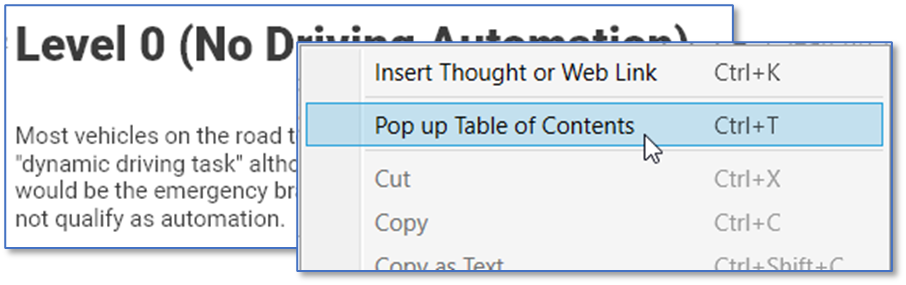
Figure 220. Pop Up Table of Contents
Spell Checking

A spell checker is automatically at work for your notes. Possible misspellings are automatically highlighted and you can right-click to view suggestions. Click the
suggestion of your choice to replace the misspelled word. You can customize the dictionary by adding words to it.
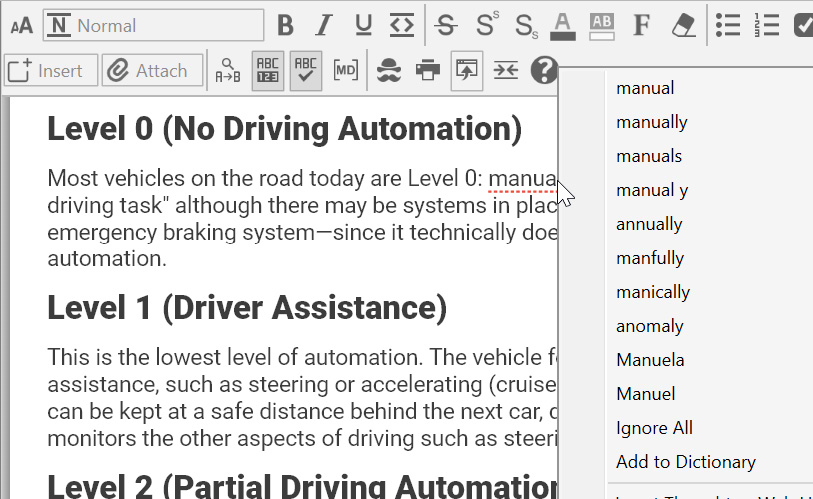
Figure 221. Spell Checker in a Note
If you prefer not to see misspellings flagged as you type:
- Click in the Notes tab, click the More button, then click the Check Spelling as You Type command (or just click the Check Spelling as You Type button if the toolbar is expanded).
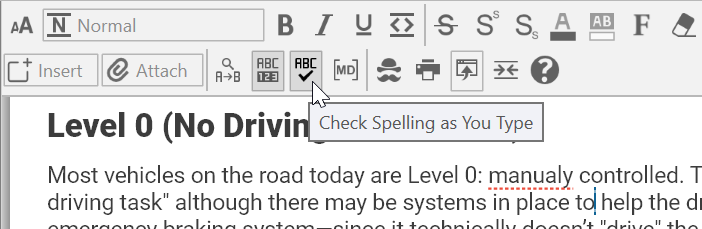
Figure 222. Disabling Spell Checking
This is a toggle command. When you want to turn the feature on again, follow
the same procedure.
Real-time spellchecking also applies to creating and editing thought names.
Inserting Horizontal Rules
You can insert horizontal rules (lines) for organizing notes into sections visually.
Click in the note where you want the horizontal rule to appear, click the Insert button, then click the Insert Horizontal Rule command.
Horizontal Rules can also be added manually by typing 3 hyphens, even when Markdown is hidden.
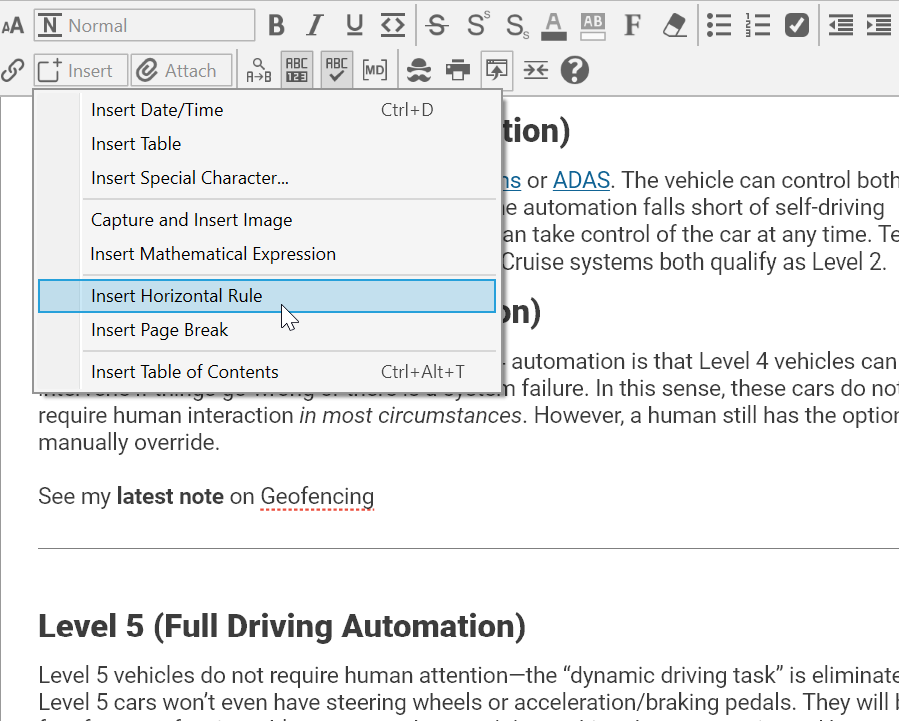
Figure 223. Inserting a Horizontal Rule
Typing 10 hyphens will create a Page Break in the note; however, this option is only enabled when Show Markdown is activated.
To remove a horizontal rule:
- Click within the rule to select it, then press the Delete key. If there is a rule between two paragraphs, the rule will also be deleted if you select and delete the paragraphs before and after it.
Creating Check Box Lists
You can create a quick check box list and mark the items as complete or
incomplete. You can either create the list as you type or turn any existing text into a check box list after you select it.
Click in the note where you want to type the first item to appear, click in any paragraph, or select multiple paragraphs.
Click the Toggle Checkbox List button in the content area toolbar.
When a task is complete, click the check box to display a check mark or click it again to remove the check mark if you decide the task isn’t complete after all.
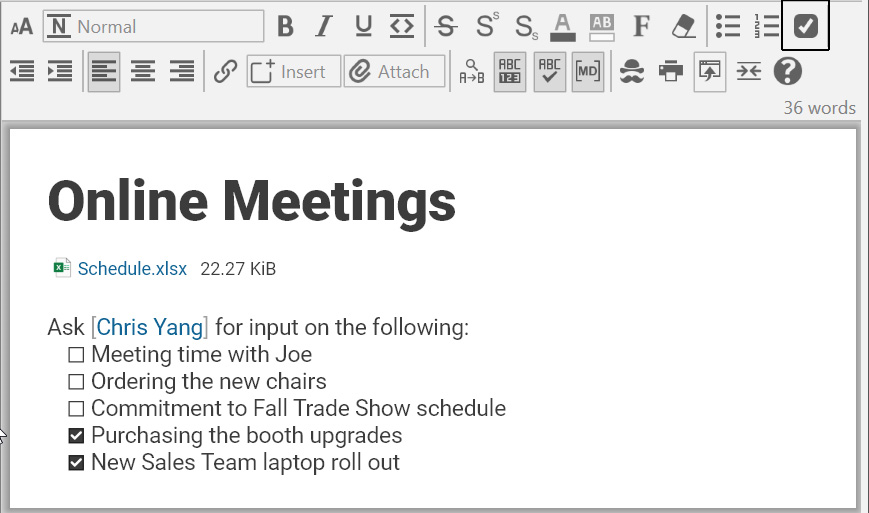
Figure 224. Formatting Text as a Check Box List
To see ALL of your To-Do items in one place:
- Click the Right Panel button in the upper-right area next to the Search box or click the To Do List command on the View menu.

Figure 225. Two Ways to Open the To Do List for All Thoughts
The To Do List panel is displayed:
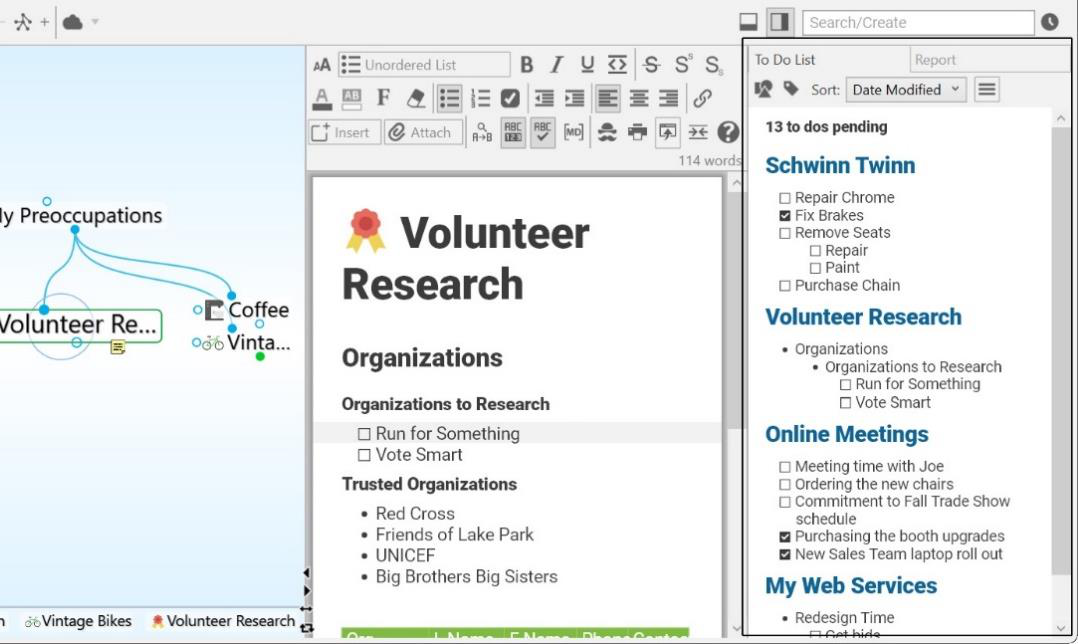
Figure 226. A To Do List for All Thoughts
When you click a check box in one location, such as the To Do List panel, it is automatically checked off in the other location (the thought) and vice versa.
Linking to Thoughts in Notes
TheBrain has a built-in feature that automatically marks note text that matches any thought in your brain with a blue dotted underline. You can then choose to quickly create a link to that thought. This is explained in the Thought Mentions section beginning on page 206.
Creating Web Links
Web links can easily be inserted, edited, and identified within your notes for the active thought. Use any of these three ways:
Type in the URL, or
Paste in the URL from the clipboard after you copy it (any selected note text is automatically linked to the URL), or
Drag the URL in from a browser
The web link will be identified and processed automatically.
Hyperlinked text in notes can be displayed and activated in several different ways. In TheBrain Preferences open the Notes Editor tab. Under User Interface, the option to Show Link Target in Pop-Up can be selected. This will show the full URL of a hyperlink in Notes when clicking on the linked text. Additionally, the
option for Clicking Links in Notes can be set to Follows Link (automatically launches URL in default browser) or Moves cursor (places cursor in the text
without activating the URL).

Figure 227. A Target Link Pop-Up on Hyperlinked Text
Videos from YouTube are embedded into notes in a playable form automatically. Just drag and drop from your browser into your notes.
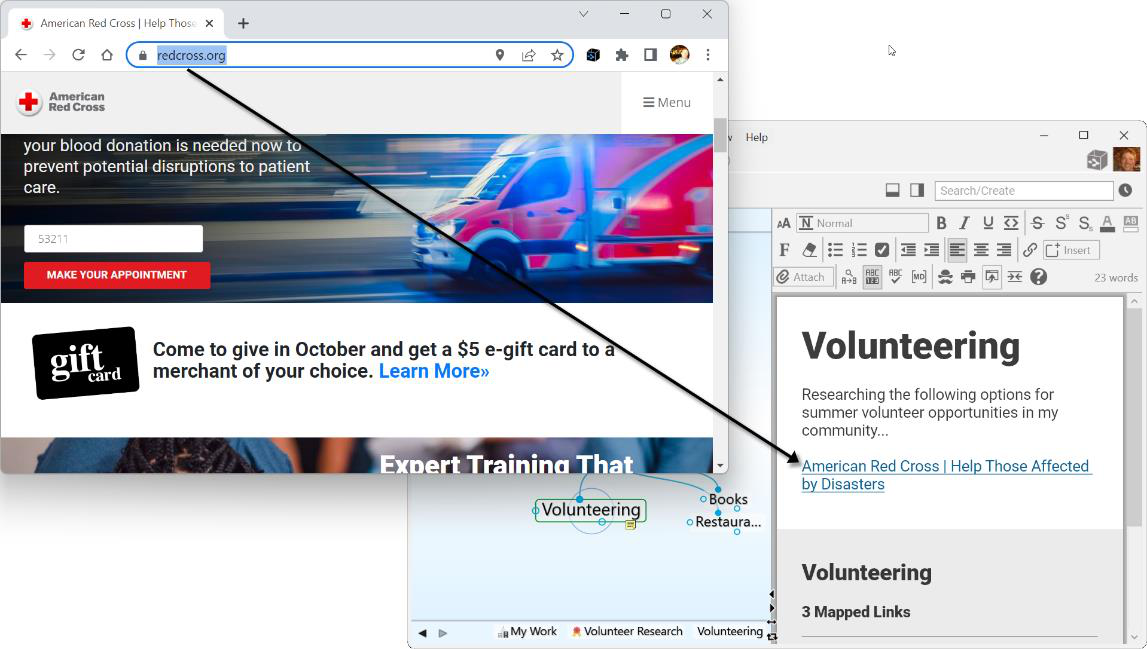
Figure 228. Dragging a Web Link into a Note
- The URL will be replaced with the title of the page it links to—and you can easily edit the title by clicking within it and using standard typing and deleting techniques. If you delete the brackets around the link text, the connection to
the URL will be broken—just use the Undo command on the Edit menu or press Ctrl-Z if you delete a bracket by accident.

Figure 229. Revising Link Text in a Note
Copying an image pasted in a note will put the image on the clipboard.
Fast Linking and Creating Thoughts from Notes
Pressing Ctrl/Cmd+K is a shortcut to:
• Insert a link to an existing thought
• Create a new thought
• Link to a URL
• Edit or remove a link
After you press Ctrl/Cmd+K:
An edit box opens so you can begin typing a URL or the name of the thought you want to perform any of these activities on. Or, if you select text or a URL first, that text will appear in the edit box.
Double-click the entry that appears to insert a link to that item in the note.
For example, double-clicking “Volunteer Opportunities” in the example below creates a link to that thought in the notes for “Goals.”
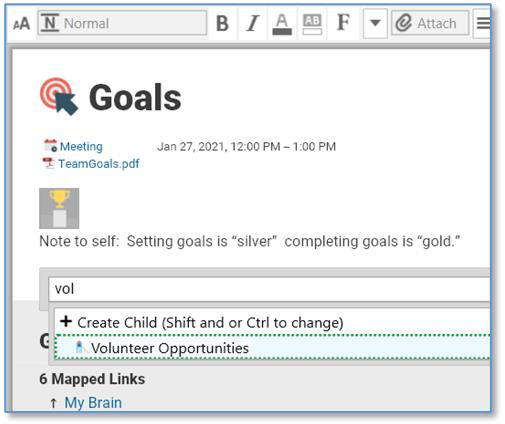
Figure 230. The Ctrl/Cmd+K Shortcut
If an existing link is selected, you’re ready to begin editing it. To remove the link, just delete its name in the edit box.
If you type a URL, it will be inserted.
The link command includes all the features of Quick Thought Creation so you can insert all types of relationships easily.
Alternatively, you can type
[[
to link or create thoughts.
Capturing and Inserting Images in the Content Area
You can take a screen capture of virtually anything you can see on the screen and then insert the image into the content area.
Click the Insert button in the content area toolbar and select Capture and Insert Image.
Your brain will be hidden temporarily and red crosshairs will appear on the screen in place of your cursor.
Click and drag a rectangle around the area to be captured as an image in your note.
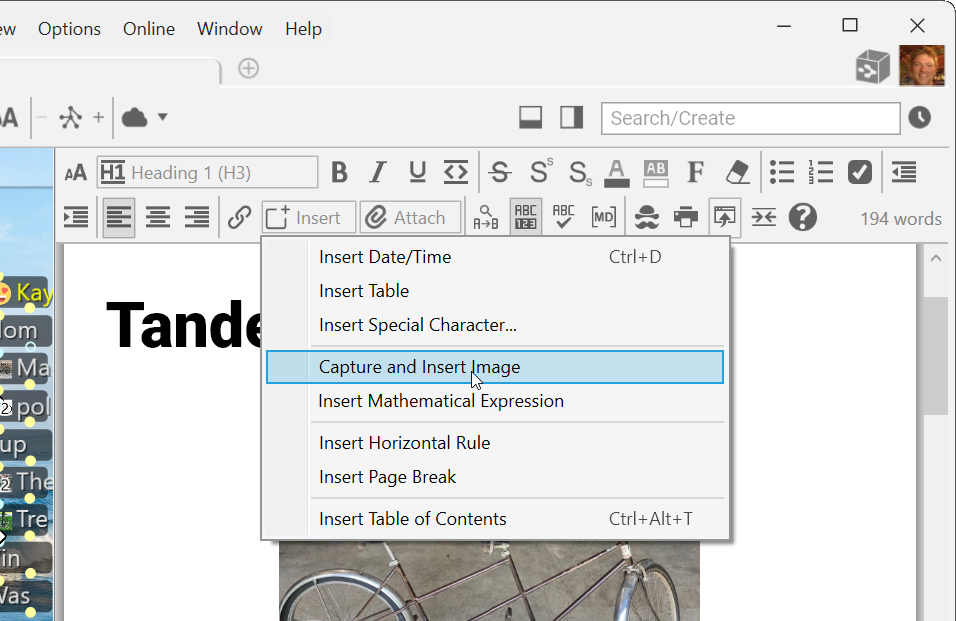
Figure 231. Capture Image from the Content Area Toolbar
Mathematical Expressions
Insert LaTex mathematical expressions directly into your notes by using the Insert button in the toolbar or placing the proper text surrounded by $$. A real time display of your mathematical expressions will be displayed while editing.
Example of a mathematical expression:
Input:
$$mr\left(\frac{2\pi}{T}\right)2 = G\frac{mM}{r2} \rightarrow T2 = \left(\frac{4\pi2}{GM} \right)r3 \rightarrow T2 \propto r3$$
Result:

mbols can be found at or
rtcut of $$ can still be used to insert mathematical expressions.
Details on Images in Notes
Select an image in a note to see its size as a percentage. The size display will update as the image is being resized.
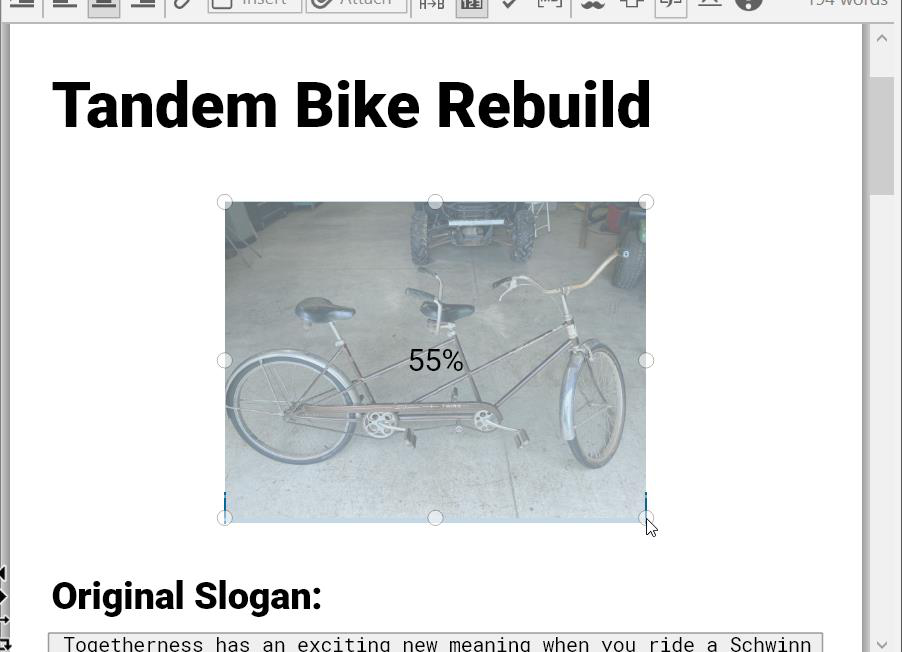
Figure 232. Image Size Displayed as a Percentage When Selected
Find and Replace in Notes
Click the Find & Replace button in the content area toolbar to open the Find and Replace fields. Type the text you’re searching for in the Find field and the replacement text in the Replace field. All matches to the Find field will be highlighted in the note. Use the arrow keys move back and forth between each occurrence to preview when you’ll be replacing. Use the Replace button to replace specific instances one at a time, or the All button to replace all instances of your search criteria.
Your cursor will remain on the current selected highlight when you close the Find/Replace fields.
The
Find
field can be used independently, without content in the
Replace
field if you are just looking for specific text to be highlighted within a long note.
Printing Notes

To print the active note, press
Ctrl
- P or click the
More
button, then click the
command (or just click the
button if the toolbar is expanded). The
dialog box will open and you can fine-tune your print request.

Figure 233. Printing a Note
Exporting Notes
Click the Export button in the content area Toolbar. You will have the following
options:
- Create Document – You will have the option to create a PDF, HTML,
Markdown or Text file. Custom settings that are selected will be
remembered for future exports. Customizable settings include:
oOptions
Thought Titles
Thought Labels
Links and Mentions
Use web thought URLs
Force white page
oFormat
PDF
HTML
Markdown
Text
oPDF Options
Page size
Orientation
Text Size
Page number footer
oMarkdown Options
Convert to “CommonMark”
Open in Browser – Note will open as HTML in your default web browser.
Additional Note Features
Word and Character Count
The number of words for each note displays in the bottom-right corner of the
content area toolbar. Hovering over the word count for each individual note will
display the character count of that note. You can toggle the display on or off by
selecting the Show Word Count button on the expanded content area menu or
the compact toolbar’s drop-down menu.
Search Web from Notes
Select any text in your note and press F4 on your keyboard (or your customized
Web Search keyboard shortcut) to open the Web Search dialog box, pre-
populated with the selected text.
Delete By Word
The content area supports keystrokes to delete by word, rather than one
character at a time:
- Ctrl+Backspace = Delete to start of current word (equal to Ctrl+Shift+Left,
Backspace on macOS)
- Ctrl+Delete = Delete to start of next word (equal to Ctrl+Shift+Right, Delete
on macOS)
Search Brain for
Select a word or phrase in any note and right click. Select the option of Search
Brain for “Selected Text” to see if that word or phrase appears elsewhere
within the same brain.
Edit Link Context Menu Commands
Once a link has been added to notes, you can right-click on it to edit it. If the link is a URL, you can edit its text. If the link is to a thought, you can search for and select a different thought.
Resizable Images and Videos
Images and videos that have been pasted into a note can easily be resized. Click on the image or video to highlight it. Each image will have eight resizing points. Click and drag on any resizing point to resize the image.
Copying Images from Notes
When a picture in the content area is copied (by right-clicking it and selecting the Copy command), pasting into Paint or Word will paste the image itself.
Pasting into notepad or some other text-only application will paste the markdown text that references the picture.
Additionally, you can right-click an image in the content area and select Copy as Image.
Adding and Viewing Thought Attachments
In addition to notes, each thought in your brain can have content associated with it such as web pages and a multitude of file attachments. You can drag and drop attachments, create them from scratch, and use any of the other options
provided by the Attach button in the content area toolbar. To access your attachments, just click their links in the content area.
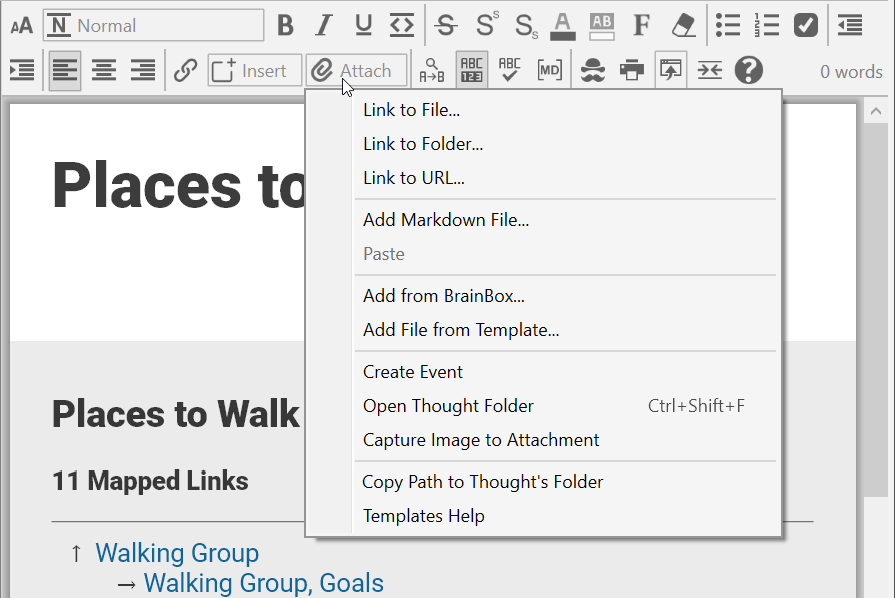
Figure 234. The Attach Button in the Content Area
Attaching Files
You can use standard “drag and drop” techniques to add file attachments into your brain from other programs to a thought or to create new thoughts.
To drag and drop one or more items into the Content Area of a thought:
Make sure the thought to which you want to add the attachment is currently the active thought and that the content area is visible.
Position the window containing the item you want to attach so that it and the content area are both visible, then drag the selected item to the blank area under the thought name in the content area. A dashed outline around
the thought name shows you that you’re about to attach the file to that thought. You can select multiple items and drag them all at the same time.
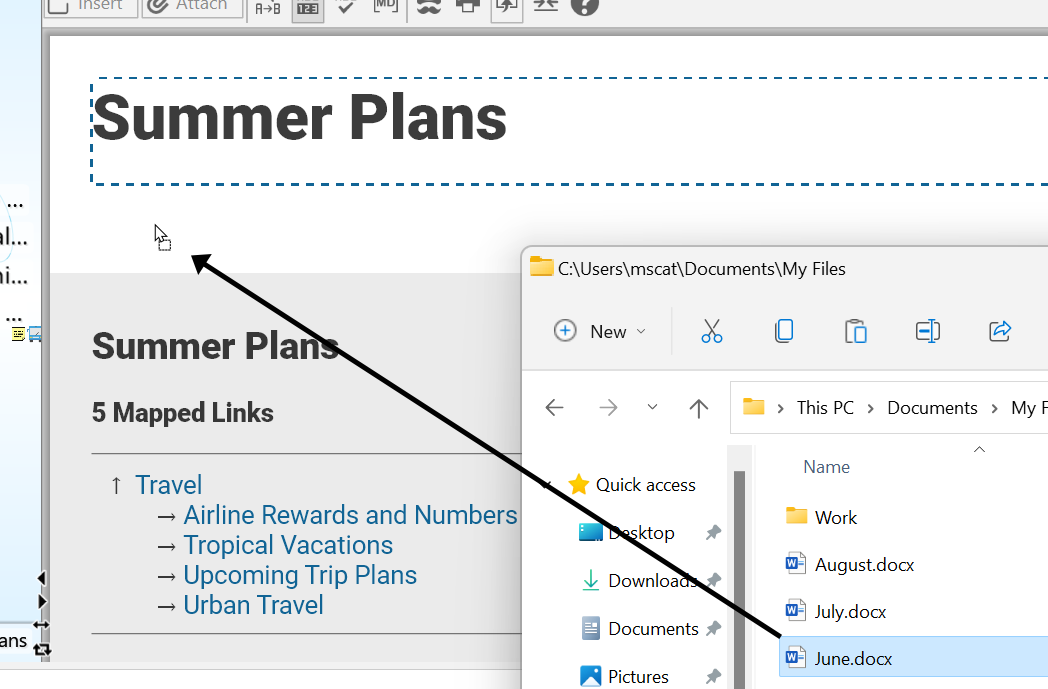
Figure 235. Dragging and Dropping a File into the Content Area
Specifying your Drag and Drop Preference
By default, all files that you drag and drop into your brain will create a copy of the original file. You can easily change the default to suit your environment. Please see the Behavior Preferences section on page 64 for information about viewing and changing the “On drag and drop of files” setting.
Tip:
You can also override the current drag and drop setting in the
Preferences
window by holding down the following keys as you drag and drop:
In Windows

InmacOS
-Link to file = Alt - Link to file = Ctrl
-Move file = Shift - Move file = Cmd
-Copy file = Ctrl - Copy file = Alt
Attaching Links to Files and Folders without Dragging
You can also add a file attachment to the active thought without dragging and dropping.
To insert a link in the active thought to a file or a folder:
Click the Attach button in the content area toolbar.
Click Link to File or Link to Folder, navigate to the item, then click the Open button.
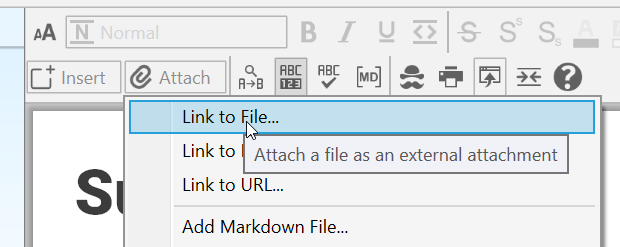
Figure 236. Using Link to File to Add a File Attachment
- The content area will display the details of the new attachment.

Figure 237. Content Area after a Link to a File is Attached
From here you can click the X button to return to the notes, click the up-arrow button to open the attachment, use the left- and right-arrow buttons to move back and forth between other attachments in the same thought or to move back to the notes, or click the Actions button to access more choices for handling the attachment.
Action Menu for Files
Open: Open the selected attachment in its default application.
Rename: Change the name of the selected attachment.
Properties: Display all attributes of the selected file in a separate dialog box; based on the default application, there may be properties you can change.
Delete: Delete the selected attachment (you will be not be prompted to confirm the deletion but you can use the Edit menu to Undo the deletion).
Copy: Copy the selected attachment to the clipboard; you can then paste the attachment elsewhere in your brain.
Cut: Place the selected attachment into the clipboard; the attachment will be removed from its current location when it is pasted elsewhere in your brain.
Move File into/out of Brain: Switch this attachment between internal and external storage; if you are moving the file out of your brain, you will be prompted to specify the destination folder.
Copy File into/out of Brain: Switch this attachment between internal and external storage; if you are moving the file out of your brain, you will be prompted to specify the destination folder.
Copy File Path: Copies the location so that you can paste it elsewhere, including the Search box; for example, you may want to see if the file is elsewhere in your brain.
Show in Explorer: Shows where the file resides outside of your brain.
Encrypt: Ensures that it is impossible to recover the file contents without a password.
Attaching Web Pages
Adding URL attachments to your brain is a simple process. TheBrain’s built-in browser will display each web page in the content area.
TheBrain’s built-in browser has recently been updated and supports more types of web content than ever before. Many web pages can event be interactive (Google Docs, Sheets, etc.) from within the content area.
The easiest method for linking a web page into your brain is to simply drag and drop it into your brain. Click on the URL icon in the address bar of any browser and drag into one of several different locations to add the web page as an attachment:
Drag and drop to the plex to create new thoughts. The thought name will be the URL of the web page or what is contained in the
<title>tag of the URL, which you can easily rename as you would any other thought. A link to the page will appear under the thought name in the content area and clicking that link will open the page in TheBrain’s built-in browser. Online non-HTML content, such as online .PDF files will be renamed with the file name.Drag and drop onto existing thoughts in the content area. This will simply add the web page as an additional attachment link. The thought name will not be updated.
Drag and drop into the body of an existing note for a hyperlink.
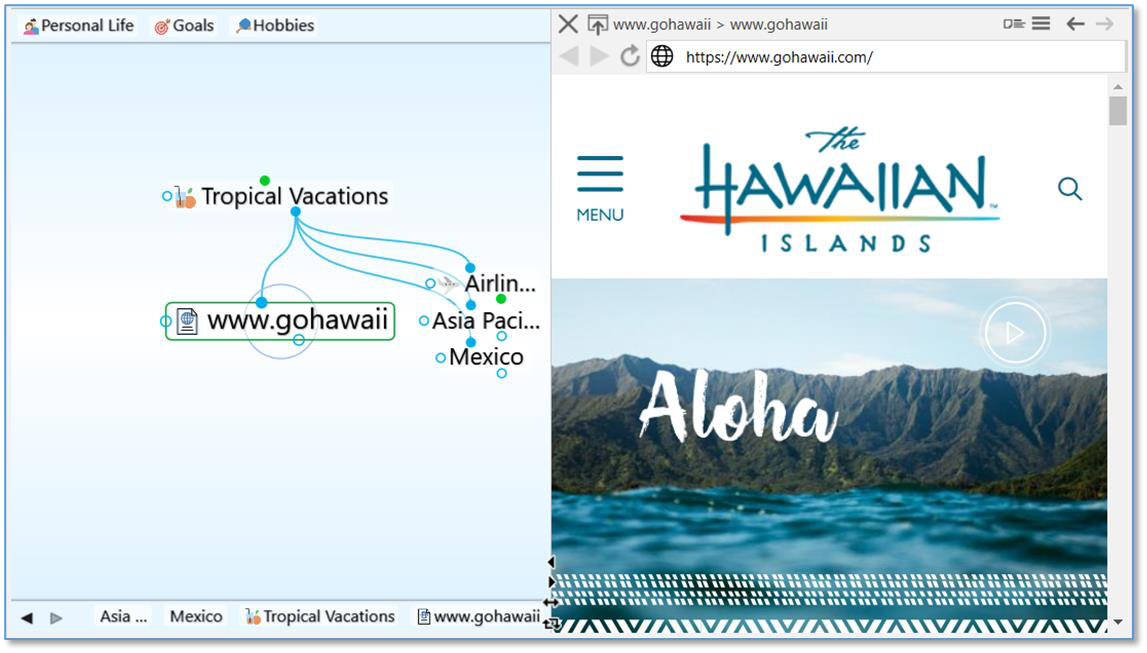
Figure 238. TheBrain’s Built-In Web Browser
Adding a Web Page by Typing or Pasting its URL
You can also add a web page attachment to the active thought by clicking the Attach button in the content area.
- Click Link to URL, paste or type the URL address into the empty field, then press the Enter key.
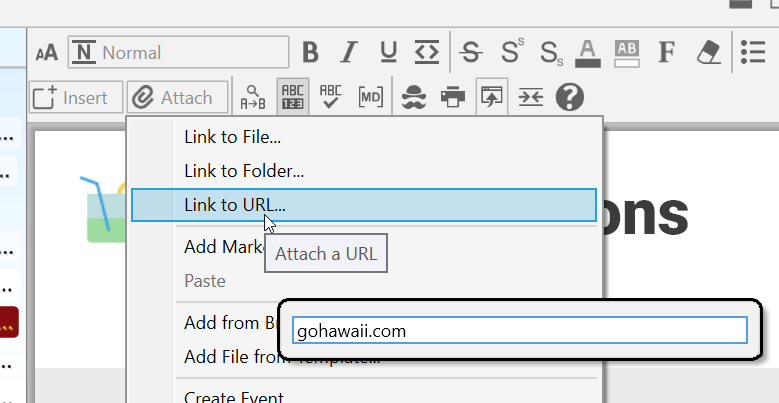
Figure 239. Adding a Web Page Attachment using the Attach Button
If the URL you are attaching to your thought already exists as an attachment on another thought, you’ll have the option to cancel, add, navigate to the Attachment or replace the attachment.
The name of the duplicate URL will be displayed in the warning message.
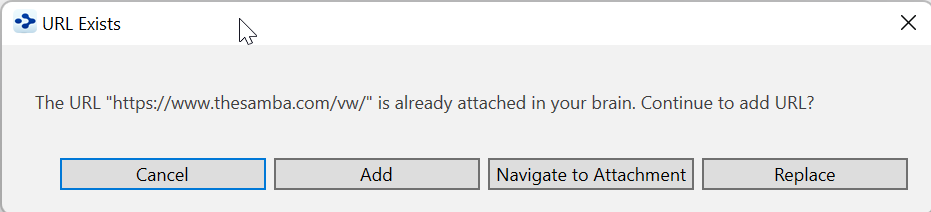
Figure 240. URL Exists
TheBrain’s built in browser allows you to open archived web pages for
attached URLs. In the context menu for any URL attachment, select
Open Using Wayback Machine
.
Attaching Video and Sound Files
TheBrain 13 includes a built-in media player that can enables playback of several common video and audio files.
To activate the video player, select a video file attachment. The video will be previewed and the player controls will be shown near the bottom of the window. To activate the audio player, use an audio file attachment.
The primary controls are: play/pause, advance by 10 seconds, and rewind by 10 seconds. There is also a timeline that can be dragged to go directly to a specific time in the video and a button to open the file in an external player. The numbers at the left of the timeline show the amount of time that has elapsed while the numbers at the right of the timeline show the amount of time remaining.
As the window is resized, the video player and its controls scale to fit within the available space with the controls appearing in a translucent overlay on top of the video when insufficient vertical space is available.
A fading animation is utilized to hide and display the controls as necessary when video is playing. For audio files, the controls are displayed in the center of the available space and do not fade out at any time.
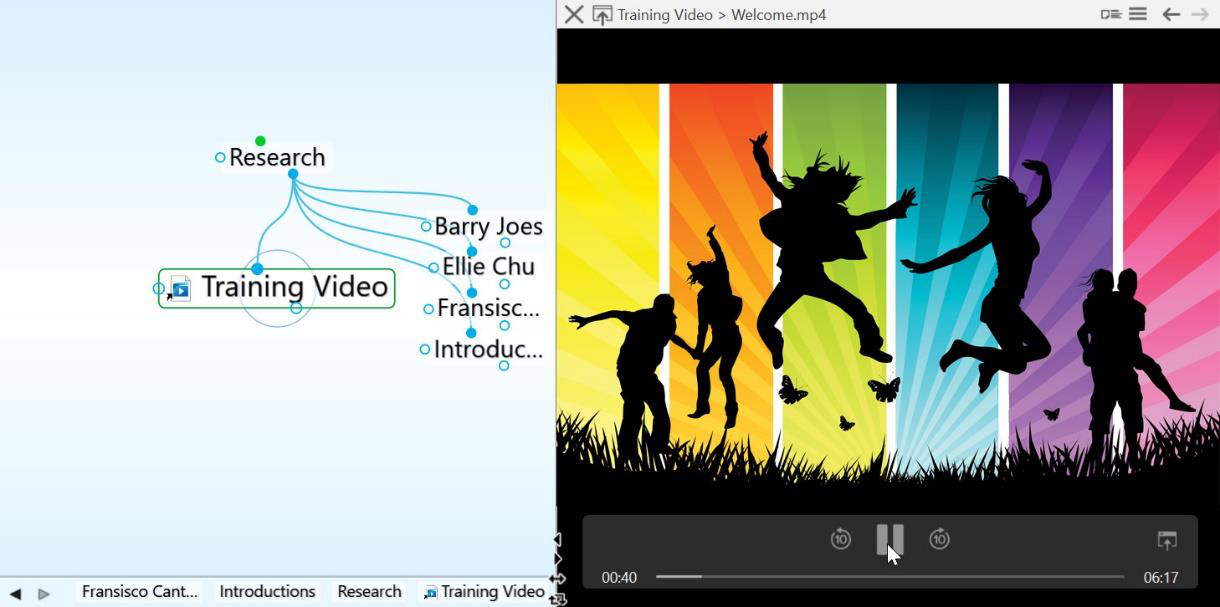
Figure 241. TheBrain’s Built-In Media Player
Supported File Types
| Media Type | Windows and macOS | Windows Only | macOS Only |
|---|---|---|---|
| Video | mov, mp4, h264, h263, mpeg, mpg, avi, mkv, wmv | mkv | 3gp |
| Audio | mp3, wav, aac, ts, flac | pcm, wma | aiff, ac3 |
Tip:
Attachments can be moved between thoughts by using drag and drop directly from the content area to another thought that is visible in the plex.
Action Menu for URLs
An attachment that is a web page has a slightly different menu—and it’s also slightly different based on whether it’s showing in the note or with the attachment “in place,” meaning in TheBrain’s built-in browser. Access the menu by either right-clicking attachment in the note or by the Actions menu button in the content area where the web page is displayed.
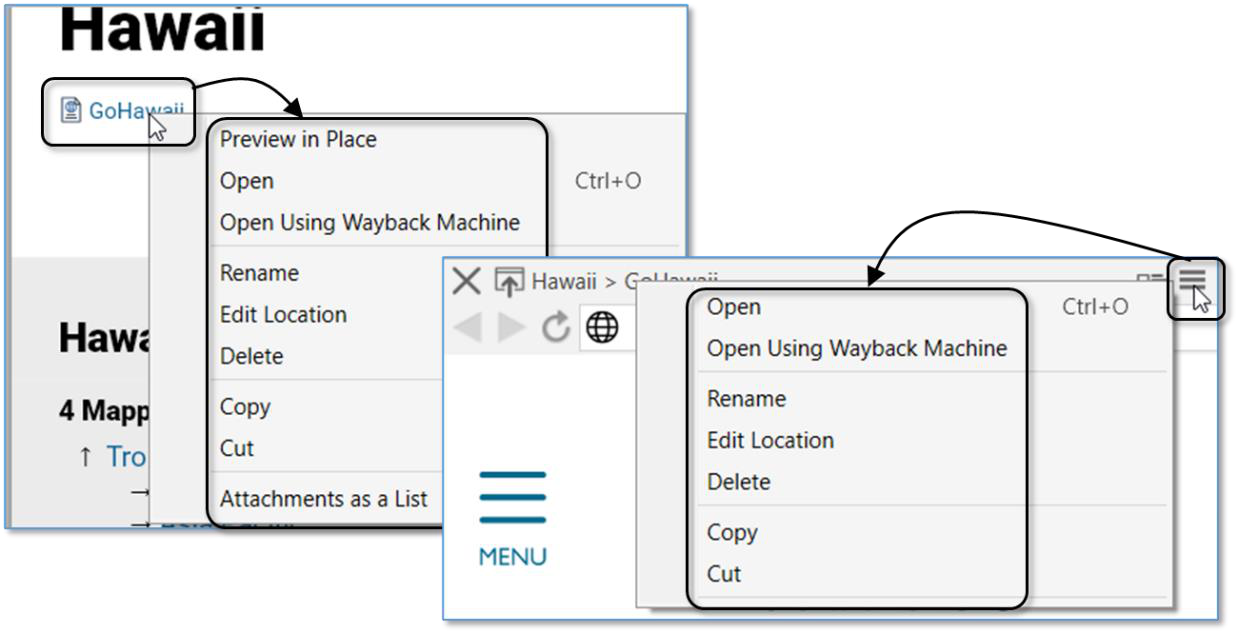
Figure 242. URL Attach Menu in Notes and in Place
- Preview in Place: Open the page within the content area in TheBrain’s built-
in browser.
Open: Open the selected web page in its default application.
Open Using Wayback Machine: Open an archived web page for the URL.
Rename: Change the name of the selected attachment (not the URL itself).
Edit Location: Change the URL address for the selected attachment.
Attachments as a List: By default, attachment links appear one after
another, wrapping to a new link when there are more than fit in one line. This
option shows each link in a separate paragraph.
The rest of the commands work as they do for file attachments.
When a thought’s attachments are modified, the modification date of the
thought is also automatically updated, improving the accuracy of your searches
and filters.
Viewing Attachments as a Slideshow
Use the Next and Previous navigational arrows in the top-right corner of the content area toolbar to browse through attachments.
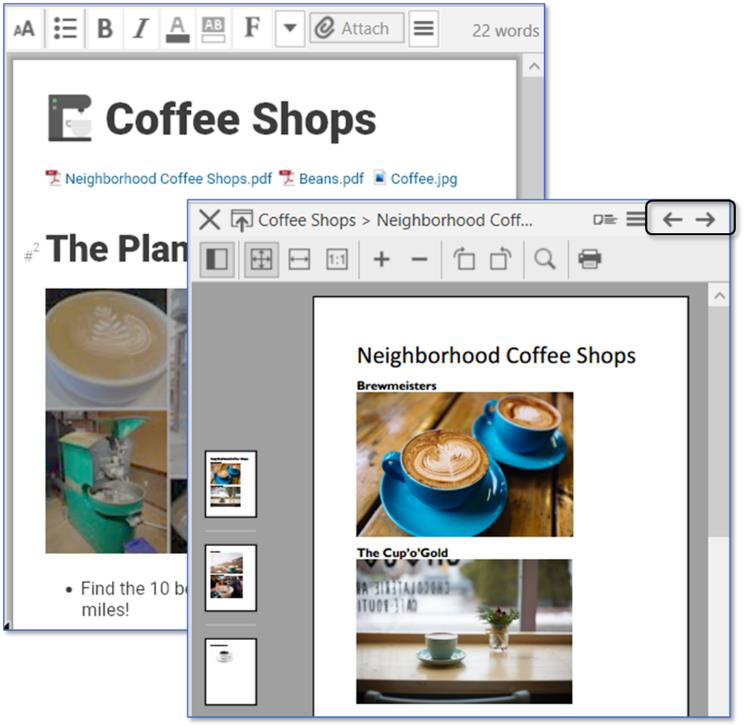
Figure 243. Next and Previous Arrows
To view attachments as a slide show:
Click the first attachment, then click the Next button to display the next attachment.
For multi-page attachments, click a thumbnail to jump to a specific page.
To return to the notes, just click the Close button (X) at the start of the Notes -
toolbar (or keep clicking the Previous button until the notes appear).
To view pictures in notes as a slide show:
- Double-click the image you want to see first to maximize it, then click the Next button to display the next picture.
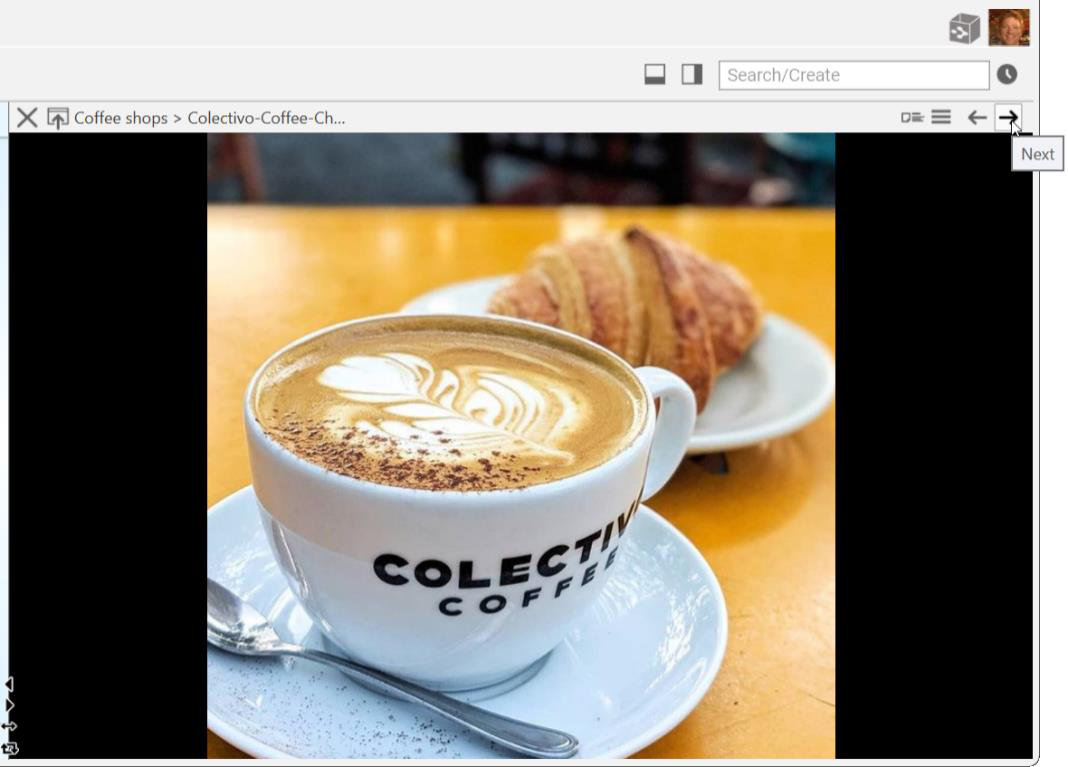
Figure 244. A Picture from Notes in Slideshow Mode
Working with Multiple Attachments
You can add multiple attachments to thoughts and you can have many types of attachments for a single thought. For example, if you have a thought for a person, you might attach their blog as a web page, and their resume in a file—all in the same thought.
Multiple attachments can be brought into TheBrain at a single time using drag and drop or copy/paste.
When there is more than one attachment, the number of attachments is displayed on the thought icon. For example, the thought shown below has two attachments:
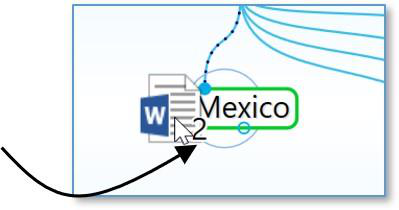
Figure 245. Number of Attachments Indicator
For keyboard navigation, when opening a list of attachments for a single thought, the first attachment will automatically be selected.
Keyboard Commands for Selected Attachments
You can use your keyboard to move the cursor from notes, up into the
attachments area to select individual attachments that are associated with a thought. Once an attachment is selected, the following keyboard shortcuts can be used:
- Space = Open/Preview
- Enter = Rename
- Backspace/Delete = Delete (confirmation prompt will display)
- Ctrl/Cmd+C = Copy
Cut/Copy Attachments Within a Brain
Existing attachments within a brain can be cut or copied onto your clipboard. You can then paste to a new thought in the same brain, a different brain, or to a different directory/location on your system. Right click on an attachment, or use the arrow keys to navigate the cursor up to a selected attachment while editing a note
Creating an Event as an Attachment
You can use the
Create Event
command on the
Attach
menu in the content area toolbar to add events to your thoughts. Please see the Managing Events section on page 229 for details.
Adding a Template File to Your Brain
There may be types of files that you create frequently that share a common look and feel. For example, you may prepare correspondence using a common letterhead. You can designate template files that will be at your fingertips whenever you create attachments.
To create a template file:
- Click the Attach button in the content area, then click the Add File from Template command.
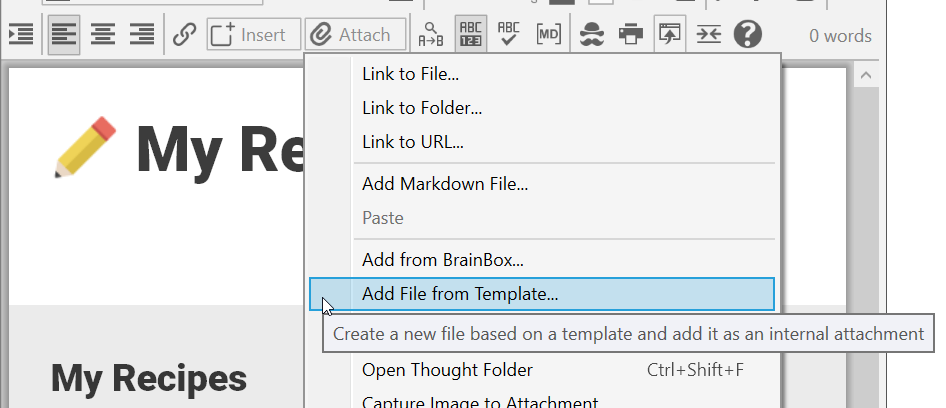
Figure 246. Adding a File from a Template
- In the Create File from Template tab, any previously created templates will appear under the “User Templates” heading and the built-in templates will appear under “System Templates.” Click the file type of your choice.

Figure 247. Selecting a Template
- The associated application will open and you can begin creating your file. Save as usual. After you close the file, TheBrain window will appear. Note that you can switch back and forth between windows—including
TheBrain—as usual, as you’re working. By default, the new file will have the same name as the active thought and it will be saved as an internal file.
Remember to click on Template Help under the Attach button if you want to add new and/or custom file types to your existing template list.
Tip:
If you edit one of the files in your templates folder, save it under a new name in order to preserve your original template.
Pasting an Image as an Attachment
If you have copied an image, you can click the Attach button in the content area, then click Paste Image. The image will become both an attachment for the active thought and its icon. Common file types such as .jpg, .gif, .png and .svg will all preview in TheBrain content area.
Additionally, multiple image files can be copy/pasted or drag/dropped into TheBrain as attachments at a single time.
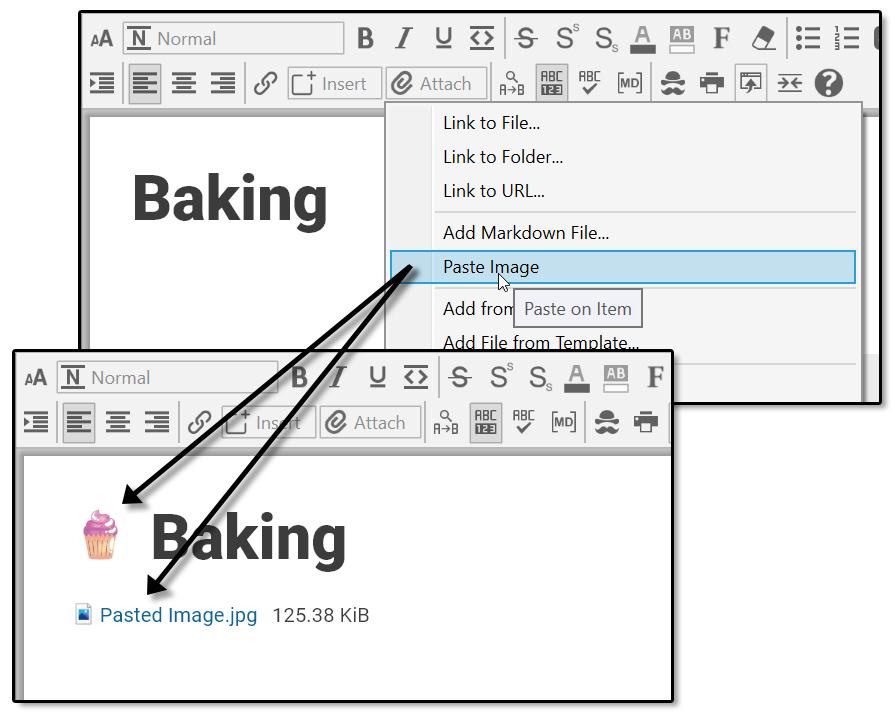
Figure 248. Pasting In an Image
Using the “Save As” Command
You can use any application’s “Save as” command to create a new file inside your brain. For example, if you have opened a Word file that is an internal attachment to a thought, you would click the
File
menu, click the
Save as
command, then enter the name of the new file to create. The new file will automatically appear in a tab of the thought’s content area.
Viewing Related Thoughts in the Content Area
Have you ever wondered whether content in one thought’s note is referencing another thought in the same brain or even if the thought you are on is being
referenced in another note—but you figured it might be too complicated to go searching? Without your having to do anything, the content area displays all
related thoughts.
Related thoughts do not have to be visible in the plex in order to display in the content area.
Thought Mentions
When a thought name appears within notes, your brain recognizes it automatically as a “mention.” Both plural and singular forms of the text are recognized, so exact matches are not required.
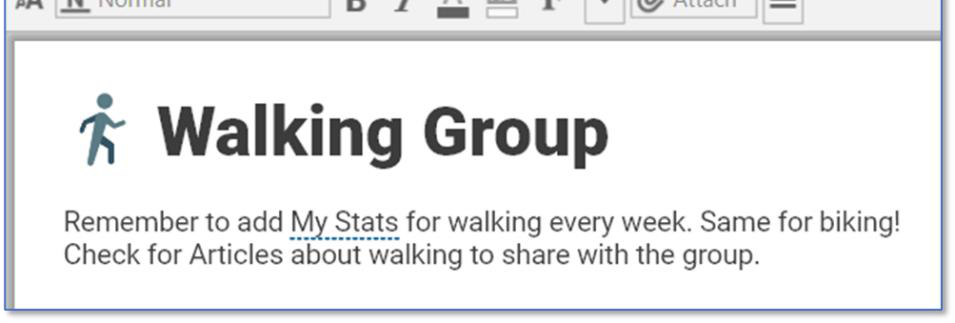
Figure 249. A Thought Mention Underlined in a Note
Right-click on a Mention in a note to either link to or activate this thought.
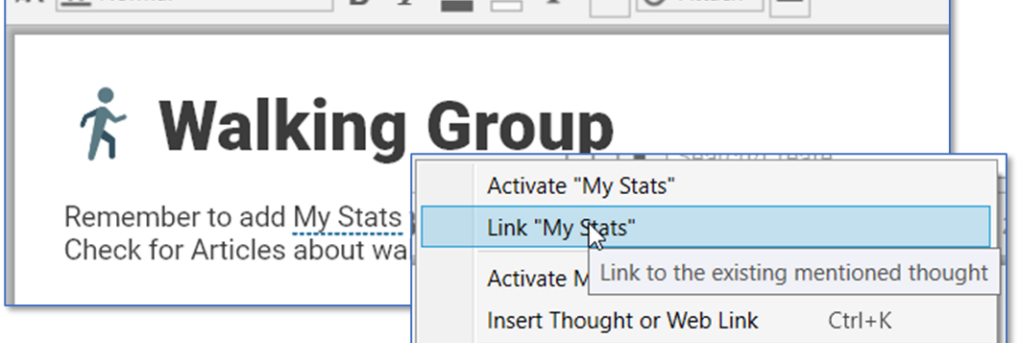
Figure 250. Context Menu When Right-Clicking on a Mention
Below the note are options for displaying more related content within the same brain by opening Mapped Links, Backlinks, or Unlinked Mentions in a footer that can appear below the note:
Mapped Links:
Thoughts that are connected in the plex as parents, children, jumps, or siblings (but do not necessarily have text in common)
Backlinks: Thoughts whose notes link to the active thought
Unlinked Mentions: Thoughts whose notes contain the name of the active thought⎯even if not explicitly linked
Click on any thought name in this display to navigate to that thought. Right click on any thought name to open a context menu with the following options for modifying the relationship between the active thought and the selected thought:
- Link as Parent
- Link as Jump
- Link as Child
- No Mapped Link (unlink)
While mapped links refer to thought names, backlinks and mentions display both the names of the related thoughts and the context of the notes in which they appear.
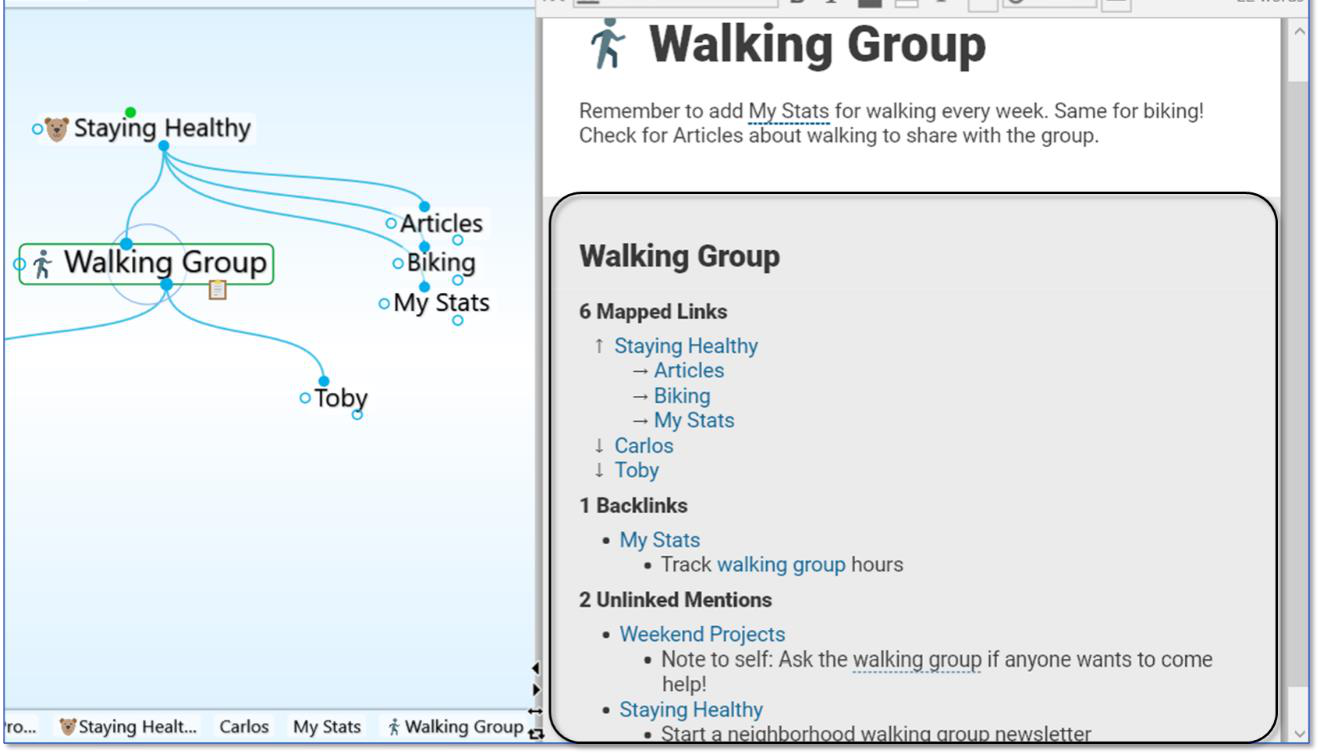
Figure 251. Content Area with Related Thoughts in the Footer
Using Related Thought Links
You can activate any related thought by clicking its link in the content area footer. This enables you to add content to one note from another via links or mentions.
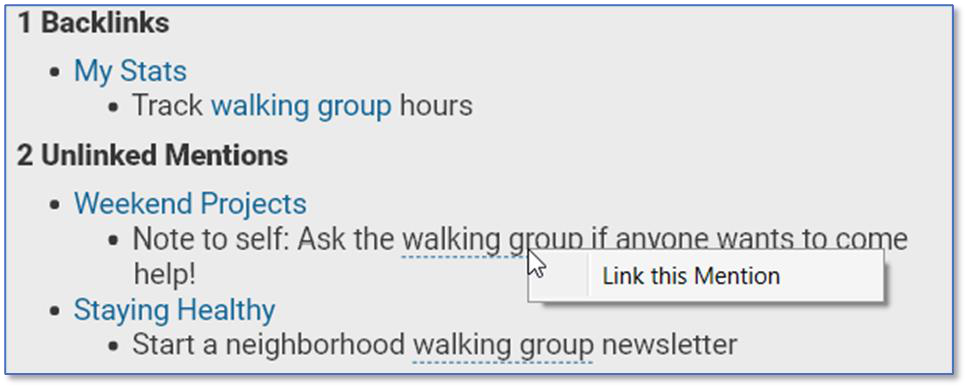
Figure 252. Two Kinds of Links for Related Thoughts
- Click asolidblue link to activate that thought.
- In the footer, click a dashed underline link to display the Link this Mention
command. Once it’s linked to the existing mentioned thought, it will move
from the Unlinked Mention section to the Backlinkssection in the
content area.
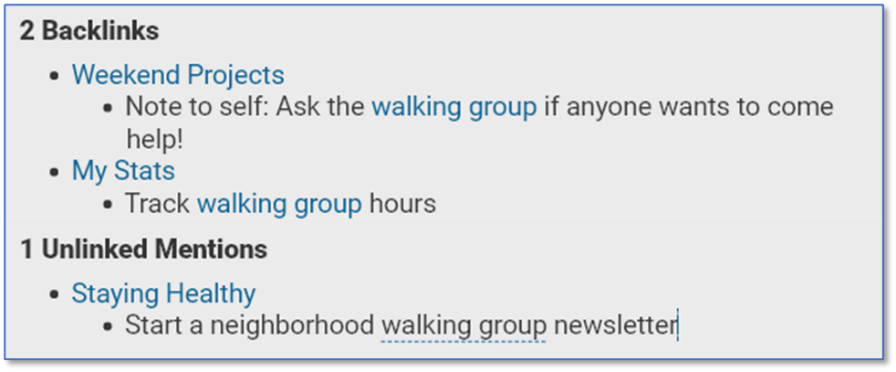
Figure 253. After an Unlinked Mention is Linked
Note that while links appear in blue by default, you can easily change their
color. To do so, select
Brain Theme
in the
Options
menu, then click the color
of your choice on the Colors tab for the Links entry. Click Save Theme to
save your change.
Hiding or Showing Related Thoughts
To hide mapped links, backlinks, or unlinked mentions in the content area:
- Right-click in the Notes area, then click Show Mapped Links, Show
Backlinks, and/or Show Unlinked Mentions in the context menu.
To restore the thought names and/or links and mentions:
- Right-click within the Notes area and click Show Mapped Links, Show
Backlinks, and/or Show Unlinked Mentions in the context menu.
Note that hiding or showing related thoughts is global and applies to your entire brain.
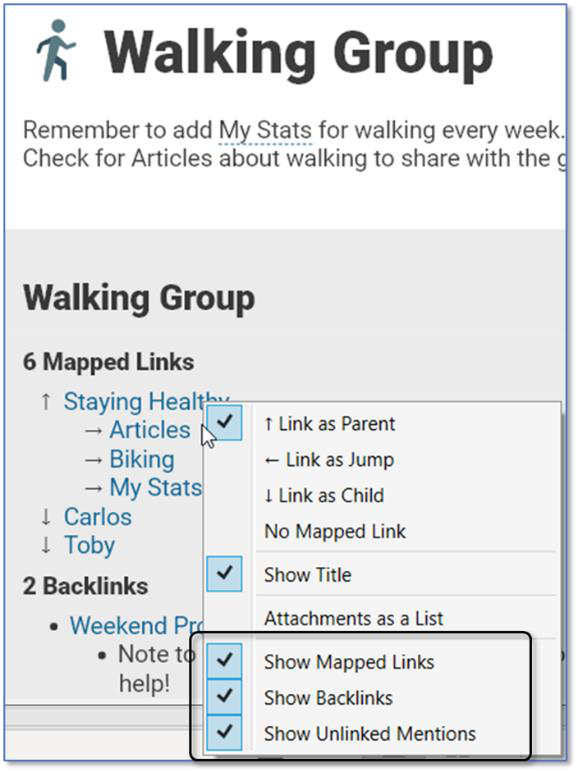
Figure 254. Context Menu Below Notes
You can also use the Notes Editor tab in Preferences to hide or display links and mentions in the content area.
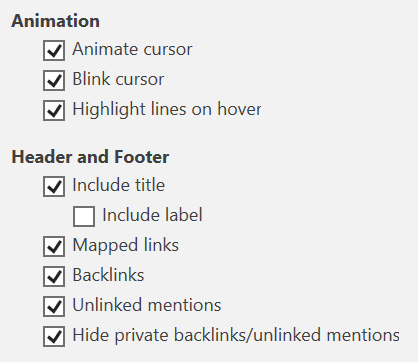
Figure 255. Links and Mentions Section in Notes Editor Preferences
Collapsing and Expanding Related Thought Sections
When you hover over the area to the left of the related thoughts, you’ll see down- and right-arrows.
- Click the down-arrow to the left of the current thought name to collapse the entire list. This symbol will become a right-arrow which you can click to expand the entire list.
- Click any other down- or right-arrow to expand or collapse that section or item.
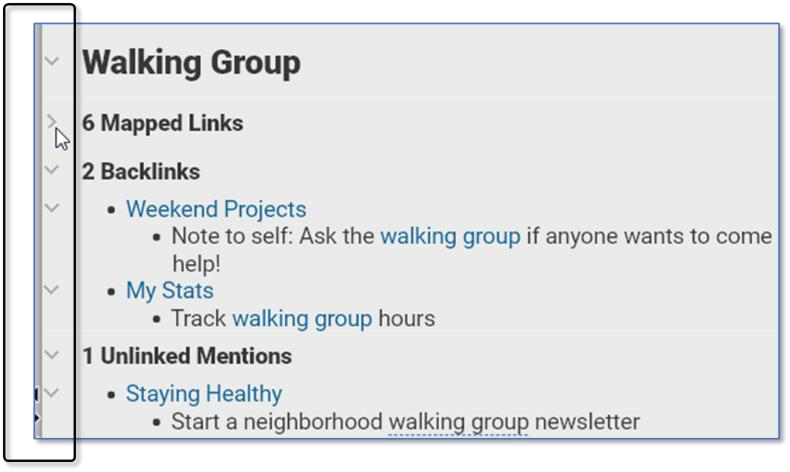
Figure 256. Collapsing or Expanding Sections
You can also collapse and expand sections within note text in a similar way when Heading styles are used.
Aggregating Content
The data in your brain can be aggregated automatically with just a few simple mechanics. When data is aggregated, you can see content from notes about the same subject throughout the thoughts in your brain all at the same time. This ability is powerful and magical!
In the example below, the four backlinks comprise every note that begins with a
“George” heading throughout the brain, organized by the name of the thought
that contains one or more “George” headings.
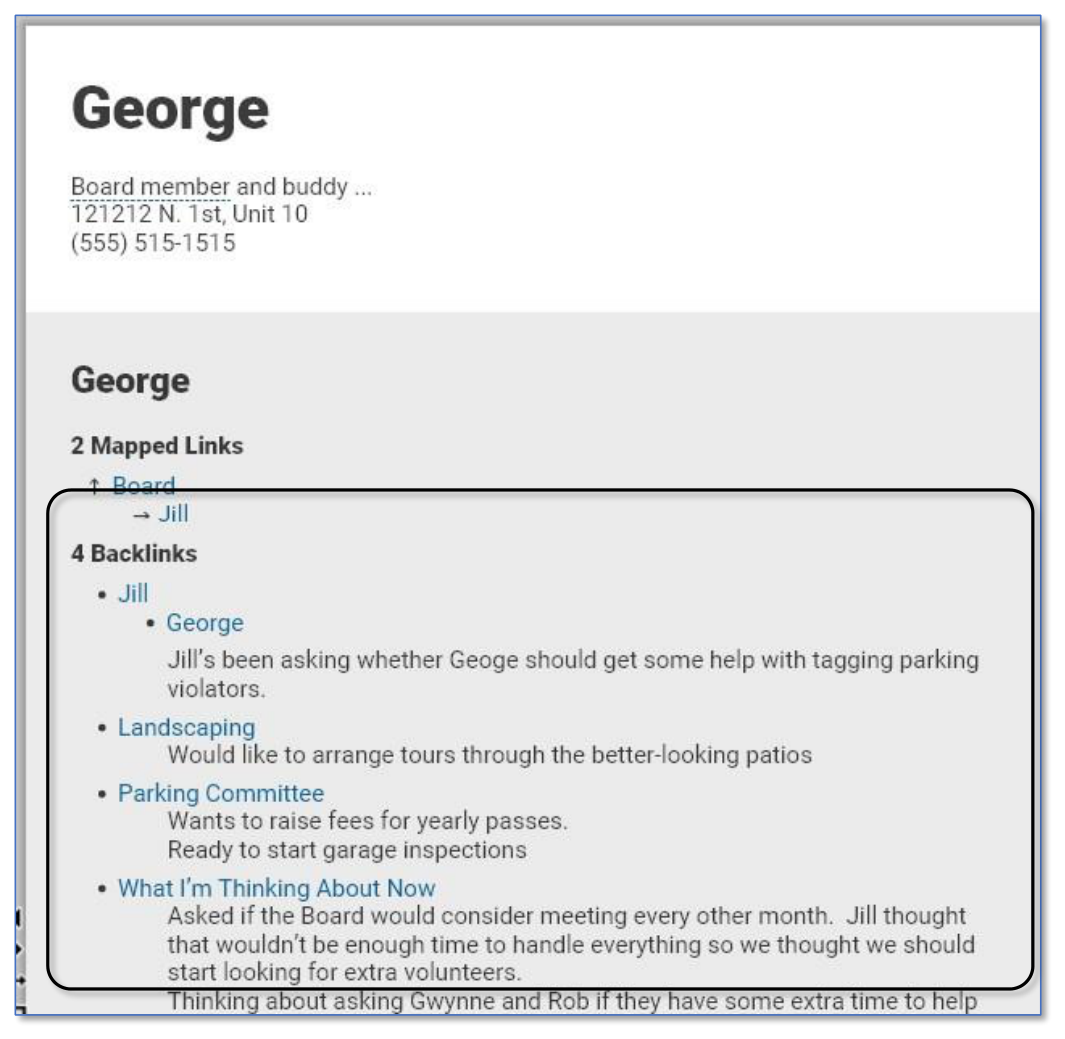
Figure 257. Aggregated Data for “George”
To prepare data to be aggregated:
- Create a thought whose name represents the information you want to see aggregated. In the Figure 257 example, that thought name is “George.” 2. In any thought that has information about “George” (following this example), precede the information with a standalone paragraph. This paragraph should simply have the text that matches the name of the thought for which you want aggregated data—“George” in our example. The text should be attached to a Heading stye.
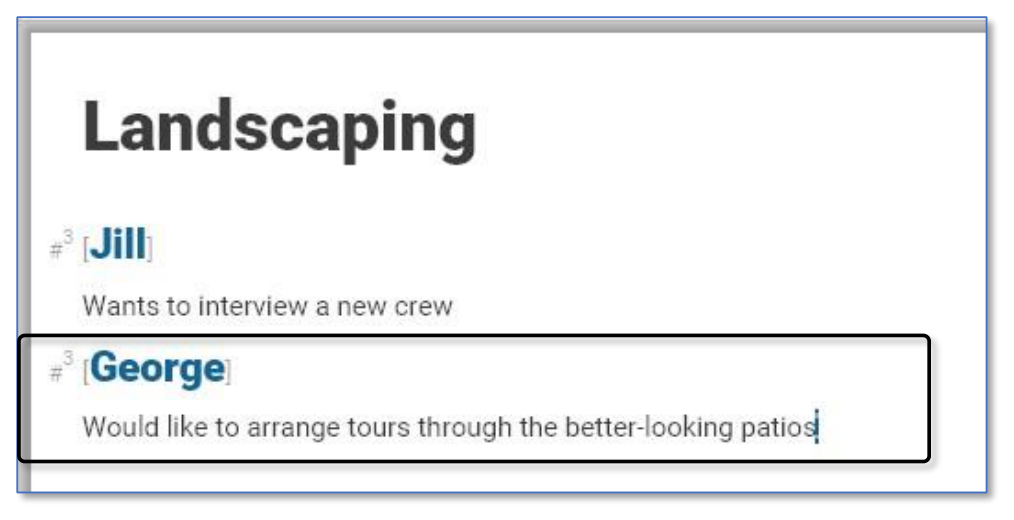
Figure 258. “George” is Formatted as a Heading 3
- Link the Heading by right-clicking it, then selecting Link (thought name).
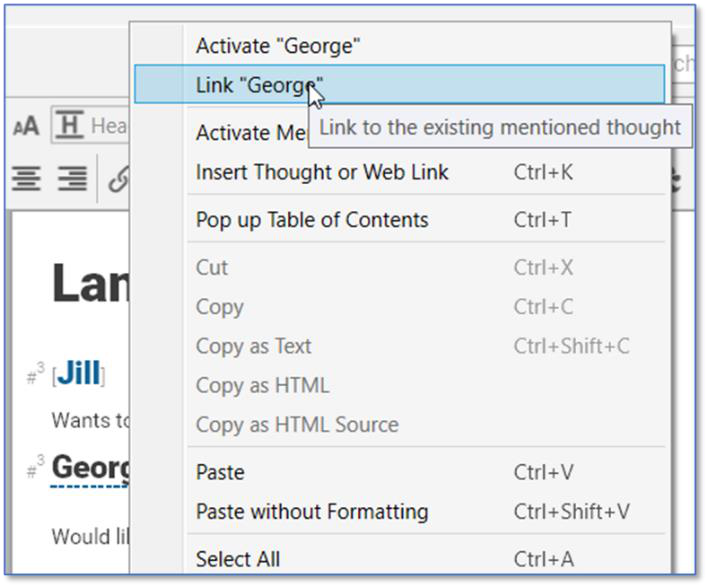
Figure 259. Linking the Heading to the Thought of the Same Name
- In this scenario, the backlink content on the George thought will display all text until it comes to the next #3 (Heading) formatted text.
Any time you activate the “George” thought, you’ll see the information
aggregated, as in Figure 257.
When selecting text in a note, you will have the option to
Add Linked
Thoughts to Selection
if backlinks are also selected.