Customizing Your Brain’s Environment
You may choose to use your brain just as it’s offered “out of the box” or you may choose to change some of the environmental settings to suit your personal preferences.
TheBrain’s Default Settings
Without making any changes, here’s what your brain looks like:
The area where your thoughts appear (the plex) will be the color and design of one of TheBrain’s “Themes.” The initial theme is randomly selected and you can change it at any time.
The left half of TheBrain window will display your thoughts and the right half of the window will display the “Content Area” which holds notes and any other items you will attach to your thoughts—files, web pages, Events, etc.
Your thoughts will be displayed in “Normal” view, meaning that you will see only the direct parents, children, jumps, and siblings of the active thought.
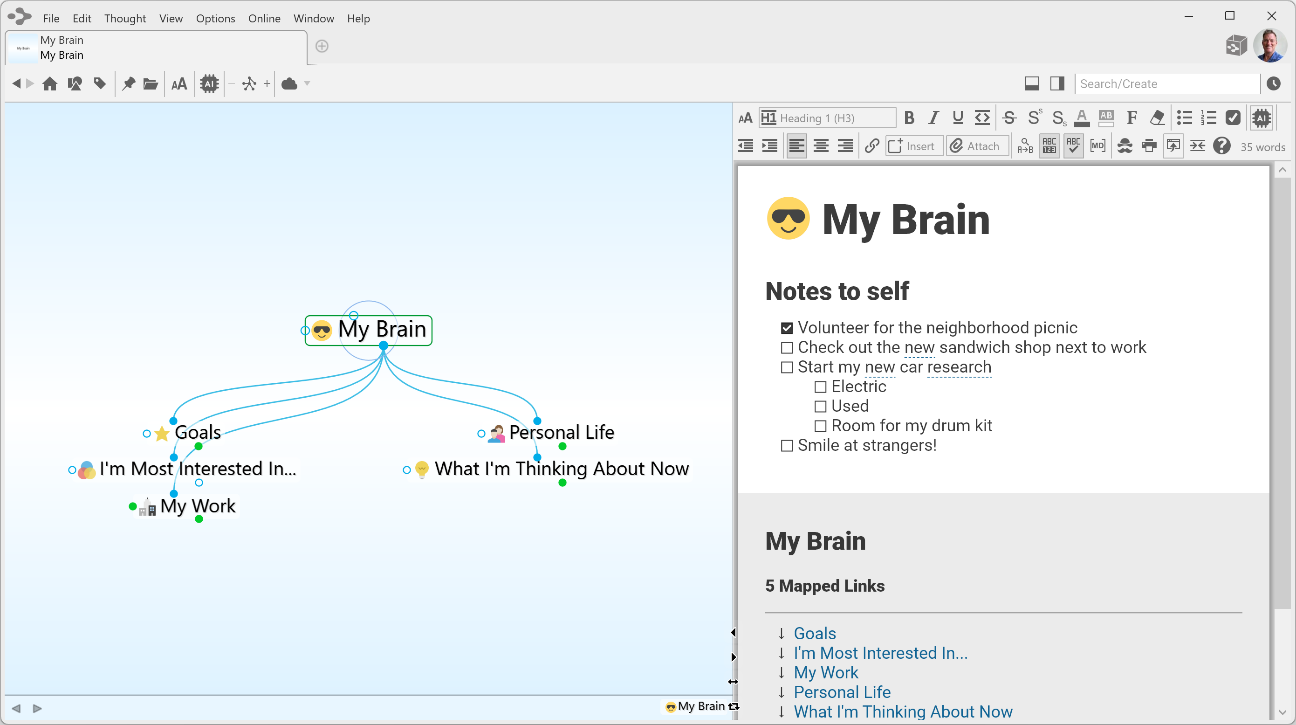
Figure 45. TheBrain Window with Default Settings
Using Smart-Splitter to Arrange TheBrain Window
The smart-splitter controls let you manage where the plex and content area display relative to each other in the Brain window.
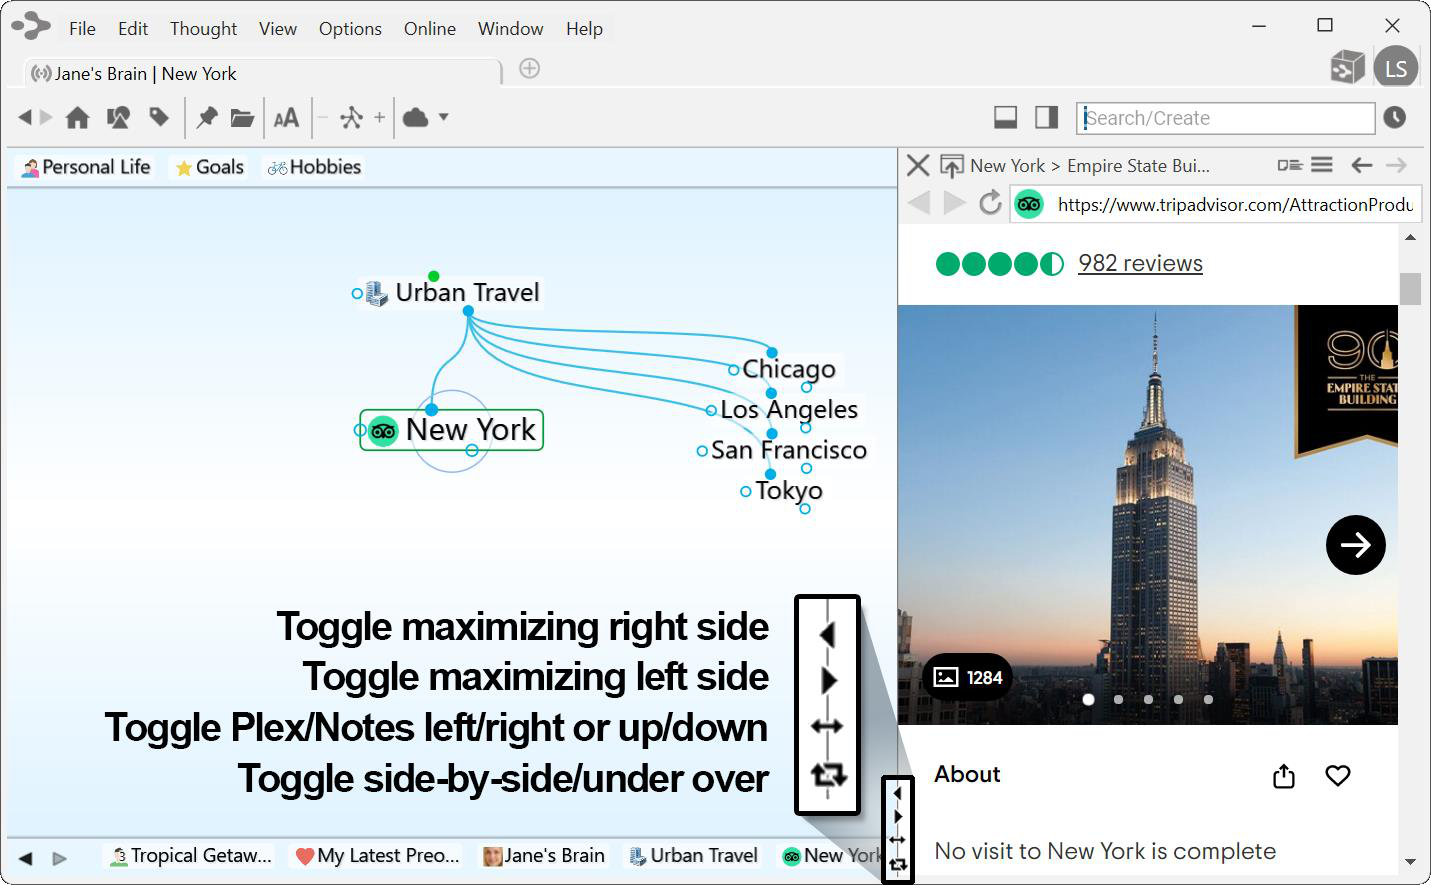
Figure 46. Smart-Splitter
Click the individual left- and right-arrows (or up- and down-arrows if the window is in “over-and-under” mode) to maximize the area the arrow is pointing towards (either the plex or the content area).
Click the double-headed arrow icon to toggle the plex to the right or left side of the content area.
Click on the two-arrow icon that forms a box to toggle between seeing the plex and content area "side-by-side" or “over-and-under.”
You can also point at the border between areas and click and drag when the double-headed arrow appears to move the border.
Moving Thoughts in the Plex
When the default settings are in use and the plex is in “Normal” view, you can move the thoughts in the plex up or down, vertically, by dragging (up or down) in any blank area of the plex background.
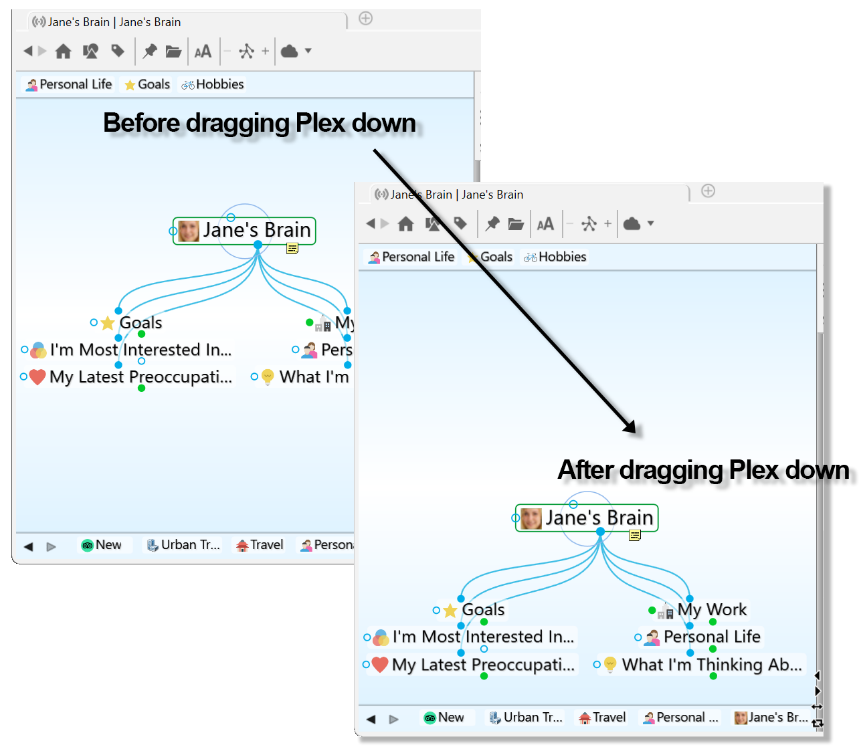
Figure 47. Dragging the Plex Vertically
Resizing Thoughts in the Plex
The plex is the heart and soul of TheBrain. You can change the size of thoughts in the plex by using TheBrain toolbar or your keyboard and mouse.
To change the size of thoughts using the toolbar:
- Click the AA button to activate the slider, then click and slide the bar up or down to grow or shrink the size of your thoughts.
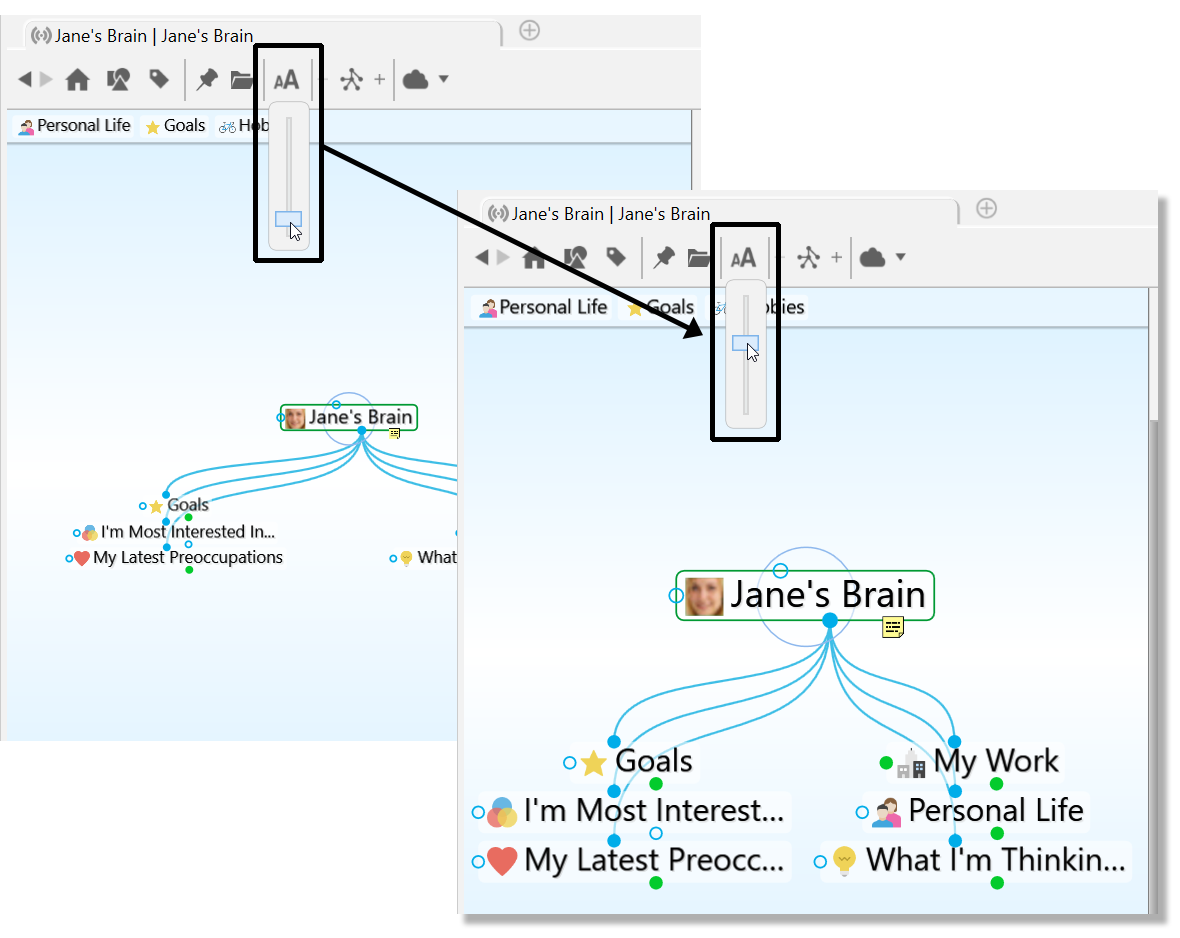
Figure 48. Resizing Thought Size with the Slider
To change the size of thoughts using the keyboard, mouse, or trackpad:
- Hold Cmd (macOS)/Ctrl(Windows) on your keyboard and scroll up or down
on your mouse wheel or trackpad while your mouse pointer is in the plex.

Figure 49. Resizing with the Mouse or Trackpad
- Hold Cmd (macOS)/Ctrl (Windows) on your keyboard and press - to make
thoughts smaller or + to make thoughts larger.

Figure 50. Resizing with the Keyboard
- Pinch to zoom on a macOS Trackpad.
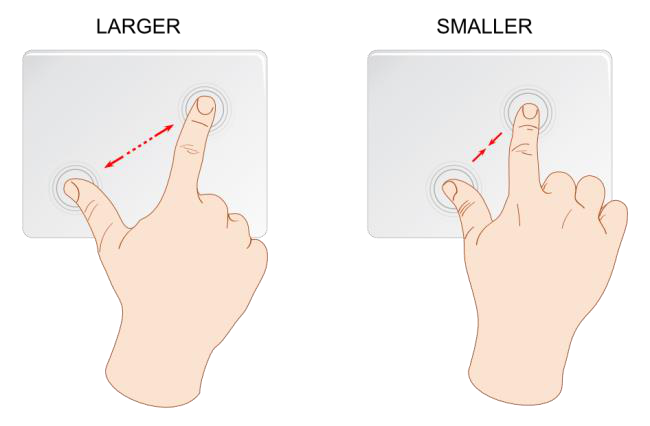
Figure 51. Resizing on a Trackpad
Customizing a Brain’s Appearance
Selecting a Theme
The Themes feature lets you choose from many built-in designs to customize the look of your brain, including the appearance of the plex and notes in the content area. You can change many of the default colors and the style of notes
associated with the Theme, then save the look of your brain as a new Theme. This lets you quickly switch from one saved Theme to another.
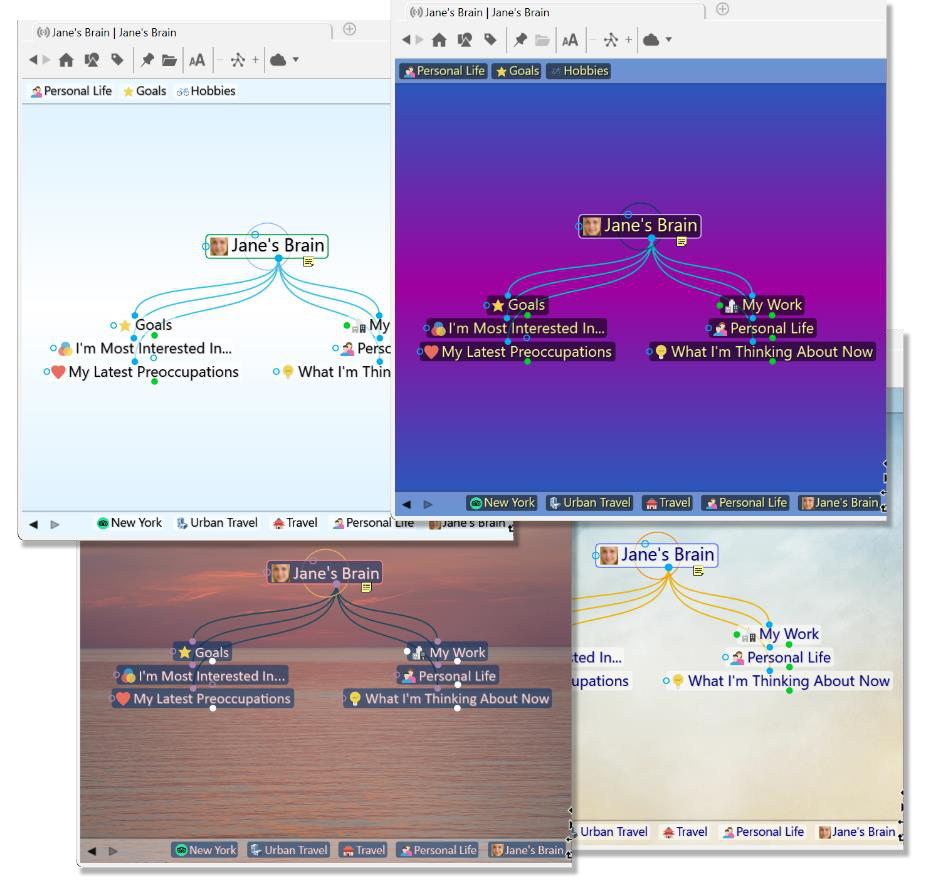
Figure 52. Sample Themes
To select a Theme:
Either click the Options menu in TheBrain toolbar (TheBrain menu on macOS) or right-click any blank space in the plex.
Click the Brain Theme command.

Figure 53. Accessing the Brain Theme Dialog Box
In the Brain Theme box, you’ll see a scrollable list of available themes in the left panel and Colors and Options tabs in the right panel. Click on any Theme to see how it looks in the plex.
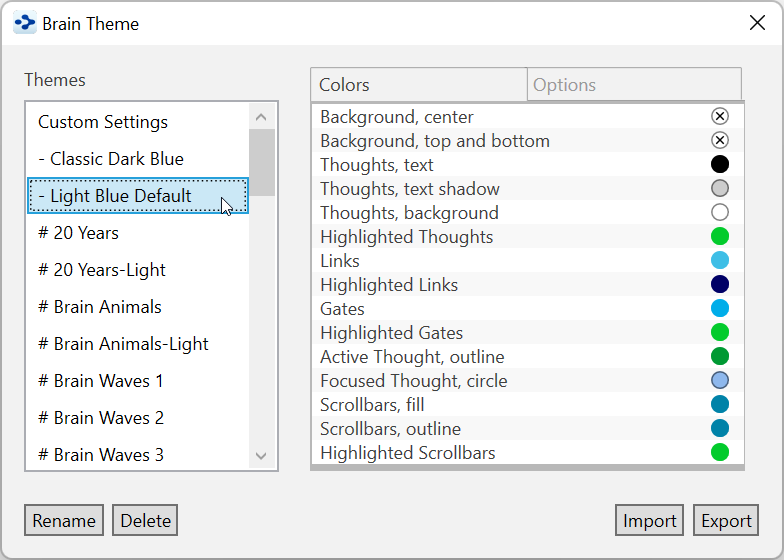
Figure 54. The Brain Theme Dialog Box
Customizing a Theme’s Colors

Have the
Brain Theme
box open when you want to customize a Theme (right- click a blank area of the plex, then click the
Brain Theme
command).
The default colors for virtually all items in the plex vary based on the selected Theme. The current color for each item is shown in the circle to the right of the item’s description. Scroll through the list in the Colors tab to get an idea of all of the items that can be changed.
To change the colors in the selected Theme:
Click the item whose color you want to change to display your choices.
Click the color of your choice, click outside of the box of colors to close it, then click Close (X) (or press Esc) to close the Brain Theme box.

Figure 55. New Selected Color for Links
Note that while you can change the color of the shadow for thought text using the theme’s Color tab settings, you can toggle whether or not text shadows
are displayed using the
Look & Feel
tab of the
Preferences
window (as explained in the Look & Feel Preferences section on page 62). By default, text shadows are displayed.
When you are happy with your color selections, click the Close button (X) in the Brain Theme box.
Defining and Selecting Additional Colors
You can add customized colors if you don’t see the exact shade you want.
- In the color selection box, click the color that’s closest to what you want, then click the box next to “Custom,” then click the Define Custom Colors button.
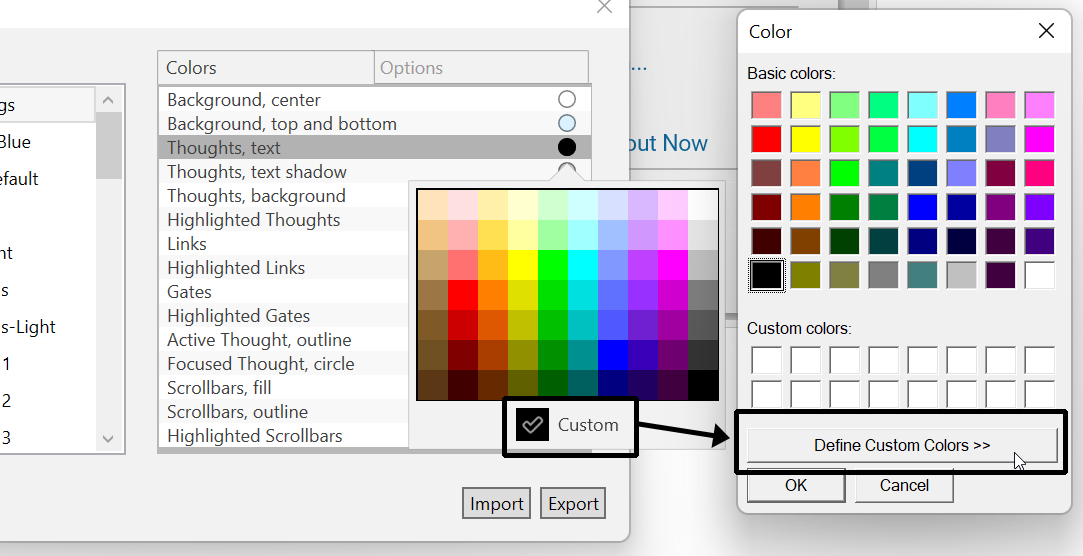
Figure 56. Define a Custom Color
- The Color window will expand to provide a slider to fine-tune the shade.
You can also select a different color and fine-tune it or type in specific RGB
or HSL numbers. Click the Add to Custom Colors button when you’re
happy with the sample color, then click the OK button.
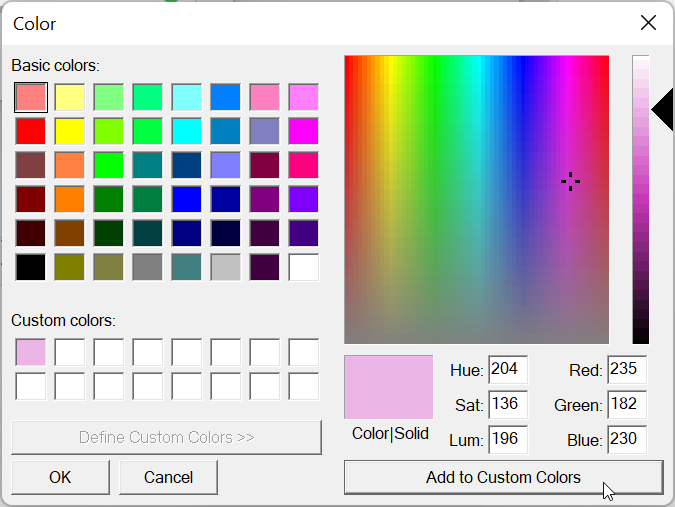
Figure 57. Adding a Custom Color
Selecting a Custom Image for the Plex
If you want to use an image of your own instead of using one in the Themes list
of the Brain Theme box, it’s very easy to do so.
To select your own background image:
- Click the Options tab in the Brain Theme box, then click the Wallpaper check box.
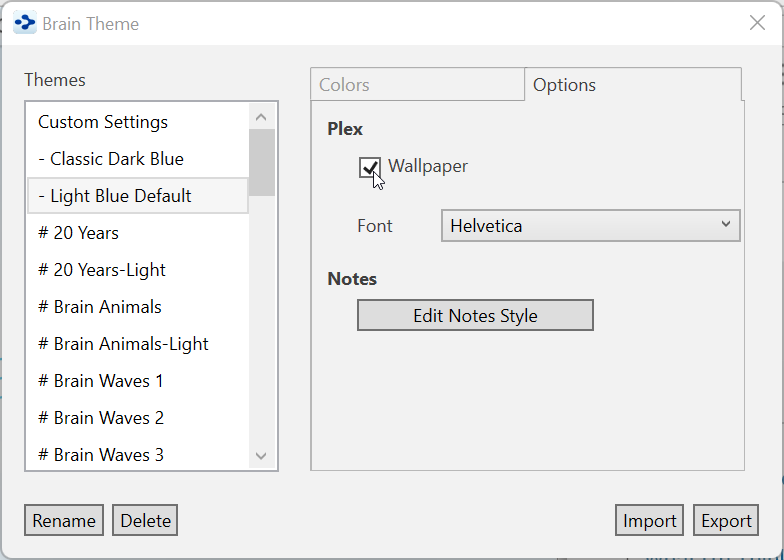
Figure 58. Options Tab in the Brain Theme Dialog Box
In the Select image file as the wallpaper window, navigate to the location of your image file, click on it, and then click the Open button. Supported wallpaper file formats include .jpg, .gif, and .png.
Click the Close button (X) in the Brain Theme box to save your new image for the plex.
To replace, remove, or copy a wallpaper image:
To replace the image, click the Select button next to the Wallpapercheck box to navigate to a different image.
To remove the image, click the Wallpapercheck box to toggle off the check mark and remove the image from the plex.
To copy a wallpaper image to your clipboard, click the Copy Wallpaper button
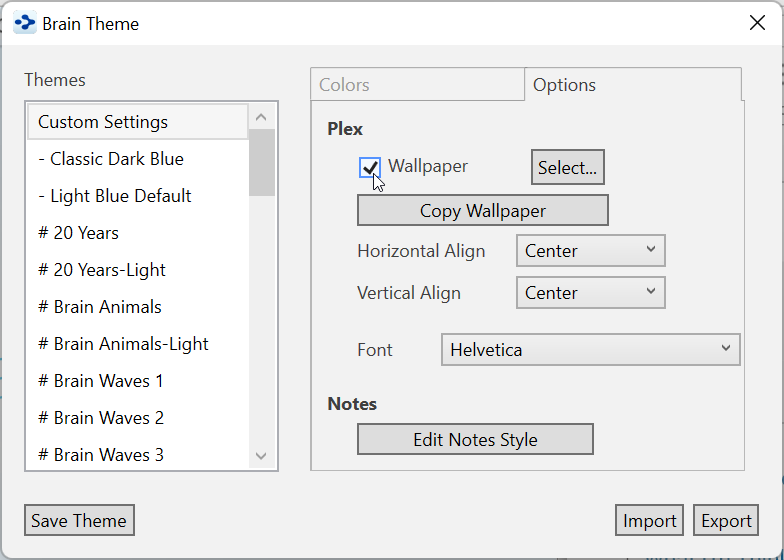
Figure 59. Replacing or Removing Wallpaper
To dynamically select new Wallpaper from a web site:
Go to a web site that offers Wallpaper files, right-click the design of your choice, then select Copy on the context menu.
Return to your brain, right-click in any blank area of the plex, then select Paste Wallpaper on the context menu.
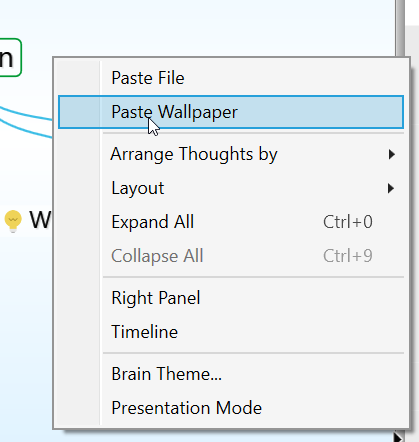
Figure 60. Context Menu on the Plex
Changing the Default Font in the Plex
By default, the font for text that appears in the plex is Helvetica. You can change it to any font installed on your machine:
- Click the Options tab in the Brain Theme box, then click the drop-down button for Font.

Figure 61. Changing the Font for Plex Text
- Click the font of your choice. You will see the text in the plex update automatically.
Changing the Content Area’s Default Attributes
You can select custom colors for your notes’ text, links, page, edge, and
background. You can also change the font, size, weight (boldness), and other attributes for the heading and body text you include in the content area—either before or after you add it. Prebuilt Styles are also available, which you can use as-is, or modify. You’ll see instant previews of the changes you make, before you apply them. And, of course, you can change your changes anytime.
By default, the notes in the content area of your brains appear in a style called “Modern,” which is a sleek and clear combination of font, color, and size.
To begin selecting different style attributes for notes:
Click the Edit Notes Style button on the Options tab in the BrainTheme box, or
Click the Notes Style button in the content area toolbar
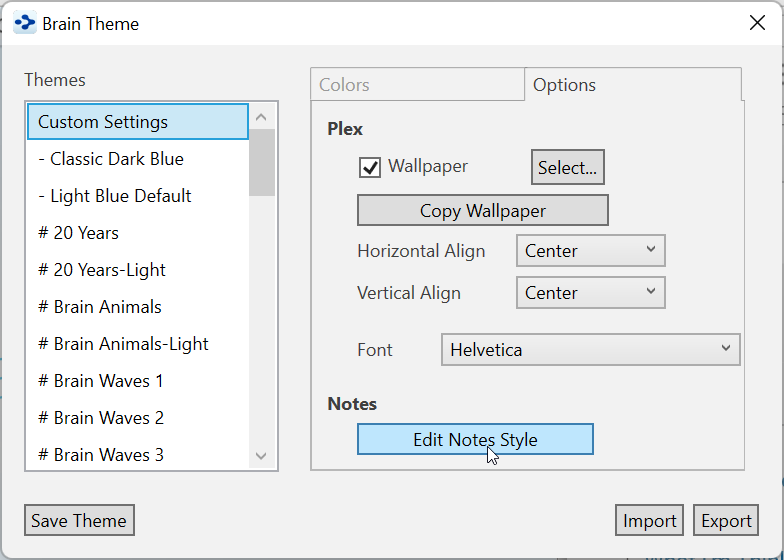
Figure 62. Changing the Style of Notes
You can also access the
Edit Notes Style
dialog box from the content area toolbar. See
Choosing a Notes Style
beginning on page 171.
To change the appearance of headings:
Click on an example heading for the level you want to change. For example, click on “Title Example Text” to change the top-level heading.
Select an attribute from the context menu. Selecting Font, Weight, Color, or LetterSpacing will take you to an additional set of choices.
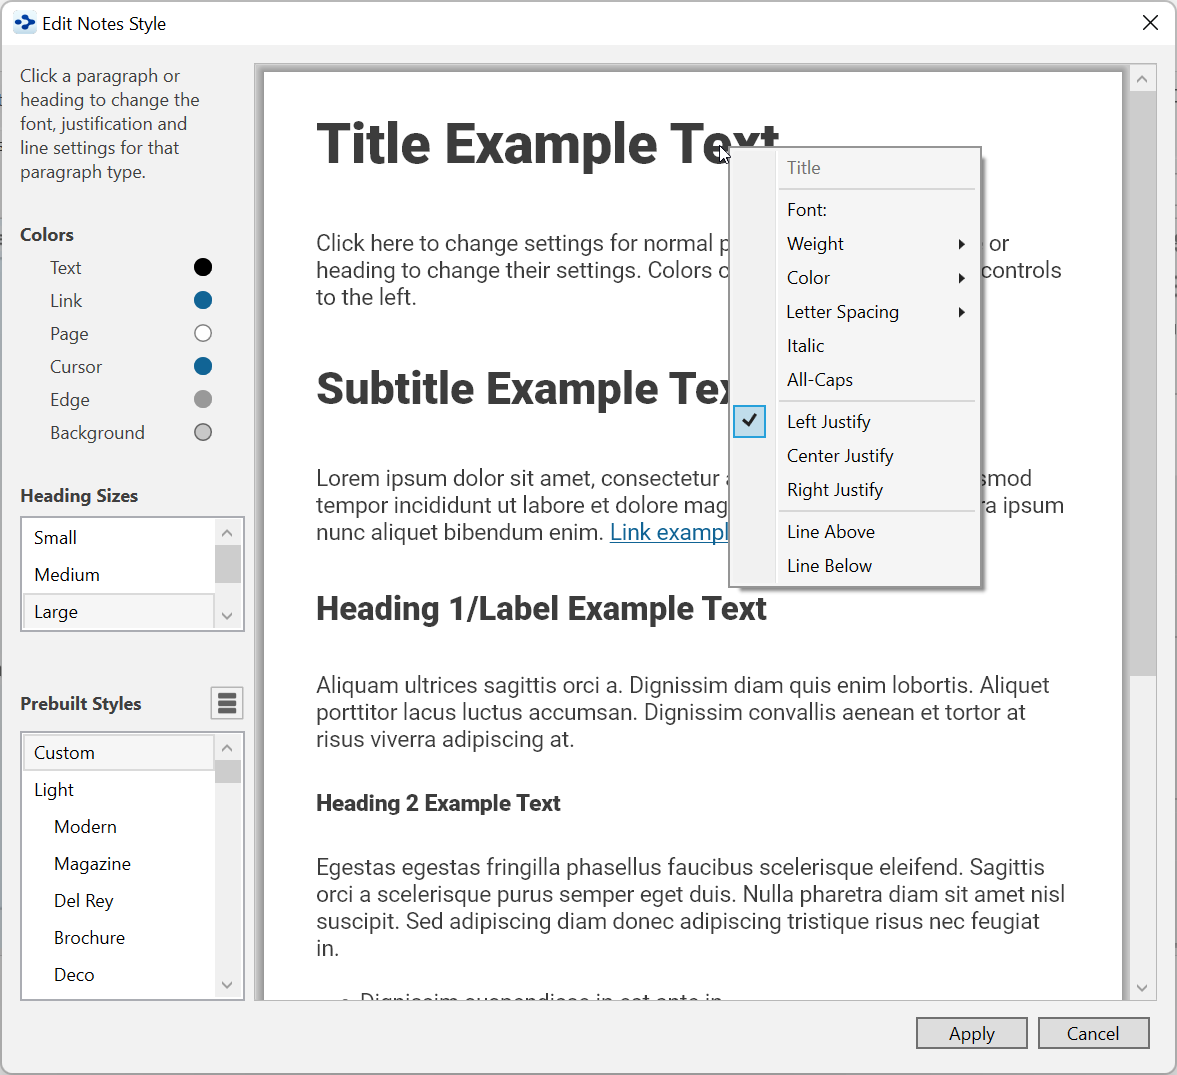
Figure 63. Style Options for Content Area Text
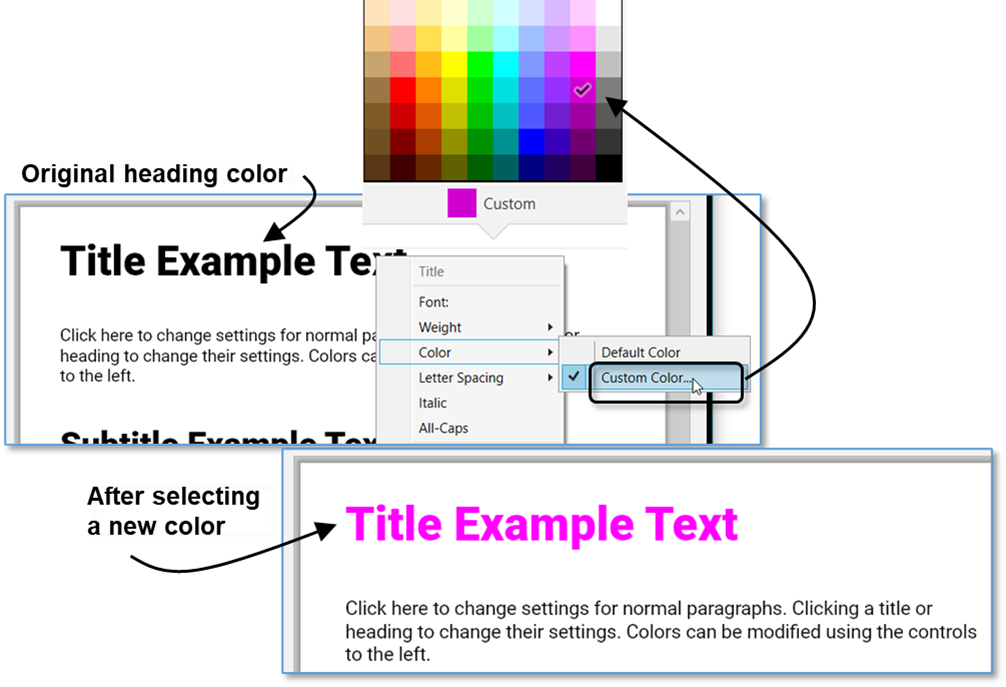
Figure 64. Before and After Changing a Heading Color Style
To select a heading color that isn’t in the palette:
- Click Custom at the bottom of the color palette, click Define Custom Colors, select a color you like, then click the OK button.

Figure 65. Options for Fine-Tuning Heading Text Color
To change the size of headings:
- Click Small, Medium, or Large in the HeadingSizes list. The sizes will adjust automatically, based on the level of each heading.
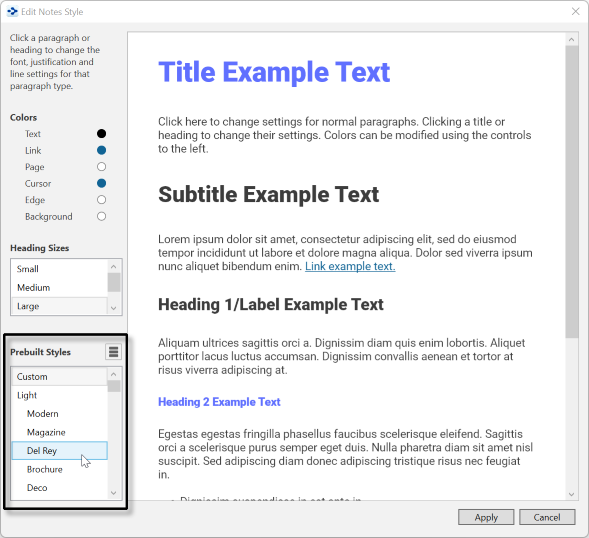
Figure 66. Options for Changing Heading Size
To change the color of non-heading text and other Content Area parts: 1. Click the round color sample in the left panel for the element you want to change.
When the palette opens, click the new color of your choice, or click Custom to select a different color. The example text will immediately reflect your choice. The palette stays open so that you can see what different colors look like when applied.
Click outside the palette to close it, when you’re ready.
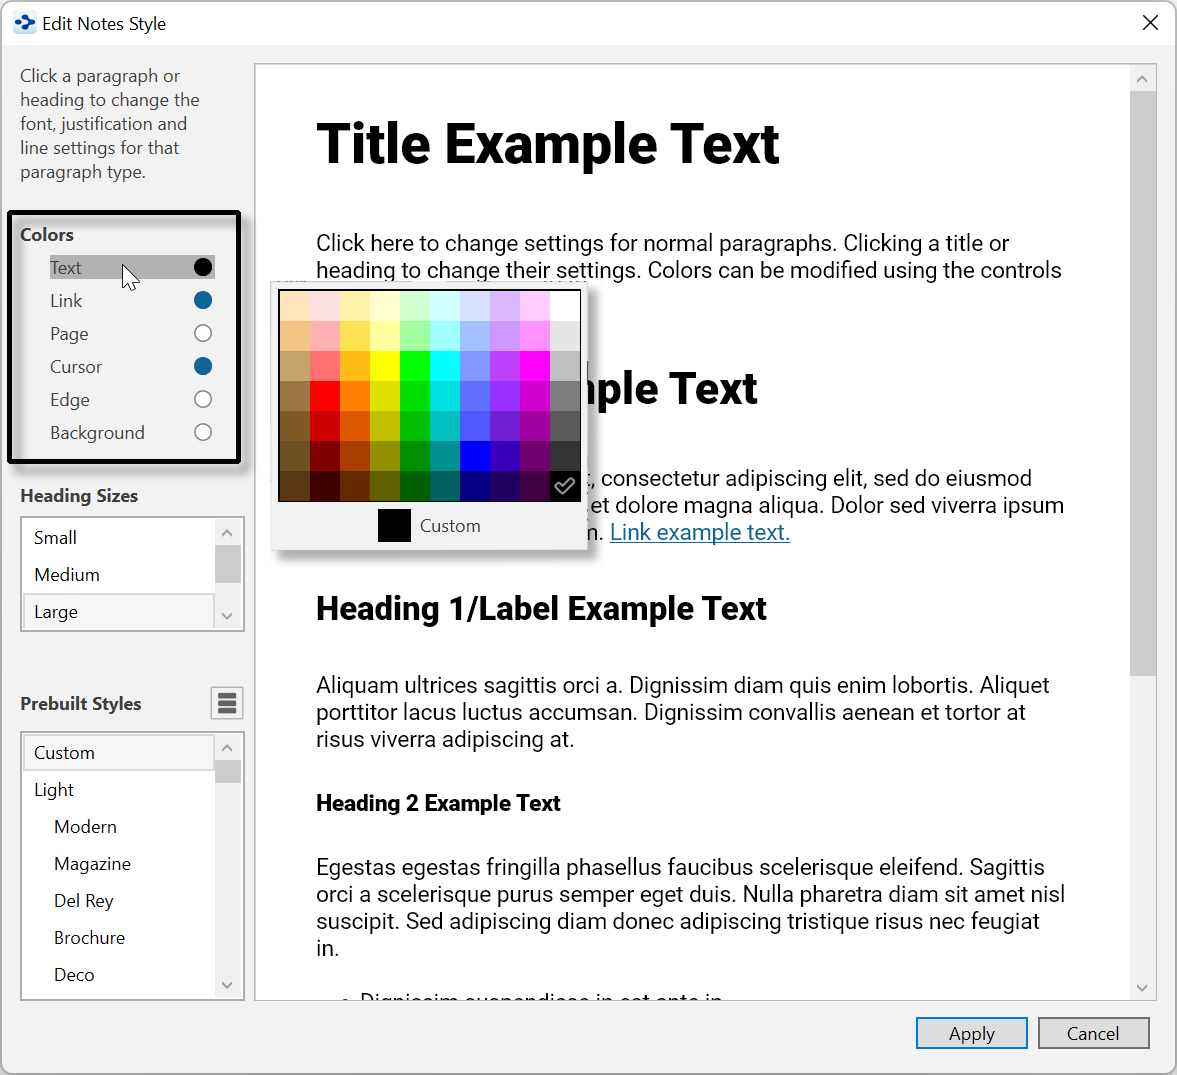
Figure 67. Selecting a New Color for Body Text in the Content Area To change the font or weight of non-heading text:
Click within any non-heading body text, then choose either Font or Weight in the context menu.
To change the font, select a choice in the scrollable list that appears—you’ll find over 1,000 options. Each has a sample of how it will appear.
Press Esc or click outside of the list to close the box if you don’t want to make a selection.
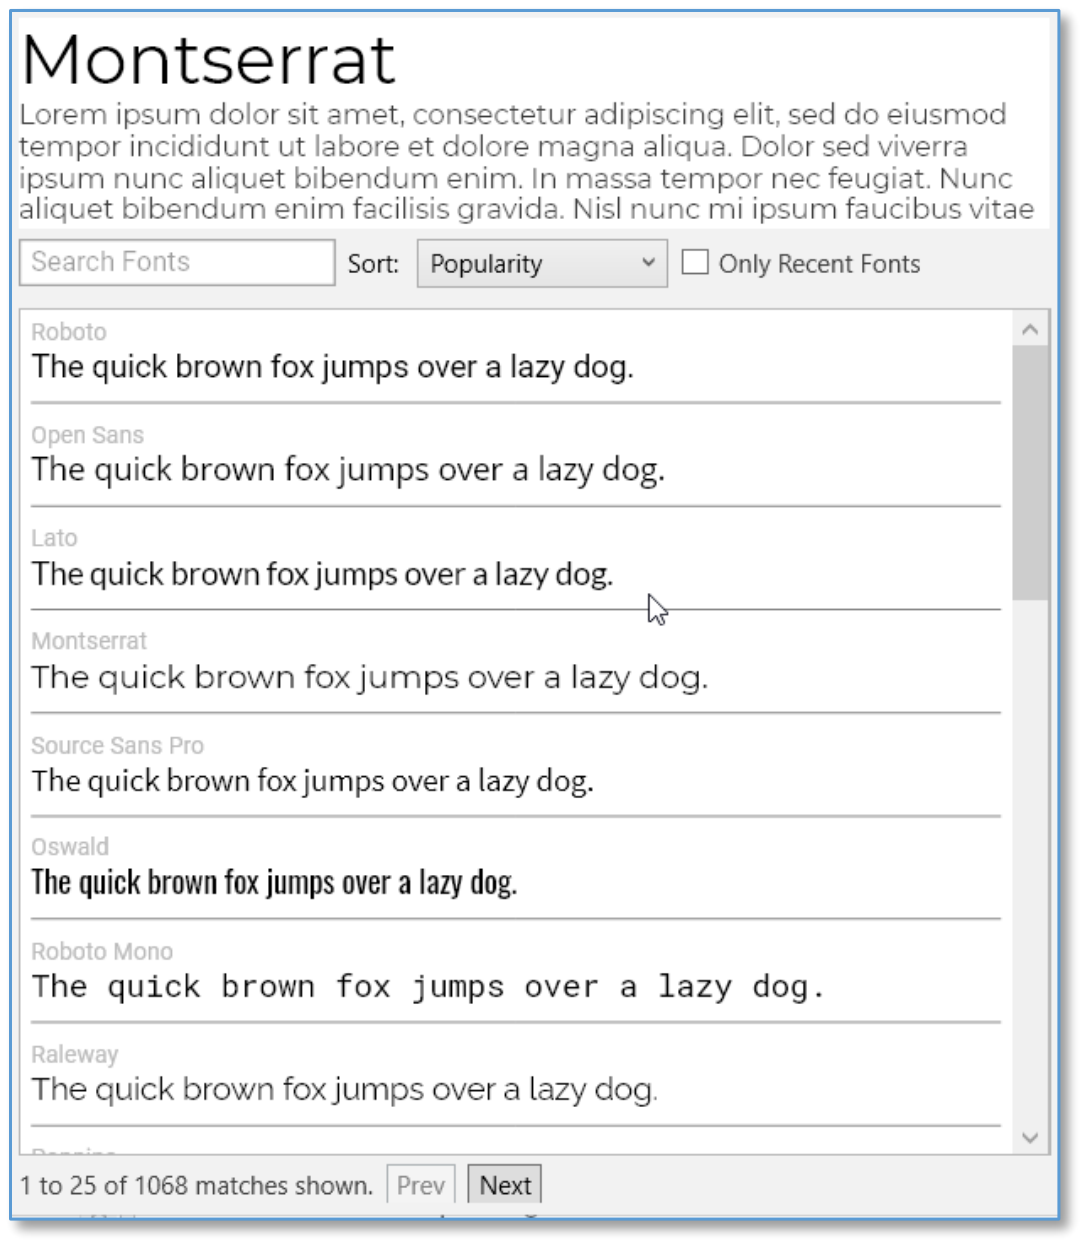
Figure 68. Changing the Font of Content Area Body Text
- To change the weight (the width/boldness of the characters), select a choice from the list that appears.
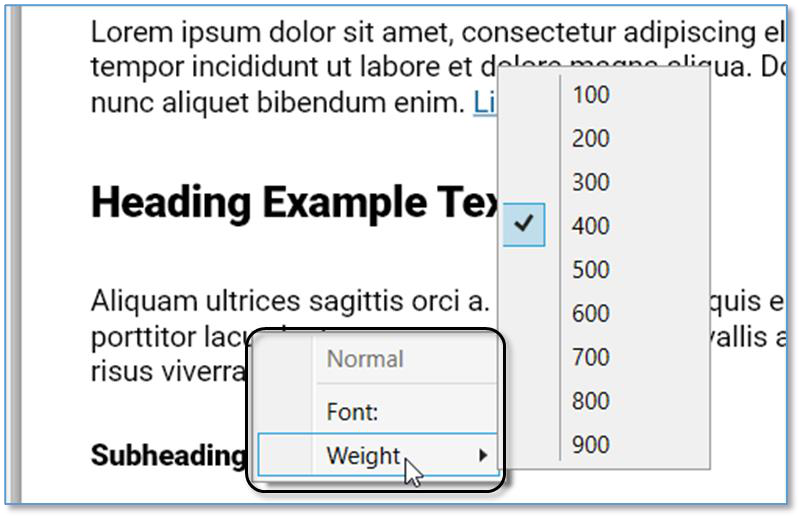
Figure 69. Changing the Weight of Content Area Body Text
Viewing and Selecting Prebuilt Styles
A handy way of seeing combinations of options for the content area is to visit the Prebuilt Styles—if you see one you like, apply it to your brain and see the results
instantly. The list of Prebuilt Styles is grouped into Light, Dark, and Fun sections.
As you click each Prebuilt Style, you’ll see the Example Text instantly reflect the look.
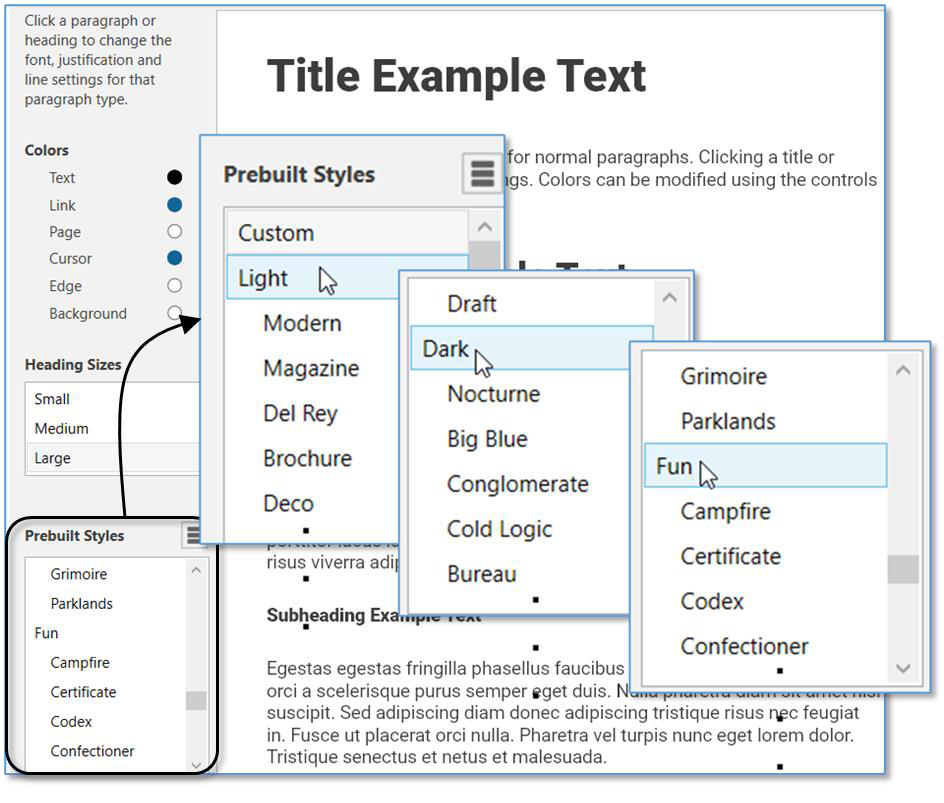
Figure 70. Selecting a Prebuilt Style
Copying, Pasting, Importing, and Exporting Styles
You can copy, paste, import, and export styles, making it easier to create new styles. Click the Actions button to display the Copy, Paste, Import, and Export options for Styles.
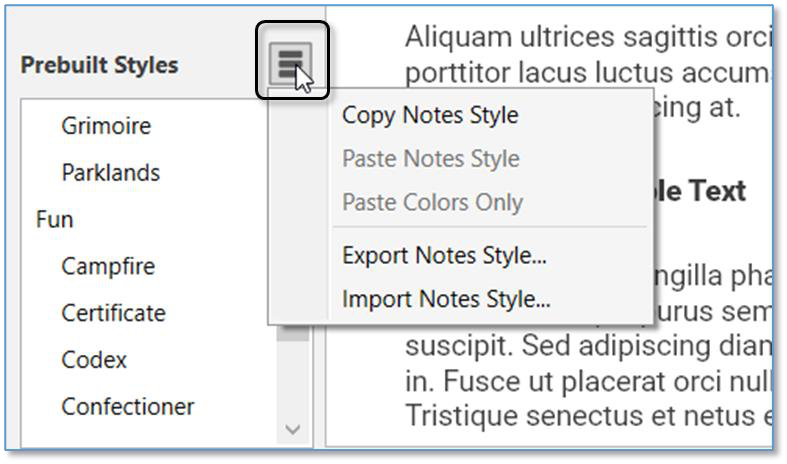
Figure 71. Selecting a Prebuilt Style
Copy Notes Style—Click when you want to apply the current notes formatting in another brain.
Paste Notes Style (available if a note style has been copied)—Click after you’ve opened the brain to receive the style.
Paste Colors Only (available if a note style has been copied)—Click after you’ve opened the brain to receive the color choices in the copied style.
Export Notes Style—Click Save after navigating to a location of your choice for saving the style file. The filename will look like this: Style-2021-08- 13.nstyle (except with the actual date you exported the file).
Import Notes Style (available if a note style has been exported)—with the receiving brain open, choose this option, navigate to the location of the .nstyle file, click Open when the file is selected, then click the Apply button.
Saving Changes
When you are happy with your content area choices, click the Apply button, then close the Brain Theme box to return to your brain.
Reverting to the Theme’s Default Settings
selected in the Themes list.
As soon as you make any changes to a Theme, “Custom Settings” will be
To switch back to the original settings for any Theme, select the Theme name in the Themes list within the Brain Theme dialog box.
Saving Themes
Make sure the tab with the brain that has the Theme you want to save is active in the plex.
Unless the Brain Theme box is already open, either click the Brain Theme command on the Options menu or right-click a blank area of the plex, then click the Brain Theme command.
Click the Save Theme button, click Save as New (so you don’t overwrite the original Theme), then type a name for your new theme in the field.

Figure 72. Save a Theme
- Click the OK button. Your new Theme will be inserted into the list of Themes, ready for use in your other brains.
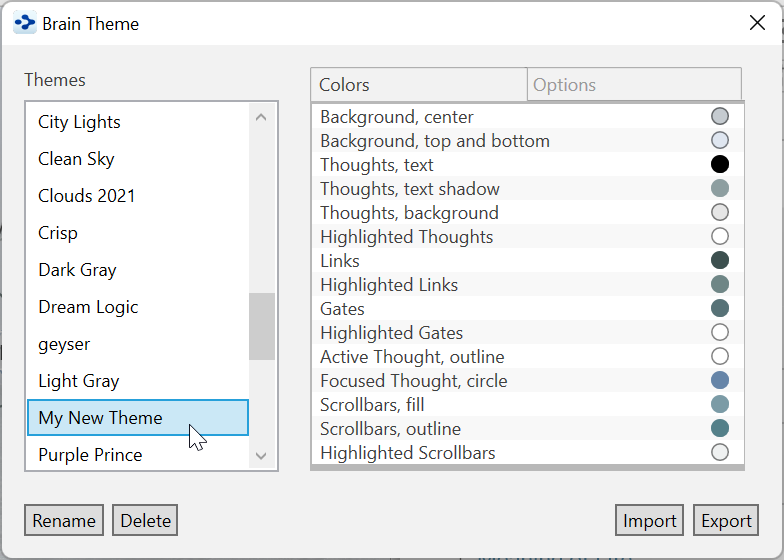
Figure 73. Newly Saved Theme in the Themes List
Your saved Theme will also include customizations you have made in the
Edit Notes Styles
window.
Renaming a Theme
In the Brain Theme box, click the Theme you want to rename, then click the Rename button.
Type or revise the current name, then click the OK button (or press the Enter key).

Figure 74. Renaming a Theme
- Click the Close button (X) to close the Brain Theme box.
Deleting a Theme
- In the Brain Theme box, click the Theme you want to delete, then click the Delete button.
Clicking on a Theme that you want to rename will activate this Theme in your
brain. You may want to save your current Theme first (if it has been customized) before renaming another, existing Theme.
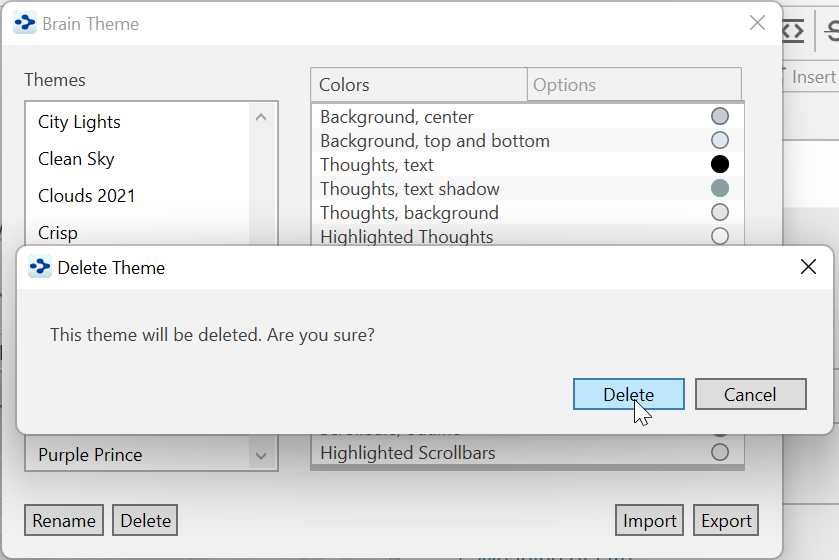
Figure 75. Deleting a Theme
- Click the Delete button to confirm that you’re sure you want to delete the
Theme.
- Click the Close button (X) to close the Brain Theme box.
Importing and Exporting Themes
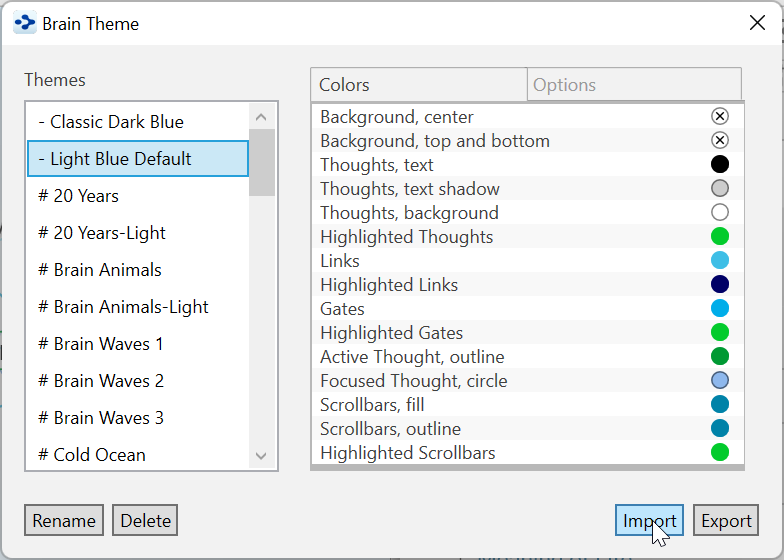
Figure 76. Importing or Exporting a Theme
To import a Theme:
- Click the Import button, navigate to the location of the .BrainTheme file you
want to import, select it, then click the Open button.
To export a Theme:
Make sure the Theme you want to export is in the active brain tab.
Click the Export button, navigate to the location where you want to save the
Theme, then click the Save button.
- Click OK in the confirmation box.
Dark Mode
The Dark Mode changes the windows, menus, icons and other user interface
elements to be predominantly dark grey. Dark Mode allows you to focus on your
work with subtle colors and fewer distractions.
- To switch to Dark Mode, click the Options menu, then click the
Preferences command (on macOS, the Preferences command is
located in the TheBrain menu). On the Look and Feel tab, select Dark
under the User Interface setting.
- After you give permission, TheBrain will restart and apply the change.

Figure 77. TheBrain in Dark Mode
- You may want to modify your Brain Theme to complement the darker
interface and tones.
- On macOS, the Dark Mode setting will follow your OS automatically.
Setting Other Preferences
TheBrain’s Preferences dialog box is where you’ll find many of the settings for
adjusting how your brain works, both mechanically and visually. Preference
settings affect how TheBrain works globally―no matter which brain is open when
you make your choices.
To open thePreferencesdialog box:
- Click the Options menu, then click the Preferences command (on macOS,
the Preferences command is located in the TheBrain menu)

Figure 78. Accessing Preferences
TheBrain Preferences are organized into these categories:
Look & Feel
Behavior
Notes Editor
System
Keyboard
Experimental
Look & Feel Preferences
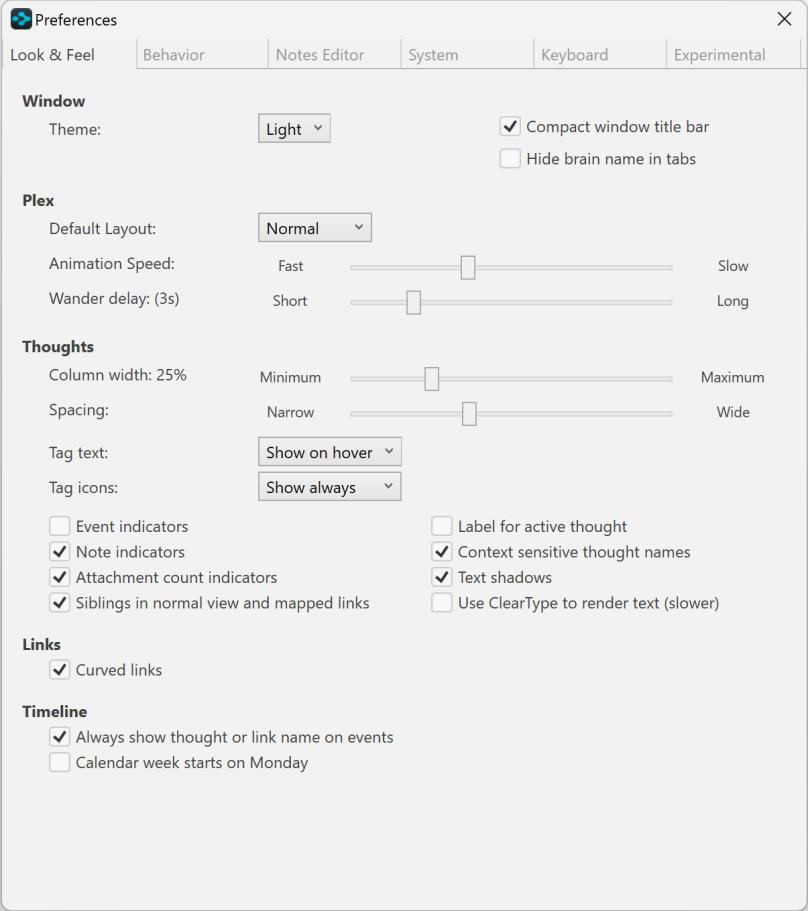
Figure 79. Look & Feel Preferences
User Interface
Preference Description
Compact Window Title Bar
Moves the File, Edit, Thought, View, etc. menu items up into the frame of the app.
Hide Brain Name in Tags
When selected, Brain tabs will only display the current active thought.
Theme Switch between Light and Dark Mode.
Plex
Preference Description
Default Layout:
Select from Normal, Outline, Mind Map or Normal +1,
Animation Speed
Drag the slider right to reduce or left to
increase the speed with which a thought becomes active when you click it in the plex.
Preference Description
Wander Delay
Wandering is an option to step randomly through TheBrain, to let you see thought associations. Drag the slider to specify the amount of delay (in seconds) between
thought activations. The delay is shortest by default.
Thoughts
Preference Description
Column Width Controls the minimum size that will be used
for columns of thoughts relative to the current
text size.
Spacing Drag the slider to decrease or increase
space between thoughts. The wider the
spacing, the larger and more spaced out the
thoughts will be.
Tags text You can choose not to show, only show Tag
text on hover (mouseover), or always show.
Tags icons You can choose to never show, only show
Tag icons on hover (mouseover), or always
show.
Show event indicators
Event icons will appear in the bottom-right area of thoughts that include events. This preference is off by default.
Show note indicators Note icons will appear in the bottom-right
area of thoughts that include notes. When
this is selected, you can hover over the icons
for an instant view of the corresponding note.
This preference is off by default.
Show attachment count The number of attachments (if more than
indicators one) will be displayed on the thought icon.
Show siblings in normal This preference is on by default.
view
Context sensitive thought Context sensitive thought names are
names explained on page 84. This preference is on
by default.
Show label for active thought
This preference is off by default.
Text shadows This preference is on by default.
Use ClearType to render text (slower)
Applies a crisper display of thought names, but may require more system resources.
Links
Preference Description
Curved Links When selected, links will be curved lines and
when not selected, links will be straight lines.
This preference is on by default.
Timeline
Preference Description
Always show thought or link name on events
This preference is on by default.
Calendar week starts on Monday
When checked, Monday will be the first day of the week. Unchecked, Sunday will be the first day.
Behavior Preferences
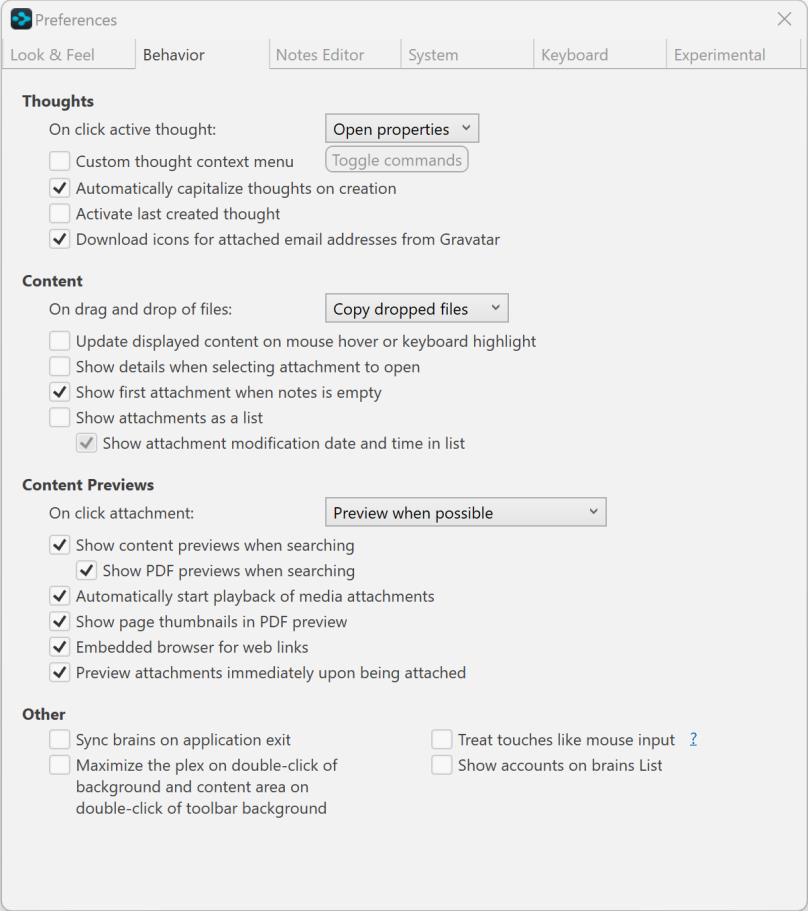
Figure 80. Behavior Preferences
Thoughts
Preference Description
On click active thought
Custom thought Context Menu
Automatically capitalize thoughts on creation
Activate last created
thought
Download Icons for
Attached Email Addresses from Gravatar
By default, the thought’s properties will display when the active thought is clicked. The other option is to do nothing.
Click on Toggle Commands and uncheck options that you would like to have hidden.
The first letter of the name of the thought will be automatically capitalized. This preference is on by default.
A thought will become the active thought as soon as it’s created. This preference is off by
default.
This preference is on by default.
Content
Preference Description
On drag and drop of files
By default, files will be copied when dragged and dropped. The other options are that they will be either moved or linked.
Update displayed content This preference is off by default.
on hover
Show details when This preference is off by default.
selecting attachment to
open
Show first attachment when notes is empty
Preference is on by default.
Show attachments as a list
Attachments will show in the same area
instead of on separate tabs within the content area. This preference is off by default.
Show attachment Will display the file modification date/time
modification date and time when files are viewed as a list
in list
Content Previews
Preference Description
On click attachment
Select between ‘Preview when possible’ or ‘Always open in default application’.
Preference Description
Show content previews when searching
This preference is on by default.
Automatically start
playback of media
attachments
This preference is on by default.
Show page thumbnails in This preference is on by default.
PDF preview
Embedded browser for web Linked web pages will open in TheBrain’s
links built in browser.
Preview attachments Attachments being dragged and dropped into
immediately upon being TheBrain will launch in the content area
attached immediately when checked.
Other
Preference Description
Sync brains on application Closing TheBrain application will sync all
exit brains. To exit immediately when this feature
is on, simply close the sync status window.
Maximize on double-click of plex background or
content tab background
Double-clicking either the plex or content area background will maximize that part of the
brain and the other part will be hidden. This preference is off by default.
Hide brain name in tabs Removes the brain name from appearing in
the tabbed interface.
Treat touches like mouse The way the plex interprets touch events can
input be altered using the preference. More
Show accounts on brains Display all available accounts below brain
list thumbnails on the brains list tab.
Notes Editor Preferences

Figure 81. Notes Editor Preferences
General
Preference Description
Layout Simple (all notes on one long scrolling page)
or Multi-Column (notes in thinner columns,
multiple columns will be displayed where
space is available)
Line Spacing Set notes line spacing.
Thought Icon
Choose between Hide, Above, Below, and Inline⎯the default icon placement is inline.
Emoji Size Set emoji size to Small, Medium, or Large.
Attachment Text Size
Set attachment text size to Small, Medium, or Large.
Custom Date/Time Format
Use the default date/time layout or customize your own.
Custom date/time format for notes
Use the following format options to customize the appearance of your date/time
stamp in notes:
Characters Result
d The day of the month, from 1 through 31.
dd The day of the month, from 01 through 31.
ddd The abbreviated name of the day of the week.
dddd The full name of the day of the week.
h The hour, using a 12-hour clock from 1 to 12.
hh The hour, using a 12-hour clock from 01 to 12.
H The hour, using a 24-hour clock from 0 to 23.
HH The hour, using a 24-hour clock from 00 to 23.
K Time zone information.
mm The minute, from 00 through 59.
M The month, from 1 through 12.
MM The month, from 01 through 12.
MMM The abbreviated name of the month.
MMMM The full name of the month.
ss The second, from 00 through 59.
t The first character of the AM/PM designator.
tt The AM/PM designator.
yy The year, from 00 to 99.
yyyy The year as a four-digit number.
z Hours offset from UTC, with no leading zeros.
zz Hours offset from UTC, with a leading zero for a single-digit value.
zzz Hours and minutes offset from UTC.
: The time separator.
/ The date separator.
Animation
Preference Description
Animate Cursor Cursor will visibly animate when clicking to
different locations in notes.
Blink Cursor Cursor in notes will blink to indicate its
location.
Highlight lines on hover Hover over any line in the notes and it will be
highlighted.
Header and Footer
Preference Description
Include Title
This preference is on by default. Option to display the Thought Label in the content area when checked.
Mapped Links This preference is on by default.
Backlinks This preference is on by default.
Unlinked Mentions This preference is on by default.
Hide Private
Backlinks/Unlinked
Mentions
This preference is on by default.
Options
Preference Description
Select adjacent text when inserting link
This preference is on by default.
Automatic smart quotes This preference is on by default.
Rename thought updates This preference is on by default. links
Check spelling as you type This preference is on by default. Applies to spell checking while creating thought names as well.
Recognize emails and phone numbers
Properly formatted emails and phone numbers will be hyperlinked.
Insert link when extracting child thoughts
When selecting text in a note to become a new thought, a link to the new thought remains on the original note.
Display
Preference Description
Underline normal links Hyperlinked text will be underlined.
Render underscore tags as italics
Unchecked – text within underscores will be underlined. Checked – text within
underscores will be italicized.
Show markdown When checked, markdown tags will be visible
in the notes.
User Interface
Preference Description
Use compact toolbars for notes
Some content area buttons will be grouped into dropdown lists⎯all tools will be available via the More Notes Editor Actionsbutton.
Show link target in pop-up When checked, hovering over a hyperlink in
a note will display the linked URL.
Restore cursor and scroll This preference is on by default.
position
Mentioned Thought names Select between Show all, Show except
common words and Never show
Clicking links in notes
Follows link or Moves cursor (places cursor in the text)
Printing
Preference Description
Include title Includes title when printing the note.
Include label Include any thought label when printing
Include links and mentions This preference is off by default.
Include attachments This preference is off by default.
Prevent widows and This preference is on by default.
orphans
Prevent orphan headers This preference is on by default.
Clipboard
Preference Description
Replace pasted URL with This preference is on by default.
page title
Preference Description
Paste without formatting as default
This preference is off by default.
Exclude color information when pasting
This preference is on by default.
System Preferences

Figure 82. System Preferences
Updates
Preference Description
Check for updates on startup
Notification of updates on startup. Always, Only free updates or Never.
Update Channel
This preference affects which kind of updates you’ll see as available when you click the Check for Update command on TheBrain’s Help menu. The default is Stable and the other choices are Beta and Alpha.
Localization
Preference Description
Interface Language The default is Automatic; however, you may select from one of 78 different languages.
Spelling Dictionary The default is Automatic and there are many other languages to choose from in the drop- down list. After you select another language, you’ll be prompted to exit TheBrain and restart so that your change can take effect.
Storage
Preference Description
The location of your brain data. The default is Storage
to use the default working directory for Import and Sync.
Proxy Settings
Preference Description
Use proxy server and proxy server requires
authentication
If you are unable to synchronize your brain with TheBrain Cloud due to a proxy server or restricted ports on your network, the Proxy settings can be used to customize the
synchronization process. Check with your network administrator for the appropriate information for these fields. By default, the Use proxy server preference is off.
Keyboard Preferences
Most Brain commands can be accessed by keyboard commands, which you can customize based on your preferences. You can even export your settings to share them with others or to transfer them from one computer to another.
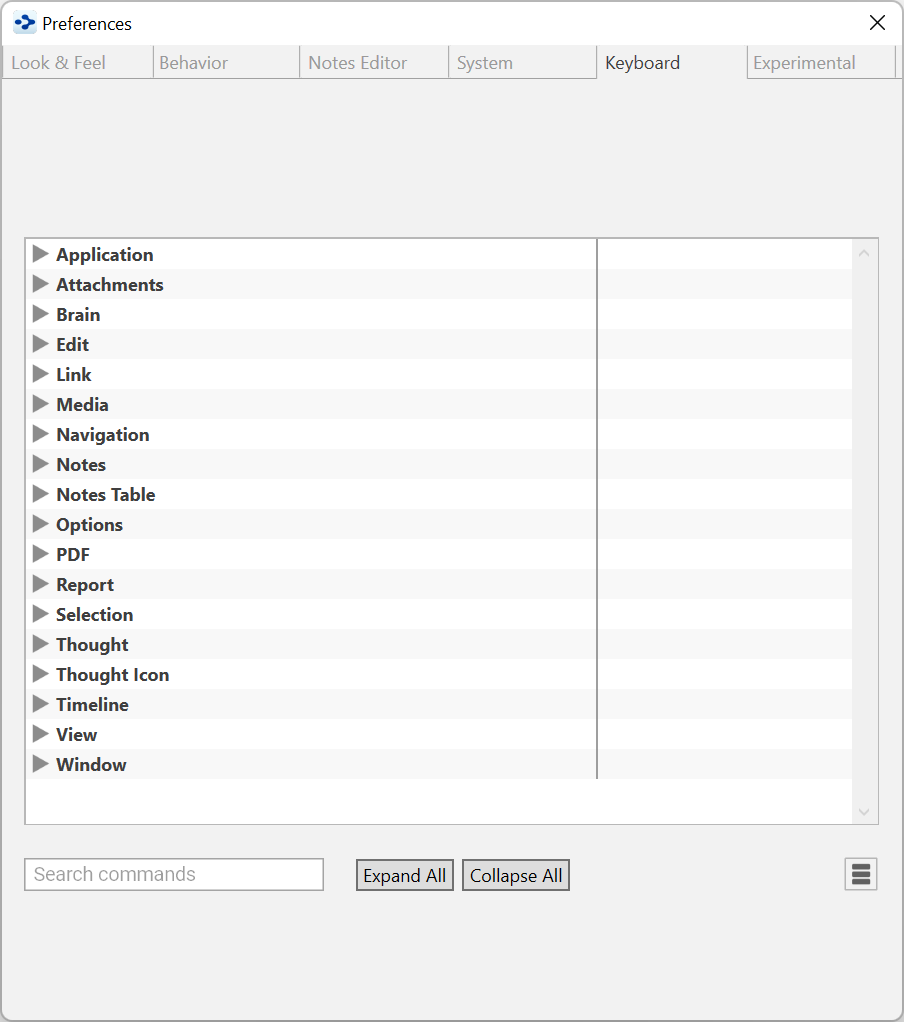
Figure 83. Keyboard Preferences
Using the Keyboard Preferences Tab
To do this … Do this …
Find a command quickly
Begin typing the command in the Search
commands field in the bottom-left corner of the Keyboard tab of the Preferences window.
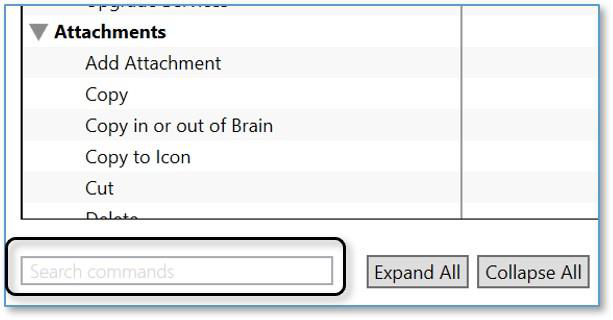
As you type, the list will shorten to match what you’ve typed. When you see the command
you’re looking for, note its shortcut or click it to define a new shortcut.
To do this … Do this …
Collapse the list to see only major headings
Restore the full list
Click the Collapse All button.
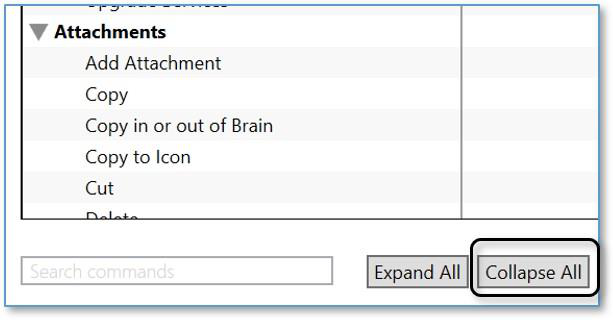
You can also collapse an individual heading, for example “Application,” to collapse or
expand just that section.
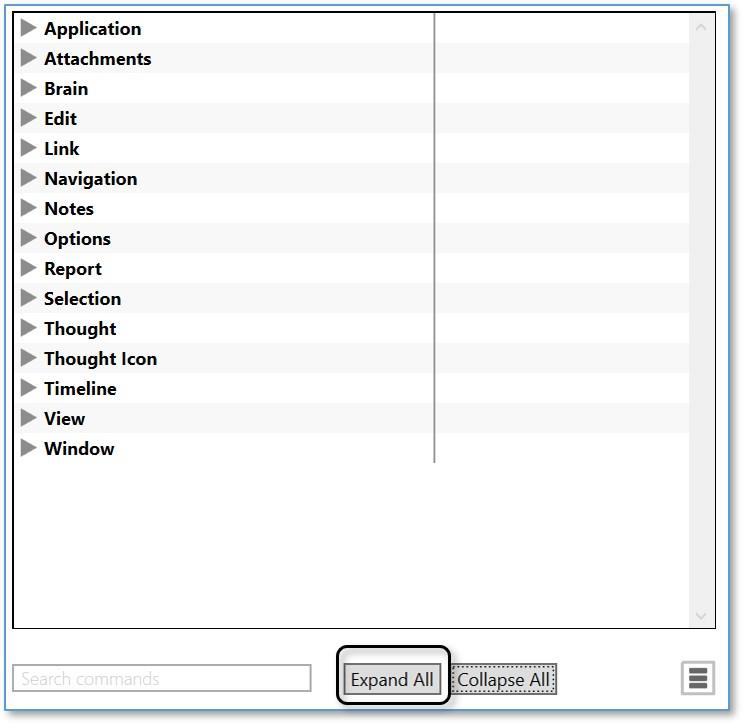
Click the Expand All button.
To do this … Do this …
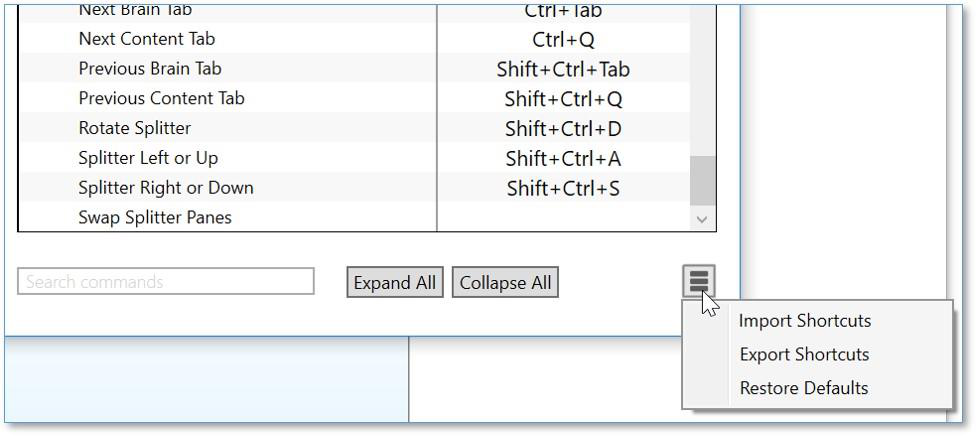
Import shortcuts Click the Actions menu button in the bottom- right corner of the Keyboard tab, then click the Import Shortcuts command.
To do this … Do this …
Export shortcuts
Click the Actions menu button in the bottom-right corner of the Keyboard tab, click the Export Shortcuts command, select a
location for the file, then click the OK button.
The file will be named
“KeyboardShortcuts.txt.”
Restore default shortcuts Click the Actions menu button in the bottom- right corner of the Keyboard tab, then click
the Restore Defaults command.
To define a new shortcut:
In the left column, expand a category of interest.
Click the command for which you want to create a shortcut. The row containing the command will be highlighted and an instruction will appear
under the Preferences tabs.
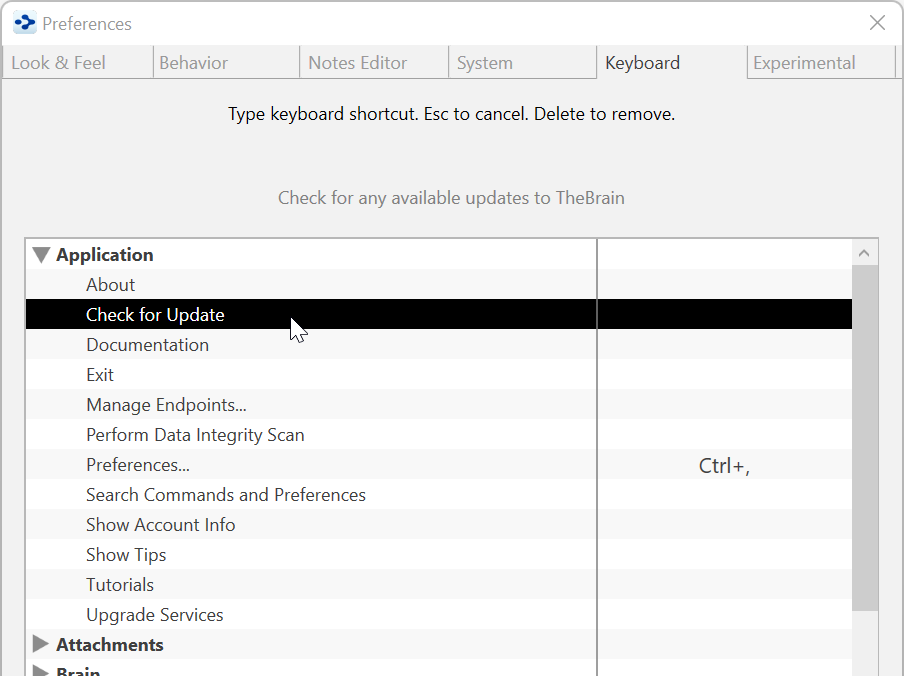
Figure 84. Creating a New Shortcut
- With the command of your choice highlighted, press the function key or keyboard combination of your choice. For example, you might choose to assign the “Check for Update” command to Ctrl+Shift+U.
Ctrl
C
) nor can you use letter or number keys by themselves. The
Alt
key can You can’t assign keys that are already used for common operations (such as
be used as a standalone modifier
Your new shortcut will display in the list. You can delete the shortcut by pressing the Delete key while the command is highlighted.
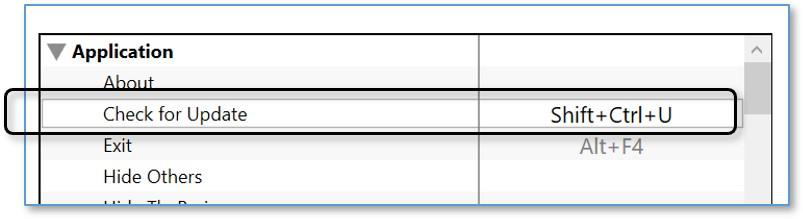
Figure 85. The New Shortcut in the List
If the keyboard shortcut you selected is already in use for another action, you will have the option to “steal” the shortcut for the current selection, or cancel the request and select a different keyboard combination.

Figure 86. Replacing an Existing Shortcut

Default Shortcuts for Windows
Application Commands Shortcut
Exit Alt+F4
Preferences Ctrl+,
Edit Commands Shortcut
Copy Ctrl+C
Copy as Text Shift+Ctrl+C
Cut Ctrl+X
Paste Ctrl+V
Paste without Formatting Shift+Ctrl+V
Redo Ctrl+Y
Select All Ctrl+A
Undo Ctrl+Z
Navigation Commands Shortcut
Activate Tag Ctrl+G
Activate Type Ctrl+E
Backward Alt+Left
Expand/Collapse Current Thought Space
Forward Alt+Right
Navigate Down Down
Navigate Enter Enter
Navigate Escape Esc
Navigate Left Left
Navigate Right Right
Navigate to Pin 1 Ctrl+1
Navigation Commands Shortcut
Navigate to Pin 2 Ctrl+2
Navigate to Pin 3 Ctrl+3
Navigate to Pin 4 Ctrl+4
Navigate to Pin 5 Ctrl+5
Navigate to Pin 6 Ctrl+6
Navigate to Pin 7 Ctrl+7
Navigate to Pin 8 Ctrl+8
Navigate Up Up
Notes Commands Shortcut
Bold Ctrl+B
Collapse All Ctrl+[
Collapse All Except Here Shift + Ctrl+I
Expand All Ctrl+]
Expand/Collapse Toggle *Ctrl+*
Find & Replace Ctrl+F
Find Next F3
Find Previous Shift+F3
Insert Date/Time Ctrl+D
Insert/Edit Thought or Web Link Ctrl+K
Italic Ctrl+I
Open in Browser Alt+Ctrl+O
Pop up Table of Contents Ctrl+T
Print Ctrl+P
Replace Next Ctrl+F3
Replace Previous Shift+Ctrl+F3
Take Action Ctrl+L
Underline Ctrl+U
Options Commands Shortcut
Web Search F4
Thought Commands Shortcut
Create Child F6
Thought Commands Shortcut
Create Jump F8
Create Parent F7
Forget Ctrl+Del
Open Folder Shift+Ctrl+F
Show Thought Properties Ctrl+Enter
Thought Icon Commands Shortcut
Select Stock Icon Alt+Ctrl+I
View Commands Shortcut
Collapse All Ctrl+9
Expand All Ctrl+0
Mind Map Shift+Ctrl+3
Normal Shift+Ctrl+1
Outline Shift+Ctrl+2
Zoom In Ctrl+=
Zoom Out Ctrl+-
Window Commands Shortcut
Close Tab Ctrl+W
Close Window Alt+F4
Keyboard Focus to Notes Ctrl+N
Keyboard Focus to Search Ctrl+S
New Tab Ctrl+T
New Window Shift+Ctrl+N
Next Brain Tab Ctrl+Tab
Previous Brain Tab Shift+Ctrl+Tab
Rotate Splitter Shift+Ctrl+D
Splitter Left or Up Shift+Ctrl+A
Splitter Right or Down Shift+Ctrl+S

Default Shortcuts for macOS
Create Child Alt+Command+Down
Create Parent
Create Jump
Alt+Command+Up
Alt+Command+Left
Rename Alt+Enter
Focus on Plex Cmd+S
Focus on notes Cmd+N
Search Web Cmd+E
Experimental Preferences
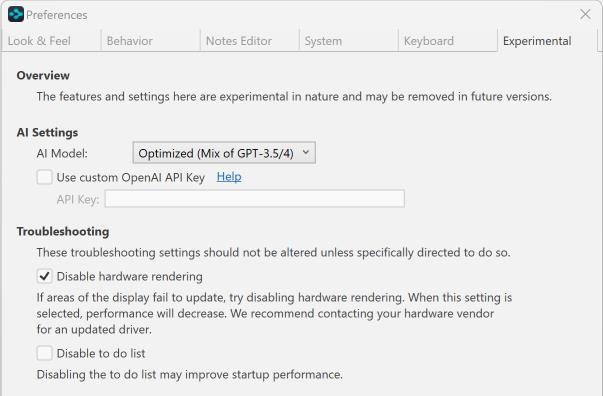
Figure 87. Experimental Preferences
The features and settings on the Experimental tab will change from time to time
and may be removed in future versions of TheBrain.
AI Settings
Select from a drop down menu of current/popular AI models that TheBrain will
use for AI generation features. You may also select to use your own custom
OpenAI API Key. For help with using a custom OpenAI API key, visit