Creating Thoughts
Creating a Single Thought
There are many ways to create a thought, but most start with the same step—choosing the thought with which the new thought will have a relationship. You will use the chosen thought as a starting place when creating the new thought.
Generally speaking, you’ll create child thoughts more often than parents or jumps. There are certainly exceptions, but usually, using a “top-down” approach is helpful if you are just getting started: Create children (and jumps, as
appropriate) and let parents happen naturally.
Once you have activated the thought that will have a relationship with your new thought, use any of these techniques to begin creating a new thought:
- Drag from the thought’s parent, child, or jump gate
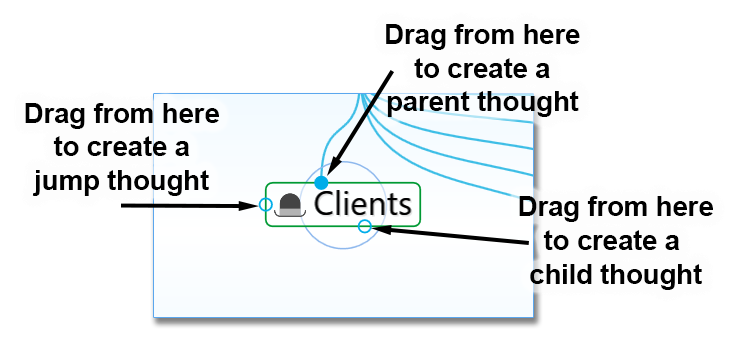
Figure 88. Gates to Drag for Creating Thoughts
- Or click the Thought menu, then click the Create Child, Create Parent, or Create Jump command

- Or, right-click the thought, then click the Create Child, Create Parent, or Create Jump command

- Or use a keyboard shortcut:
On Windows, press the F6 key (for a child thought), F7 (for a parent

thought), or
F8
(for a jump thought)
On macOS, press the Option+Cmd+Down Arrow (for a child

thought),
Option+Cmd+Up Arrow
(for a parent thought), or
Option+Cmd+Left Arrow
(for a jump thought)
No matter which of the above methods you use to begin creating your new thought, the next thing you’ll see is the Thought Creation dialog box with the cursor blinking in the field for typing in the name of your new thought.
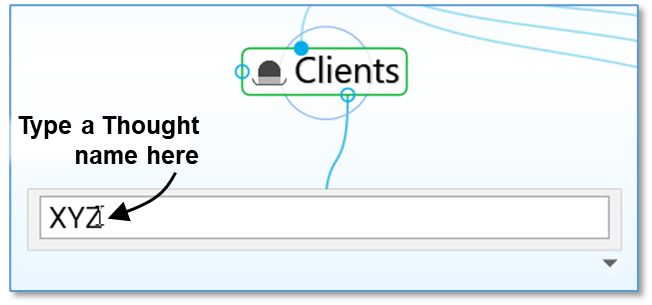
Figure 89. Thought Creation Dialog Box 1. Type the name of your new thought in the field provided.
- Press the Enter key or click in a blank area of the plex to save your new thought (or press the Esc key to cancel the process and close the box).
Automatic initial-capitalization: If you type a thought name using all
lowercase letters, the first letters of words will be capitalized for you
automatically. TheBrain uses “smart rules” to determine which words should be lowercase (such as “a,” “and,” and “of”). For example, if you’ve typed “visit the

of Liberty.” This feature is active, by default, but you can turn it off in the
Behavior
tab of the
Preferences
dialog box.
statue of liberty” the thought name will automatically become “Visit the Statue
If spellcheck is turned on in the content area toolbar, thought names will also be spellchecked in the Thought Creation dialog box as well as in the Thought Properties dialog box.
Displaying Thought Properties and Details
- To expand the thought creation box to include the Type and Tags buttons
(explained in the Thought Types and Tags section beginning on page 123),
click the down-arrow in the bottom-right corner
- To display a thought’s details (create/modify dates and ID) after the thought is
created, click the down-arrow in the bottom-right corner
- To hide the thought’s details, click the up-arrow in the bottom-right corner
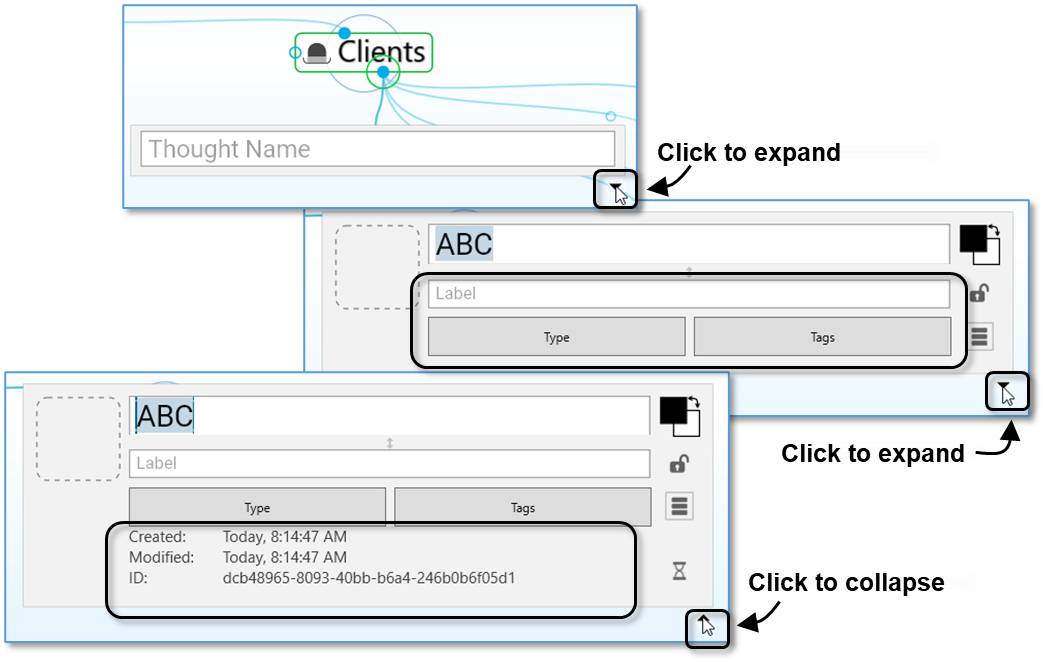
Figure 90. Showing and Hiding Thought Properties and Details
Creating Multiple Thoughts at Once
TheBrain offers a timesaver (affectionately known as the “semi-colon trick”) for
creating more than one thought at a time.
- Type a semicolon (😉 to separate multiple thought names in the Thought
Creation dialog box
- This feature can also be used while creating new Thought Types and
Thought Tags
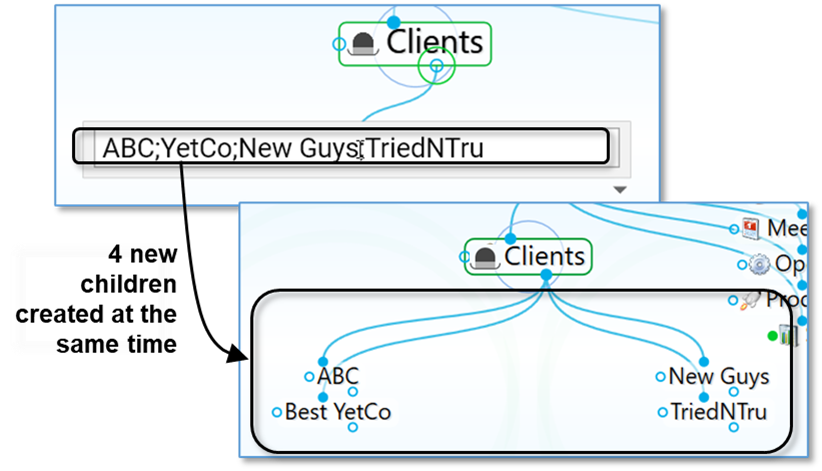
Figure 91. Creating Multiple Thoughts
Creating Context-Sensitive Thought Names Using Commas
It’s always good to be specific with your thought names. TheBrain has some time savers to help you if you have repetitive information that needs to be added to your brain. For example, say you have thoughts for each of your clients, each of whom has a billing department. You’d like a child thought named “Billing Info” for each of your client thoughts. However, you may not want to have identical thought names because when you see these thoughts later you won’t be able to tell them apart without looking at their parents.
To remedy this potential dilemma, when you type the name of the new thought, start or end the name with a comma. The parent thought name will be added automatically. When this thought is displayed, its name will vary depending on the context in which it’s viewed. If the client thought is active, the client’s name will be hidden and it will appear as just “Billing Info.” But when you activate this thought, the full name along with the client’s name will appear.
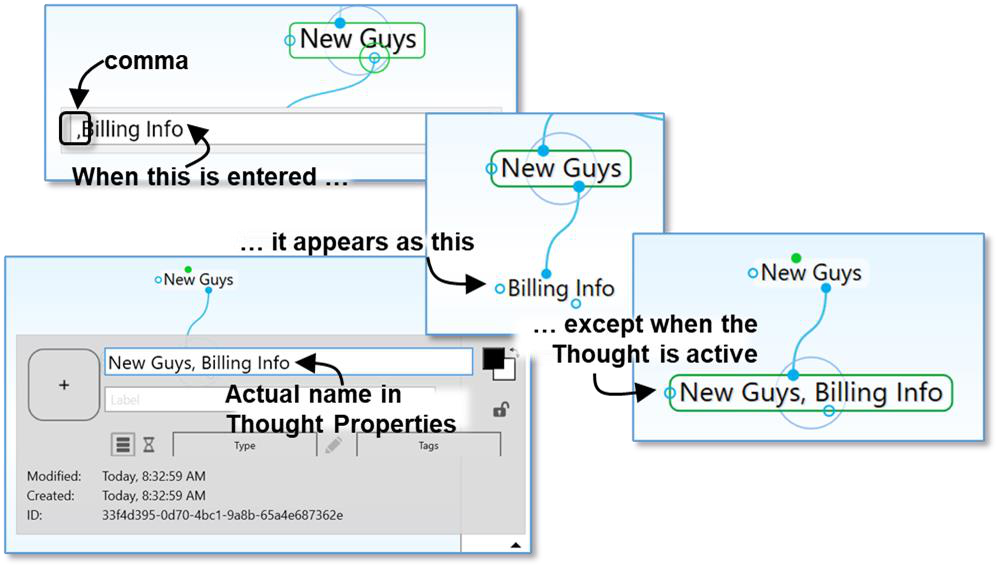
Figure 92. Sub-Category Thoughts
The thought will display its full name when it is active or when hovering over it with the cursor. When its parent thought is active, you’ll see only the portion of the name that does not repeat the parent’s name. Ensuring that each of your thoughts has a unique name will help you find and identify them more easily.

Tip:
The part of the thought’s name that is hidden is context sensitive. Say for example that you wanted to have a single place to see the billing information for all your clients. You might create a thought called “Billing Info” and then link to the billing information thoughts for each of your clients, such as “New Guys, Billing Info.” If you do this, when Billing Info is active “New Guys, Billing Info” will appear as just “New Guys,” whereas when New Guys is active, that same thought will appear as Billing Info. Try it―you’ll see how this can be very useful.
When thoughts are displayed in alphabetical order, the current view of the context sensitive name will determine its position.
Using Parentheses to Assist with Thought Sorting
Adding parentheses around the first part of thought name will skip that part for sorting purposes (unless there is a tie) when thoughts are grouped
alphabetically.
To enable this feature, a thought name must have both an open parenthesis as the first character and a close parenthesis later in the thought name. Whitespace will be trimmed, and there must be some thought name left after that. (Later parenthesis will be ignored.)
Note that this is mutually exclusive to Hidden Ordering Prefixes starting with a dot. You can only have one or the other.
Example: if your thoughts are grouped alphabetically, the following group of thoughts named:
(The) Beatles
Belle & Sebastian
(The) Bee Gees
(The) Beach Boys
would display as:
The Beach Boys
The Beatles
The Bee Gees
Belle & Sebastian
Creating Thoughts with Artificial Intelligence
Thoughts can automatically be created on any topic via TheBrain’s AI integration. From any thought in your brain, click on the AI button in the tool bar above the plex.
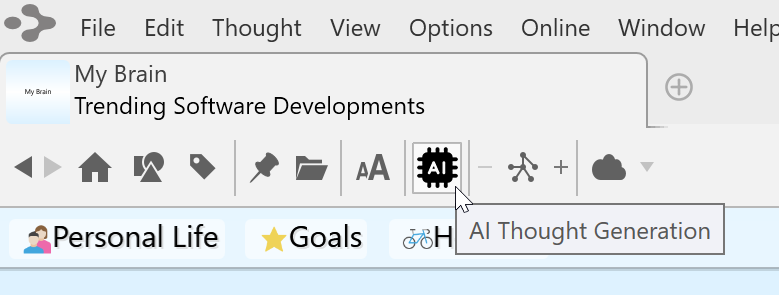
Figure 93. AI Thought Generation
The active thought will automatically be selected as the Topic Name. You will have the option of generating a thought structure (multiple generations of thoughts below the active thought) or generate child thoughts (one generation below the active thought)
Additional settings will allow you to:
- Set Context Thought – Select a parent thought above the active thought to be referenced as context for your new content. This is helpful for
general thought names. For example, a thought named “Directors” can be given greater context by selecting a parent thought named “Silent Film”
- Use Children for Context – If the thought already has some children, check this box to give AI an indication of the type of content you are hoping to see.
- Creativity – Select from 0% - 100% creative. Not seeing the results
you’re looking for? Try bumping up the creativity level and let AI start thinking “outside the box.”
- Mode – Categories vs. List – Your results will either be categories that your query can be placed in vs. lists of specific types of your query. For example:
oFruit Category: Citrus, Melons, Benefits, Impact on Agriculture…
oFruit List: Banana, Kiwi, Lime, Strawberry…
- Language – Regardless of your default language settings, your AI query results can be generated in one of 78 different languages.
While AI is generating your new content, you will not be able to move to a different thought or brain tab. When complete, the new content will be displayed in the plex and new thoughts will appear with a glowing boarder. You can review your new content before selecting one of the three options in the banner above the plex to either Accept changes, Redo (opens the AI pop up window with the most recent settings) or Discard.
Creating Orphan Thoughts
When you create a thought in your brain, you usually first decide what
relationship it will have with an existing thought, but sometimes you just want to create a thought unrelated to an existing thought.
To create a thought independently of other thoughts, type into the Search box. If no search result is returned, hit enter and the new thought will be created as an Orphan. This works well especially when you are looking for something and discover you haven’t yet put it into your brain.
Tip:
You can also create an orphan thought by pressing
F9
on Windows or
Opt
Cmd
Right Arrow
on macOS.

Figure 94. Default Windows Keyboard Shortcut for Create Orphan
Create Thoughts from Search, Notes or Events
You can create a new thought instantly from the Search box or within Notes or Events. Say you’d like a “Monthly Meetings” thought to be a child of “My Work,” but you’re not sure whether you already have a thought with that name. You can begin by searching, and if it doesn’t already exist, no need to retype the name.
To create a new thought using search:
Activate the thought that should be the parent, child, or jump thought of the new thought.
Click in the Search box at the top-right corner of the window, then type the name of the thought you’re looking for, or want to create if it’s not found.
If the thought doesn’t already exist and you want to create it:
- Press the Enter key to create it as a child of the active thought, or
- Hold down the Shift key as you press the Enter key to create it as a parent of the active thought, or
- Hold down the Ctrl key as you press the Enter key to create it as a jump thought of the active thought, or
- Hold down the Ctrl key as you press the Shift key, then click on Create Orphan to create it as an orphan thought
Your new thought will be the active thought.
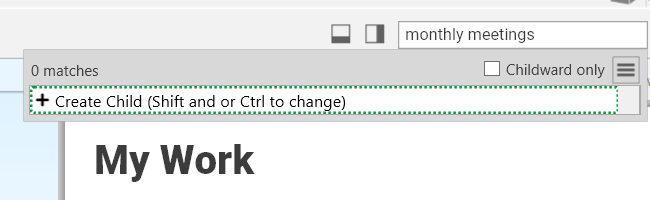
Figure 95. Creating a Thought from the Search Box
To create a new thought when searching finds an existing thought: 1. Press the up-arrow key. This highlights the default option—Create Child.
Note that pressing the Enter key before pressing the up-arrow key activates the existing thought.
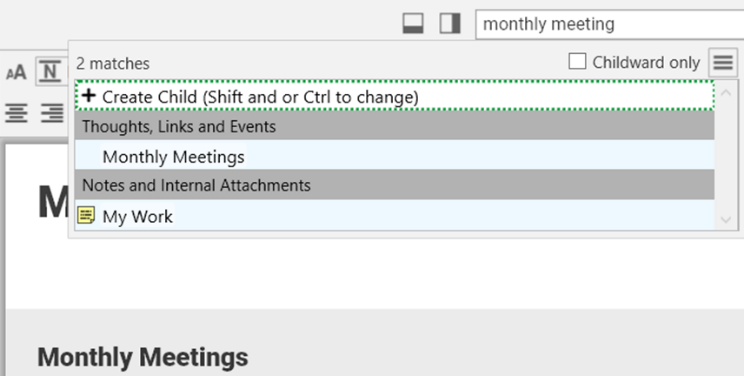
Figure 96. Creating a Thought from the Search Box when the Thought is Found
- Use any of the same key combinations for creating a new thought from the Search box when a thought isn’t found.
To create a new thought from within a note:
Select the text within the note for which you want to create a child, parent, or jump thought.
Right-click the selected text, then click the Insert Thought or Web Link command. Optionally, you can revise the text in the new box that appears, if you want a different name for the new thought.
Select a relationship for the new thought:
- Press the Enter key to create it as a child of the active thought, or
- Hold down the Shift key as you press the Enter key to create it as a parent of the active thought, or
- Hold down the Ctrl key as you press the Enter key to create it as a jump thought of the active thought
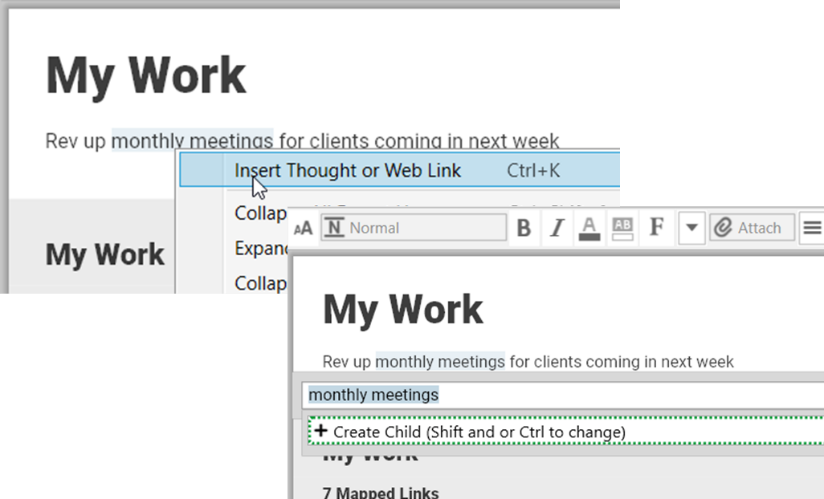
Figure 97. Creating a Thought from a Note
To create a new thought from within an Event:
Open an existing Event or click and drag from the start to finish times in the timeline to create a new Event.
Type a name for the new thought where you see “No thought or link” at the top of the Event box. A new orphan thought will be created with that name.
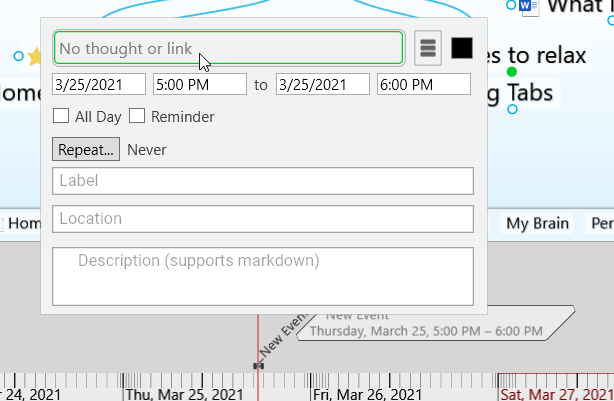
Figure 98. Creating a Thought from an Event
Changing the Order of thoughts in the Plex
You can use TheBrain’s hidden ordering system to change the default
alphabetical ordering of thoughts in the plex to any order you prefer. To do this, type a period and a number as the first characters of any thought name. These characters will not be displayed in the plex. For example, try creating the following group of child thoughts in one area:
.01 Zebra
.02 Walrus
.03 Aardvark
The thoughts will appear in the order of Zebra, Walrus, Aardvark (without the periods or numbers), rather than alphabetically. You can always delete or revise the numbers in the Thought Properties dialog box.
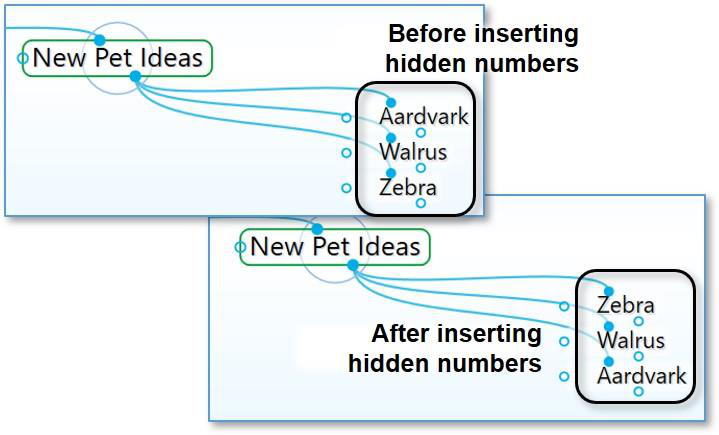
Figure 99. Changing Thought Order
Copying Thoughts Within and Between Brains
Thoughts, including all of their notes, properties, events, and attachments, can be copied and pasted between brains or duplicated within a brain. When thoughts are copied, associated thought types and link types are automatically copied as well.
To copy a thought within the same brain:
- Right-click the thought to be copied and then click the Copy “name of thought” command on the context menu.
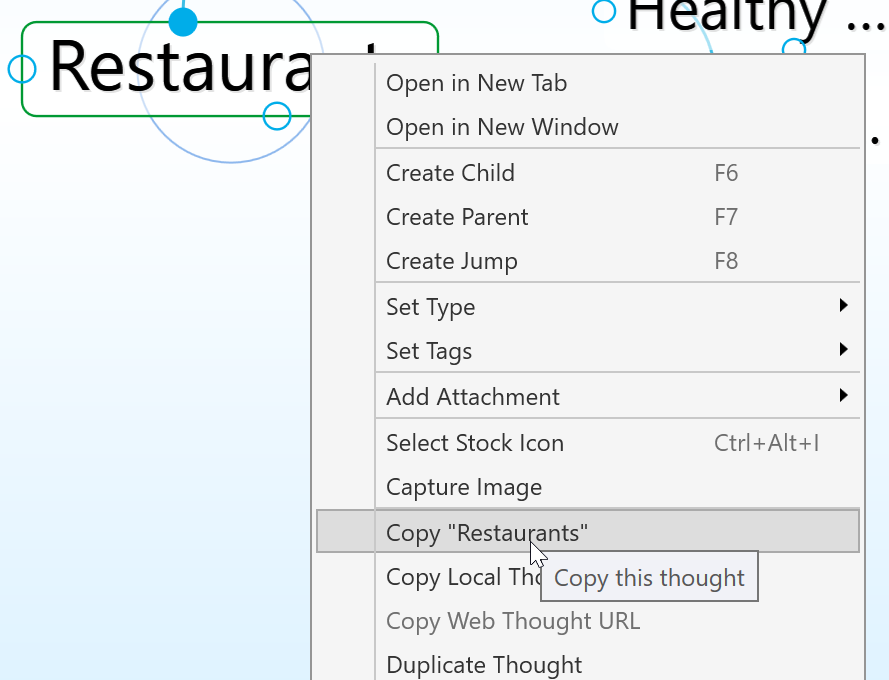
Activate the thought that will be the parent of the newly copied thought.
Right-click within any blank area of the plex and click Paste Thought(s) on the context menu.
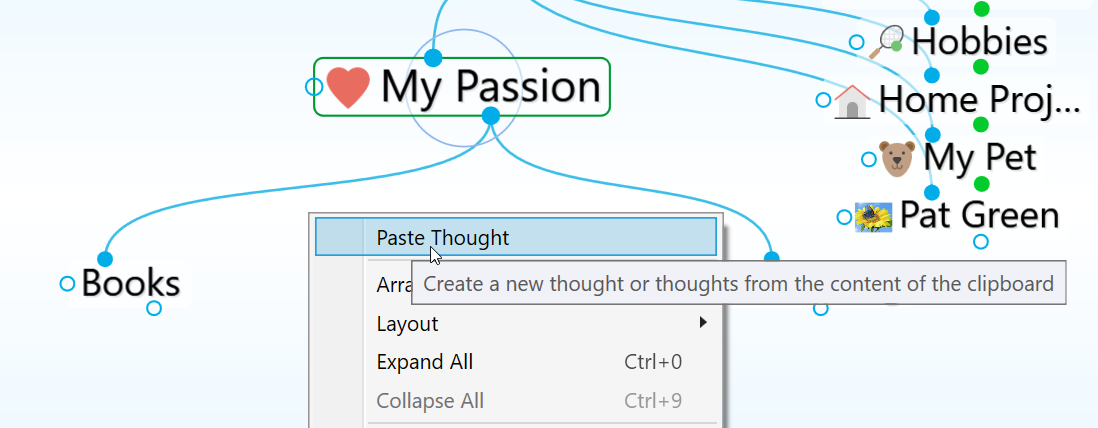
- The copied thought will automatically be linked as a child of the active thought and it will also retain all of its original relationships.
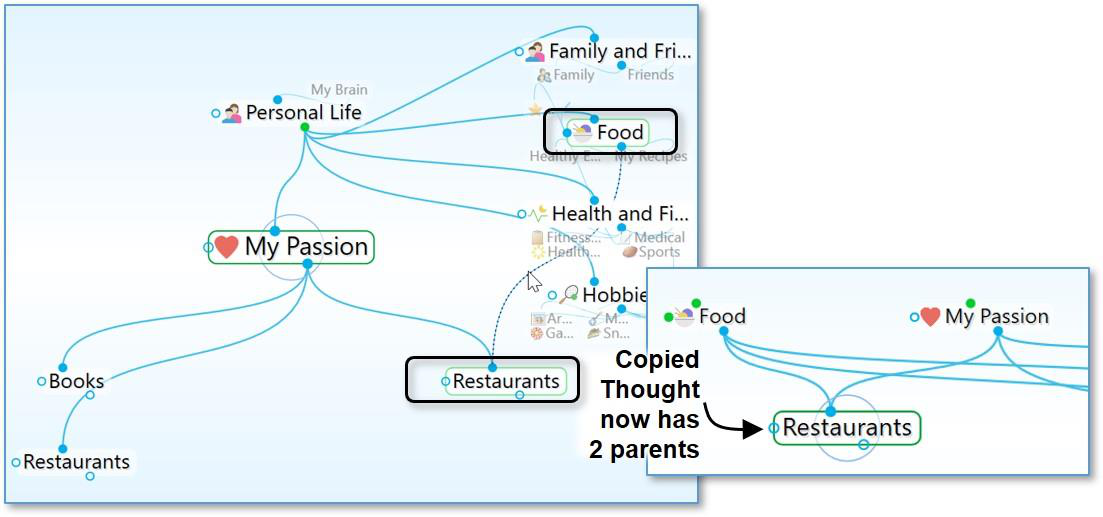
Figure 100. Copied Thought with Two Parents
To create a duplicate of a thought:
If you just want to make a duplicate of a single thought without retaining any of its links, you can use the Duplicate Thought command.
Right-click the thought to be duplicated and then click the Duplicate Thought command on the context menu.
The duplicated thought will appear as a child of the original, as shown in the figure below.
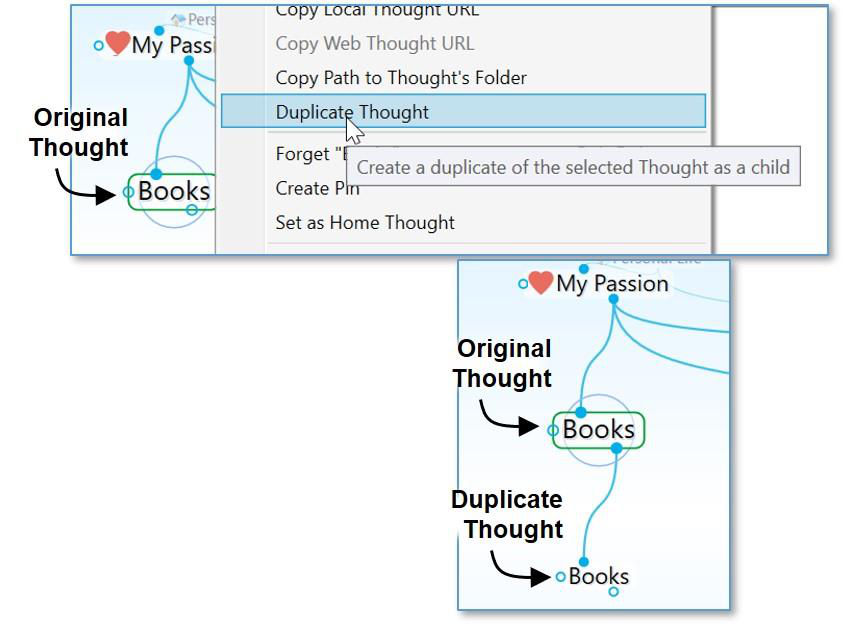
Figure 101. Duplicating a Thought
To copy a thought to another brain:
Right-click the thought to be copied and then click the Copy “thought name” command on the context menu (or activate the thought, click the Edit menu, and then click the Copy command).
Open the brain into which you want to copy the thought.
Right-click on the background of the plex and then click the Paste Thought command on the context menu (or click the Edit menu and then click the Paste Thought command).
The thought will be pasted into the brain and linked as a child of the active thought. It will include any attachments, thought types, notes, or other attributes it had in the original brain.
If you have selected multiple thoughts, they can all be copied at once using the
same technique. Right-click anyplace within the Selection panel to open the context menu. See Selecting Multiple Thoughts beginning on page 97 for complete instructions about selecting multiple thoughts.
Paste Thought Colors:
Right-click on any thought with modified colors (text or background) and select Copy “thought name”
Right click on another thought (in the same brain or a different brain) and select Paste Thought Colors. This thought will then have the same text and background colors as the thought that was originally copied. This
feature can also be used when working with multiple thoughts in the Selection Box.
Merging Thoughts
You can automatically merge multiple thoughts that refer to the same thing. You can combine the links, attachments, and notes so that the resulting thought has all of the information from those multiple thoughts.
To merge thoughts:
Ctrl+click on two or more thoughts that you want to merge into a single thought. The thought names will automatically appear in the Selection panel.
Right-click in the Selection panel, then click Merge (n) Thoughts.
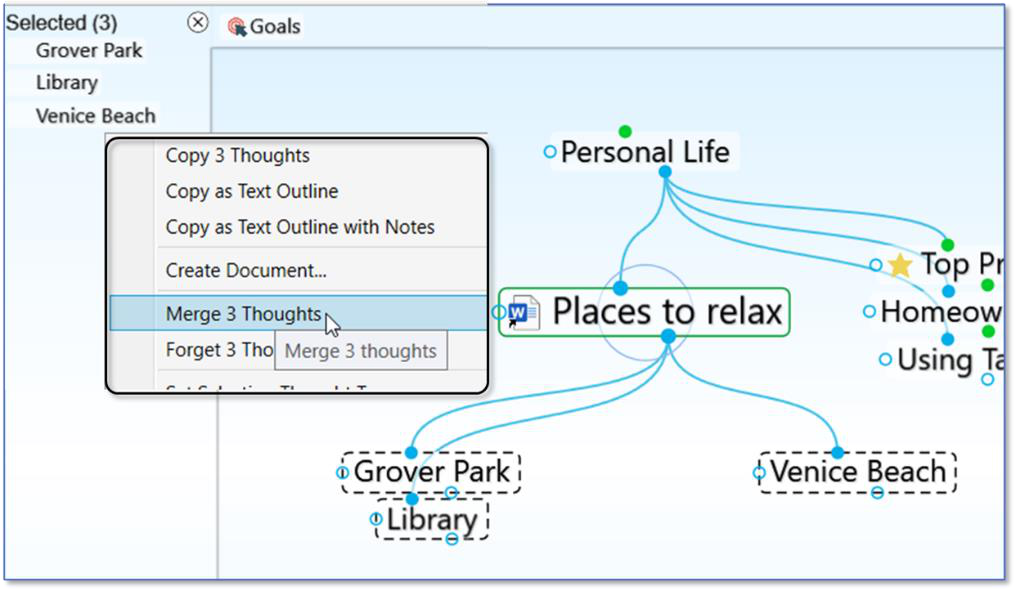
Figure 102. Merging Three Selected Thoughts into One
When you activate the new thought, you’ll see all content that was in each of the standalone thoughts. The name of the new thought becomes a combination of the formerly separate thoughts, in alphabetical order.
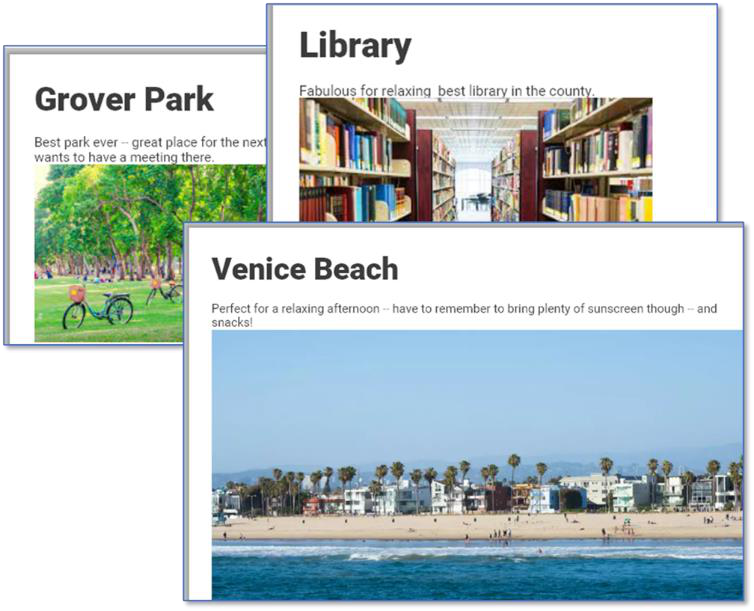
Figure 103. Original Content Area of Three Thoughts before Merging
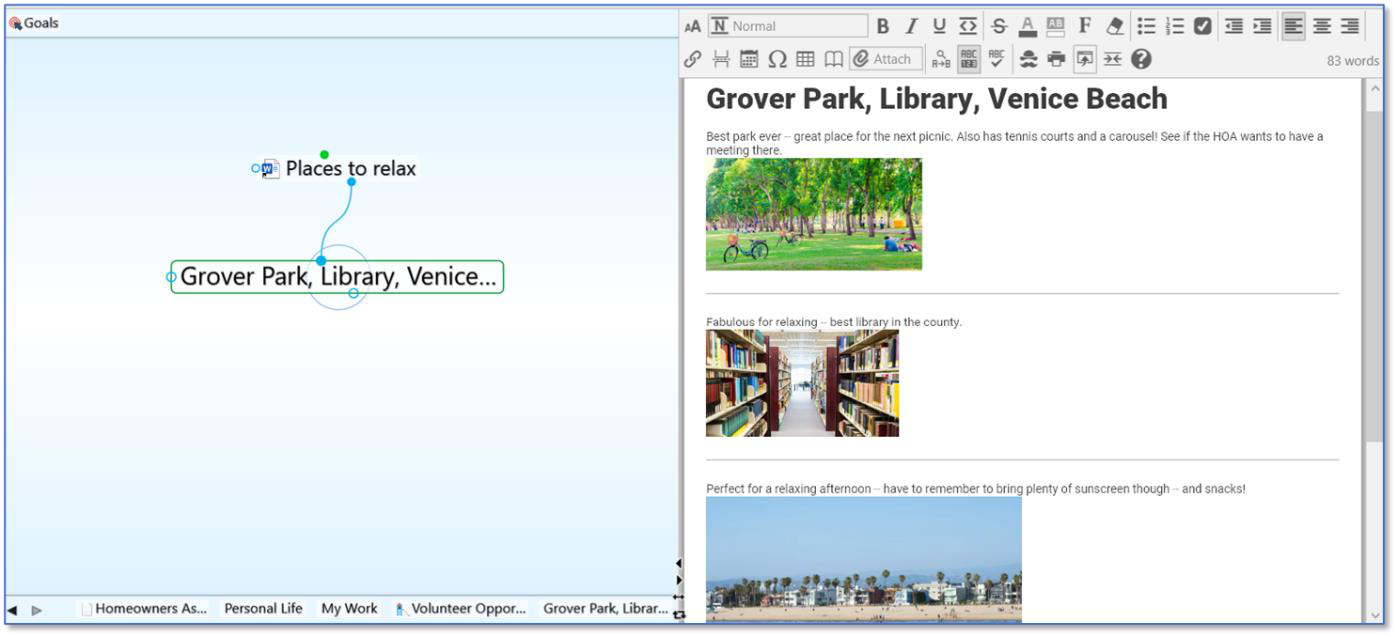
Figure 104. After Merging
Undoing and Redoing Actions
Changing your mind about your actions is easy. You can undo up to 100 actions
during your current session. Actions that have been undone can also be re-
executed using the Redo command.
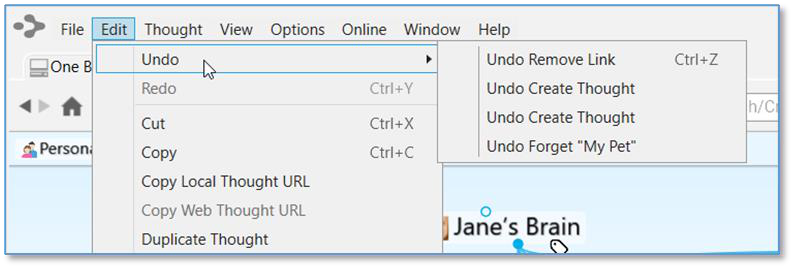
Figure 105. Undo and Redo Commands
To undo an action:
Click the Edit menu and then click the Undo command. The list on the secondary menu displays your most recent action first.
To undo your most recent action, click the first item in the secondary menu. To undo multiple actions, select the oldest action to be undone from the list. All actions above that action will also be undone.
To redo an action you have undone:
Click the Edit menu and then click the Redo command. If there are multiple items that can be redone, a secondary menu will be displayed.
Click the action of your choice. As in the list of actions that can be undone, the list is in most-recent-action-first order. All actions above the item you click will also be undone.
The Undo and Redo lists are cleared when you sync your brain (including an auto sync) and when your brain is closed.